Rough Country 379.22 User Manual
Page 3
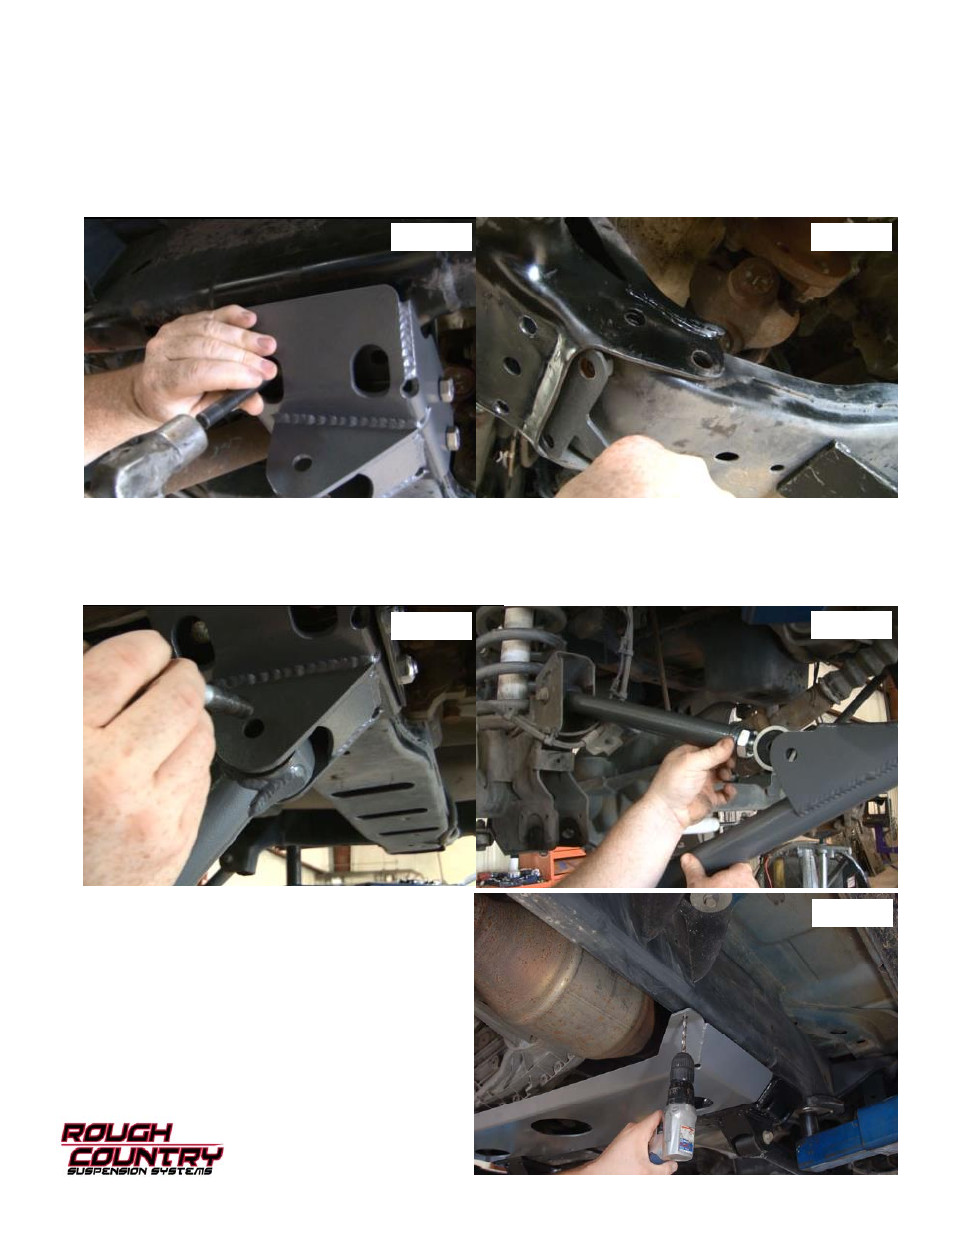
14. Install the new lower control arm mount with the supplied 14mm x 200mm long bolts. Do not tighten at this time.
Hold the bracket up close to the frame and use a transfer punch to mark the frame.
See Photo 5. Drill the frame with
a 17/32
” drill bit (clearance for the new 1/2” bolts). Remove the two bolts and the new control arm bracket from the
cross member.
15. Place flag nut in-between trans cross-member
See Photo 6 and frame mount where you have just drill holes and
reinstall lower control arm bracket with the 14mm x 200mm bolts, washers, and nuts. Insert the supplied 1/2
” x 1”
bolts into the drilled holes to secure bracket. Tighten all bolts using a 22mm for 14mm bolts (Do not tighten inside
bolt it will be used to hold the skid plate later) and a 19mm for the 1/2
” bolts.
16. Install lower control arm into new bracket using stock hardware.
See Photo 7. NOTE new lower control arm will be
install with the pocket facing outward. Assemble the upper control arm and adjust the length to 17.25
” for the 5inch
lift.
17. Install upper control arm into pocket on axle using stock hardware then attach it to lower control arm using supplied
9/16
” x 3.75” bolts.
See Photo 8. Then install lower control arm to axle using stock cam bolts. Hand tighten only.
18. Repeat steps 9-17 on the passenger side.
19. Remove the nuts on the two center bolts of the cross
member that was installed earlier. This will be the
mounting point of the new skid plate.
20. Hang the new skid plate on the 2 bolts and reinstall the
nuts. Tighten with a 22mm socket and wrench.
21. Make sure the skid plate is center before drilling the
holes for the self taping bolts
22. Drill the 4 holes using a 15/32
” drill and install the 4
self taping bolts with a 9/16 socket.
See Photo 9.
Photo 5
Photo 6
Photo 7
Photo 8
Photo 9