Functional overview, Front panel – Toshiba RD-XV48DTKF User Manual
Page 11
11
EN
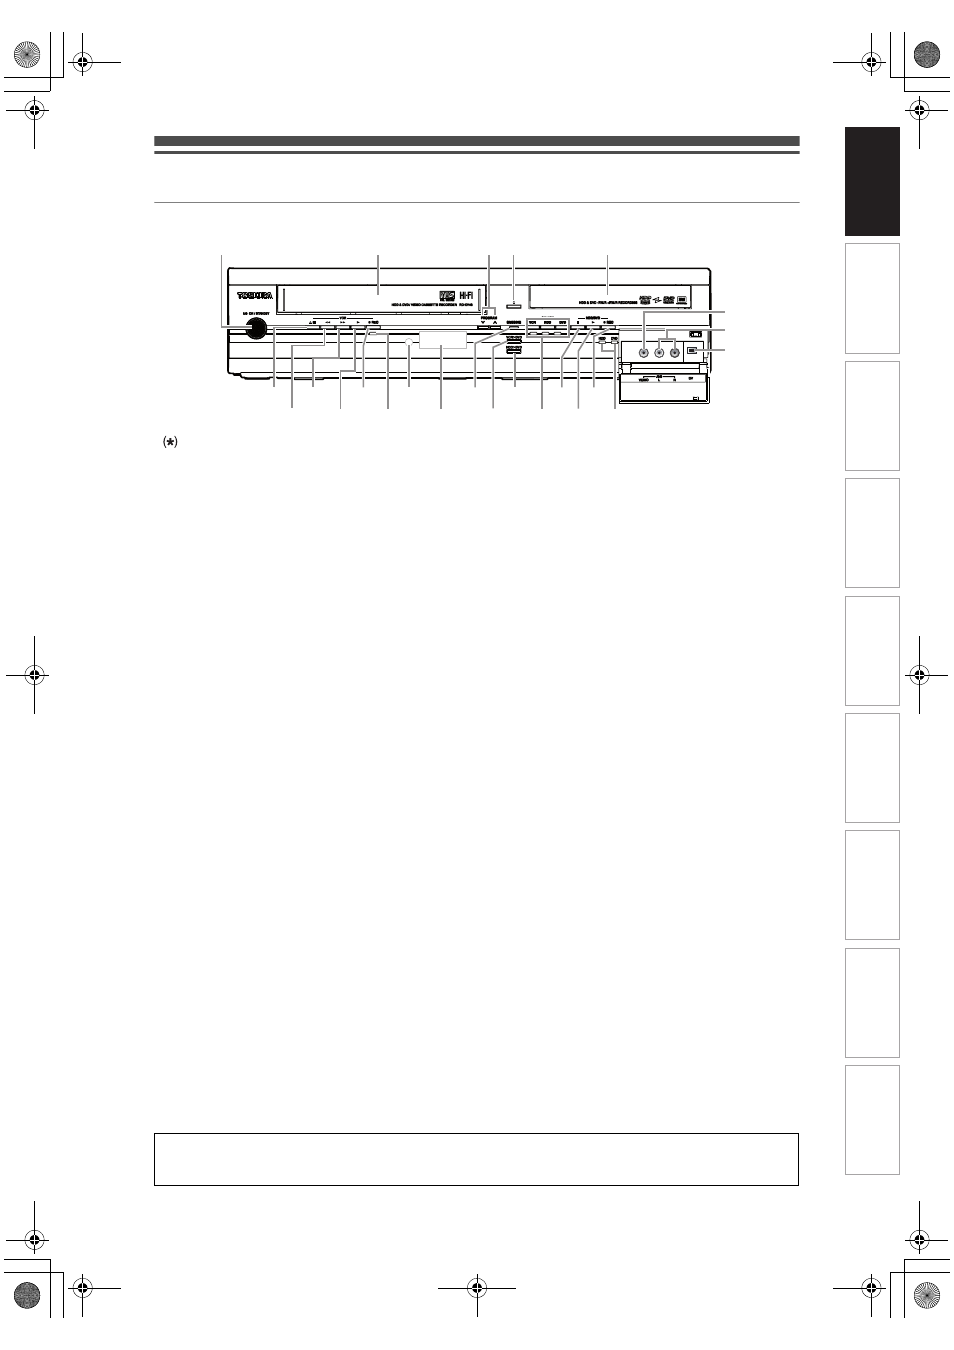
Functional Overview
Front Panel
1
B ON\STANDBY button
• Press to turn the unit on and off.
2 Cassette compartment
• Insert a tape here.
3 PROGRAM
G \ H buttons
4 A (OPEN
\CLOSE) button* (DVD)
• Press to open or close the disc tray.
5 Disc tray
• Place a disc when the disc tray is opened.
6 VIDEO input jack (AV3)
• Connect the video output of an external device
here using a commercially available Video
cable.
7 AUDIO input jacks (AV3)
• Connect the audio output of an external device
here using a commercially available Audio
(L / R) cable.
8 DV input jack (AV4)
• Use to connect the DV output of external device
with a DV cable.
9 REC indicators (HDD/DVD)
• Lights up during HDD/DVD recording.
10 I REC button (HDD/DVD)
• Press once to start a recording. Press
repeatedly to start one-touch timer recording.
Each press increases the recording time by 30
minutes up to 8 hours.
11 B (PLAY) button* (HDD/DVD)
• Press to start or resume playback.
12 C (STOP) button (HDD/DVD)
• Press to stop playback, recording or dubbing.
13 Device Select Buttons / Indicators
14 DUBBING HDD
M DVD button
• Press to start One Touch Dubbing from HDD to
DVD.
15 DUBBING VCR
M DVD button
• Press to start One Touch Dubbing from VCR to
DVD.
16 DUBBING indicator
• Lights up during dubbing
17 Display
• Shows information and messages. Refer to
“Front Panel Display Guide” on page 19.
18 Infrared sensor window
• Receive signals from your remote control so that
you can control the unit from a distance.
19 REC indicator (VHS)
• Lights up during VCR recording.
20 I REC button (VHS)
• Press once to start a recording. Press
repeatedly to start one-touch timer recording.
Each press increases the recording time by 30
minutes up to 8 hours.
21 B (PLAY) button* (VHS)
• Press to start playback. Press to turn on the unit
to start playback.
22 D (FWD) button* (VHS)
• Press to fast forward or fast search. Press to
turn on the unit to fast forward.
23 E (REV) button* (VHS)
• Press to rewind or rewind search.
• Press to turn on the unit to rewind.
24 A / C (EJECT
\STOP) button (VHS)
• Press to stop playback, recording or dubbing.
• Press to eject the videotape.
1
23*
22*
21* 19
17
15
13 11* 9
2
5
3 4*
24
20
18
16 14
12 10
8
7
6
You can also turn on the unit by pressing these buttons.
HDD/DVD: Press to change the channel up or
down.
VHS
: Press to change the channel up or
down. Press to adjust the tracking
during playback or in slow motion of
the tape. While playback is in still
mode, you can adjust the vertically
blurred picture.
VHS : Press to activate the VCR. Lights up when
VCR is selected.
HDD: Press to activate the HDD. Lights up when
HDD is selected.
DVD : Press to activate the DVD. Lights up when
DVD is selected.
Button names described in the Owner’s Manual
The instructions in this manual are described mainly with the operations using the remote control. Some
operations can be carried out using the buttons on the front panel.
In
tr
od
uc
ti
on
Con
n
ec
ti
on
s
B
asi
c Setup
P
layb
ack
Ed
iti
n
g
O
the
rs
Fu
nct
ion
S
e
tu
p
Re
c
o
rd
in
g
V
H
S
Fu
nc
ti
on
s
E3NG0FD_EN.book Page 11 Wednesday, January 30, 2008 10:37 AM