Firmware upgrade utility – Tripp Lite RACKMOUNT B020-U16-19-K User Manual
Page 19
To upgrade your firmware:
1. Run the downloaded Firmware Upgrade Utility by double-clicking the
file icon or by opening a command line and entering the full path to it.
The Firmware Upgrade Utility Welcome screen appears.
2. Read and Agree to the License Agreement (click the I Agree radio
button).
3. Click [Next] to continue. The Firmware Upgrade Utility main screen
appears:
The utility inspects your installation. All the devices capable of being
upgraded by the package are listed in the Device List panel.
4. As you select devices, a detailed description of each appears in the
Device Description
panel.
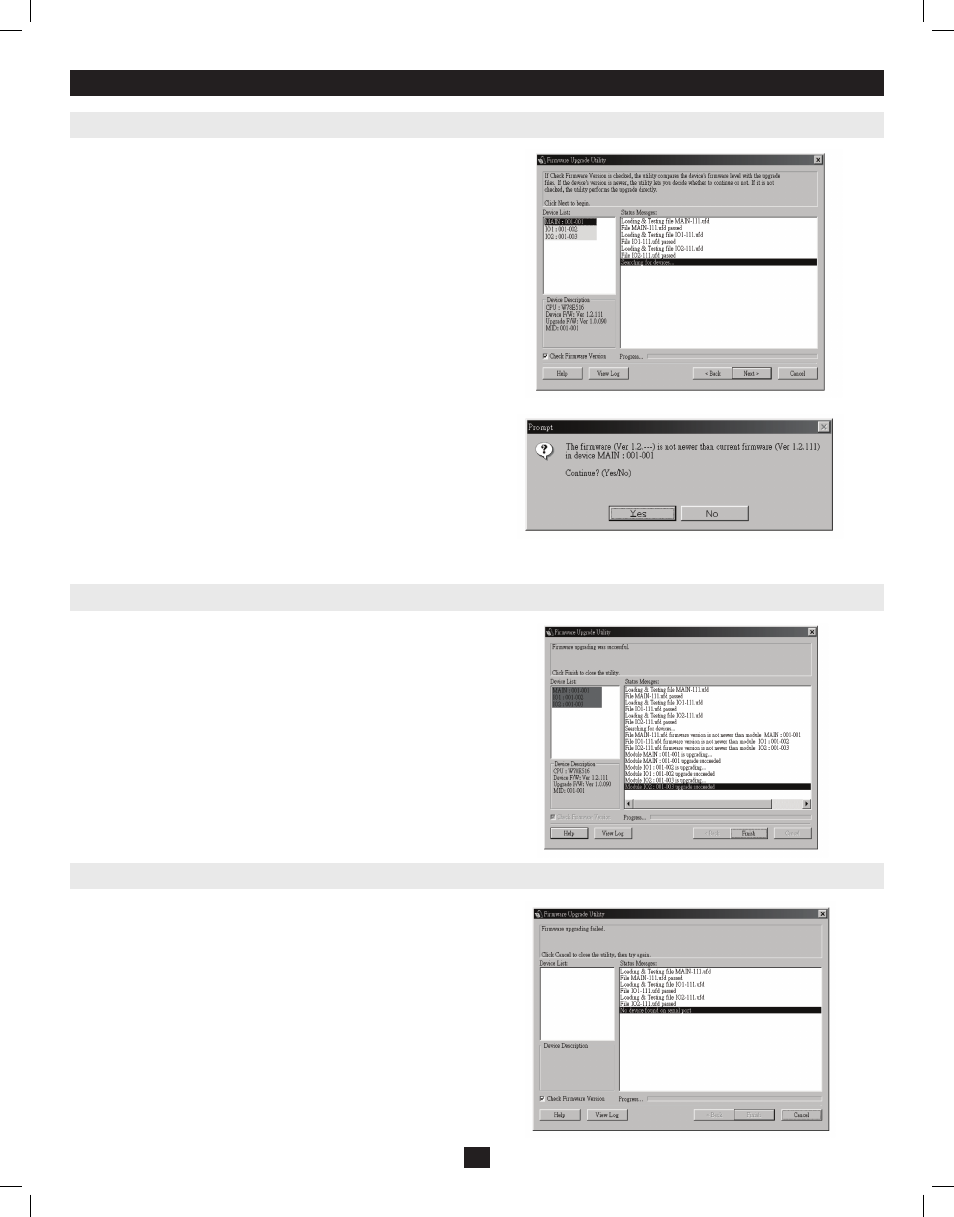
5. After you have made your selection(s), click [Next] to perform the
upgrade. If you enabled Check Firmware Version, the utility compares
the device’s firmware levels with that of the upgrade files. If it finds
that the device’s version is higher than the upgrade version, it brings
up a dialog box informing you of the situation and gives you the
option to Continue or Cancel.
If the Check Firmware Version is not enabled, the utility installs the
upgrade files without checking whether they are a higher level
version.
As the upgrade proceeds, status messages appear in the Status
Messages panel, and the progress toward completion is shown on the
Progress
bar.
8. Firmware Upgrade Utility
8.2 Starting the Upgrade
8.3 Upgrade Succeeded
After the upgrade has completed, a screen appears to inform you that the
procedure was successful:
Click Finish to close the Firmware Upgrade Utility.
If the upgrade failed to complete successfully, a dialog box appears asking
if you want to retry. Click Yes to retry. If you click No, the Upgrade Failed
screen appears:
Click Cancel to close the Firmware Upgrade Utility. See the next section,
Firmware Upgrade Recovery
, for how to proceed.
8.4 Upgrade Failed
19
201011080 • 932900-EN.indd 19
11/29/2010 4:30:17 PM