Maintenance and troubleshooting, 1 lamp replacement, 2 troubleshooting tips – Runco VX-2i User Manual
Page 49: Table 5-1 . troubleshooting chart, Lamp replacement, Troubleshooting tips
Runco VX-2i Owner’s Operating Manual
39
5.1
Lamp Replacement
The lamp should be replaced when it reaches the end of its life (typically 2000 hours), or
sooner if a noticeable degradation in brightness occurs. Contact your Runco dealer to
obtain a replacement lamp.
1.
Turn off the projector and unplug the power cord. Allow the projector to cool down for
approximately 45 minutes prior to removing the lamp assembly for replacement.
2.
Loosen the four rear Lamp Cover screws and remove the cover.
3.
Remove the two lamp assembly mounting screws.
4.
Grasp the lamp assembly handle and pull gently, removing the lamp module from the
projector housing.
5.
Install the new lamp module.
6.
Replace the lamp cover and re-tighten all screws.
7.
Reset the Lamp Hour counter. To do this, select Service from the Main Menu, then
Display Device, then Installation. Use the cursor buttons to highlight Reset under
“Lamp Hours” and press ENTER.
5.2
Troubleshooting Tips
Table 5-1 provides some general guidelines for troubleshooting problems you may
encounter with the VX-2i. If you encounter an issue not described here, please contact
Runco Technical Support.
5. Maintenance and Troubleshooting
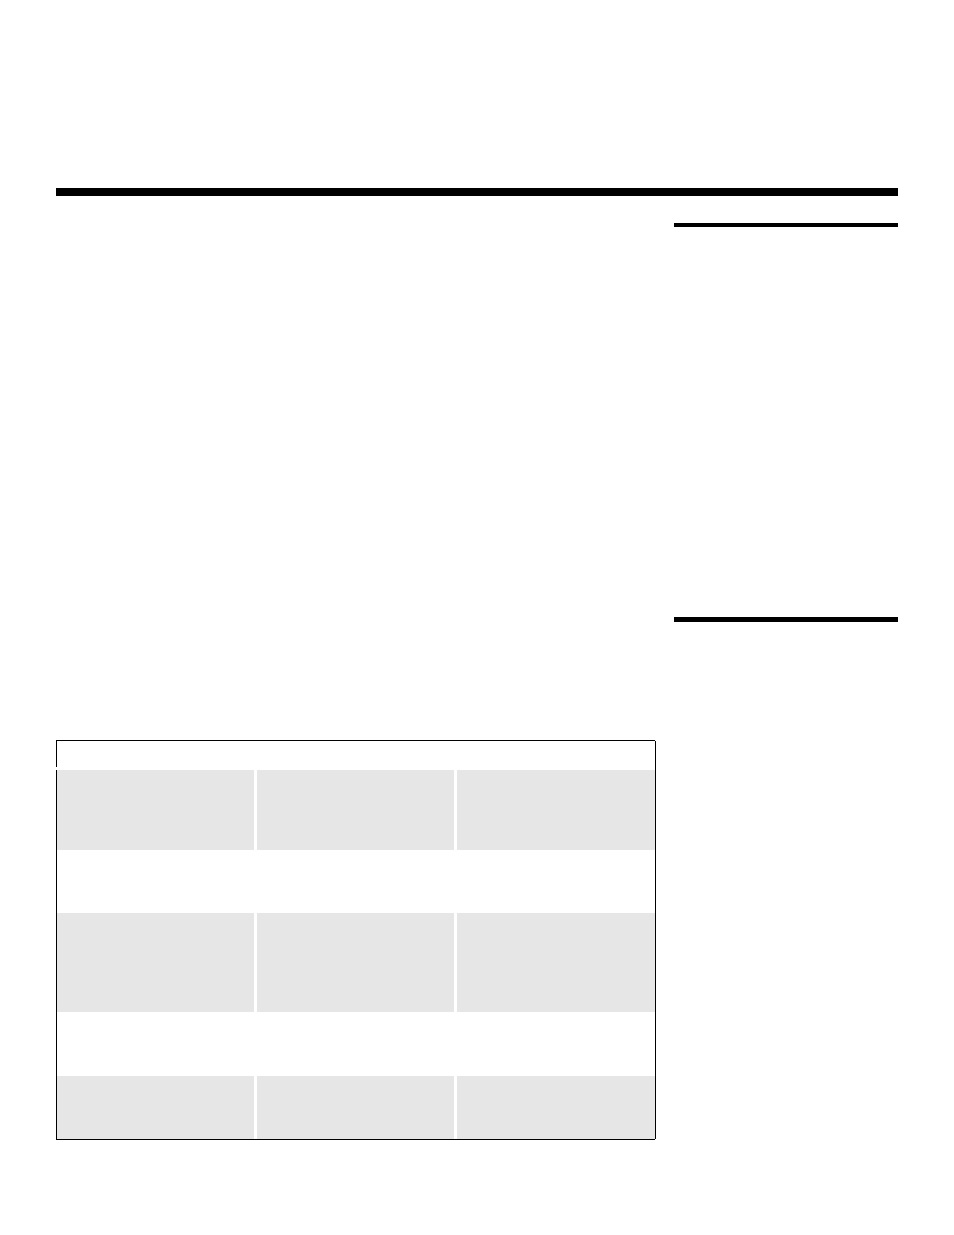
Table 5-1. Troubleshooting Chart
Symptom
Possible Cause(s)
Solution
The projector does not turn
on after initial installation. The
power LED lights red after you
press the power button.
• The VX-2i is not plugged in
or the AC outlet is not
active.
• Ensure that the VX-2i is
plugged in and that the AC
outlet is active.
The projector is on, but there
is no video image on-screen.
• Incorrect source selection.
• Source component is not
turned on.
• Select the correct source.
• Turn on the source.
A projected image from a
DVD is split or otherwise
scrambled.
• DVD player is set to
progressive scan mode.
• Turn off progressive scan
on the DVD player.
• Connect the DVD player to
the HD/RGB 1 or
HD/RGB 2 input.
Image is too bright and/or
lacks definition in the bright
areas of the image.
• Contrast is set too high.
• Lower the contrast setting.
Image appears “washed out”
and/or dark areas appear too
bright.
• Brightness is set too high.
• Lower the brightness
setting.