RCA RTS202 User Manual
Page 5
EN
4
EN
5
• If your television is a high
definition television with an HDMI
input, we highly recommend you
use use the unit’s HDMI output to get
the highest possible video resolution.
• If your television does not have HDMI
input but does support Progressive
Scan, we recommend you use the
unit’s progressive scan output. Set the
Progressive Scan option in the Video
menu to On.
• If one of the devices is not working,
check that all the cables have been
inserted properly into the jacks.
• If your component has only one input
for audio (mono), connect it to the
left (white L/Mono) audio jack on the
TV and don’t connect the right audio
part of the cable.
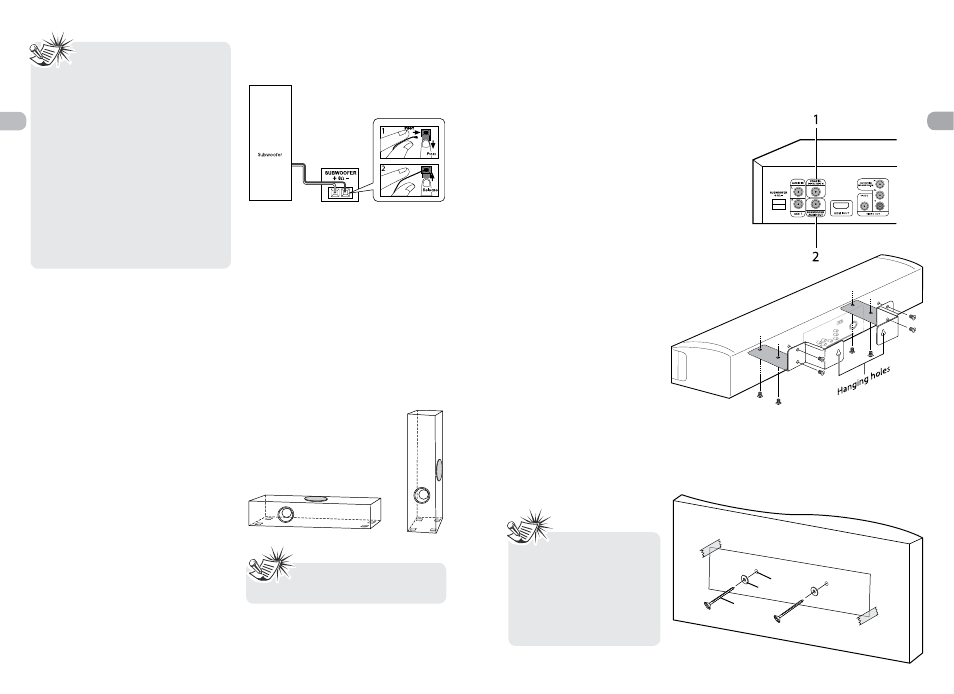
Connecting the subwoofer
Press down the tab to open the terminal and
insert the subwoofer speaker wire. Release the
tab to lock wire in the terminal.
Note: It is not recommended
to place the subwoofer near
the TV set.
Positioning the subwoofer
A subwoofer is designed to reproduce
powerful low bass effects (explosions, the
rumble of spaceships, etc.).
It can be placed either vertically or horizontally.
For best effects, allow at least two inches of
clear space over the speaker driver and the
port hole.
Use of Rubber Pads
Attach the included rubber pads to the
subwoofer to avoid mechanical vibration
noise, especially when placing the subwoofer
on a hard surface. Attached the rubber pads
to the corners of the subwoofer for maximum
stability.
Other connection options
There are several ways in which you can
incorporate your unit into an Audio-Video
system. This depends on the sockets and
other appliances you have. Sound and image
quality depend to a large extent on the types
of connections used.
1. Coaxial Digital Audio Input
The coaxial digital audio input is compatible
with Dolby Digital (Surround Sound) and
PCM (Digital Stereo) signals when compatible
components are connected. Typical compatible
devices include HDTVs, DVD players, Cable or
Satellite set top boxes.
2. Subwoofer Audio Out
For your convenience, this product is equipped
with a subwoofer preamp output, allowing you
to connect an optional powered subwoofer
(not supplied), if you so desire. Simply use an
RCA cable to connect a powered subwoofer
to the SUBWOOFER AUDIO OUT jack. If you
connect another powered subwoofer, you
must disconnect the supplied subwoofer
speaker to avoid interference.
Using the wall mount bracket
Use the wall mounting hardwares (supplied) to
secure the brackets into your Sound Bar.
Use the 1:1 Wall Mount Template (supplied)
to drill holes in the wall. If attaching to a wall
constructed of drywall and wooden studs, you
must position the Template to ensure the drill
holes align with the centers of the wooden
studs in the wall.
If your wall is of drywall and stud construction,
we recommend you use the following
hardware (not included):
a. 2 pcs. woodscrews, size #8x2”
b. 2 pcs. washers, size #8
wall
1:1 Wall Mount
Template
Washer
drill here
Wood screw
• We recommend that
Wall Mounting be carried out
by a professional. Additional
or alternative parts may be
needed for certain type of
wall constructions.
• Before hanging to the
wall, please make all AV
connections.
Method 2 (good)
Component video jacks (Pr, Pb, Y)
• The component video jacks are color-coded
green, blue and red.
• Additional component video cables (not
supplied) are required to provide best
picture quality. They are usually color-
coded green, blue and red.
• Connect the component video OUT jacks on
the unit to the component video IN jacks
on your TV so the video content goes from
the unit to the screen.
Method 3 (basic)
Composite video jack (yellow)
• The basic video jack is color-coded
yellow.
• Video cable (yellow) for the connection
for good picture quality.
• Connect the video OUT jack on the unit to
the IN jack on your TV so the video content
goes from the unit to the screen.
Installing the Sound Bar to the wall