Convenient functions, Entering text, Delete navigator – Panasonic SC-RT50 User Manual
Page 31: Show enter name screen, Press [ w ] (set), Press [functions, Press [ ] to select “delete” and press [enter, Press [delete, Deleting a title or a still picture during play, W to save frequently used phrases
31
RQT8655
Entering text
Refer to the control reference on page 30.
[RAM] [-R] [-R]DL] [-RW‹V›] [+R] [+R]DL] [+RW] [SD]
You can give names to recorded titles, etc.
The maximum number of characters:
* Scheduled recording
If a name is long, parts of it may not be shown in some screens.
1
Show Enter Name screen.
2
Press [
, , , ] to select a
character and press [ENTER].
Repeat this step to enter other characters.
pTo erase a character
Press [
, , , ] to select the character in the name field
and press [
].
pUsing the numbered buttons to enter characters
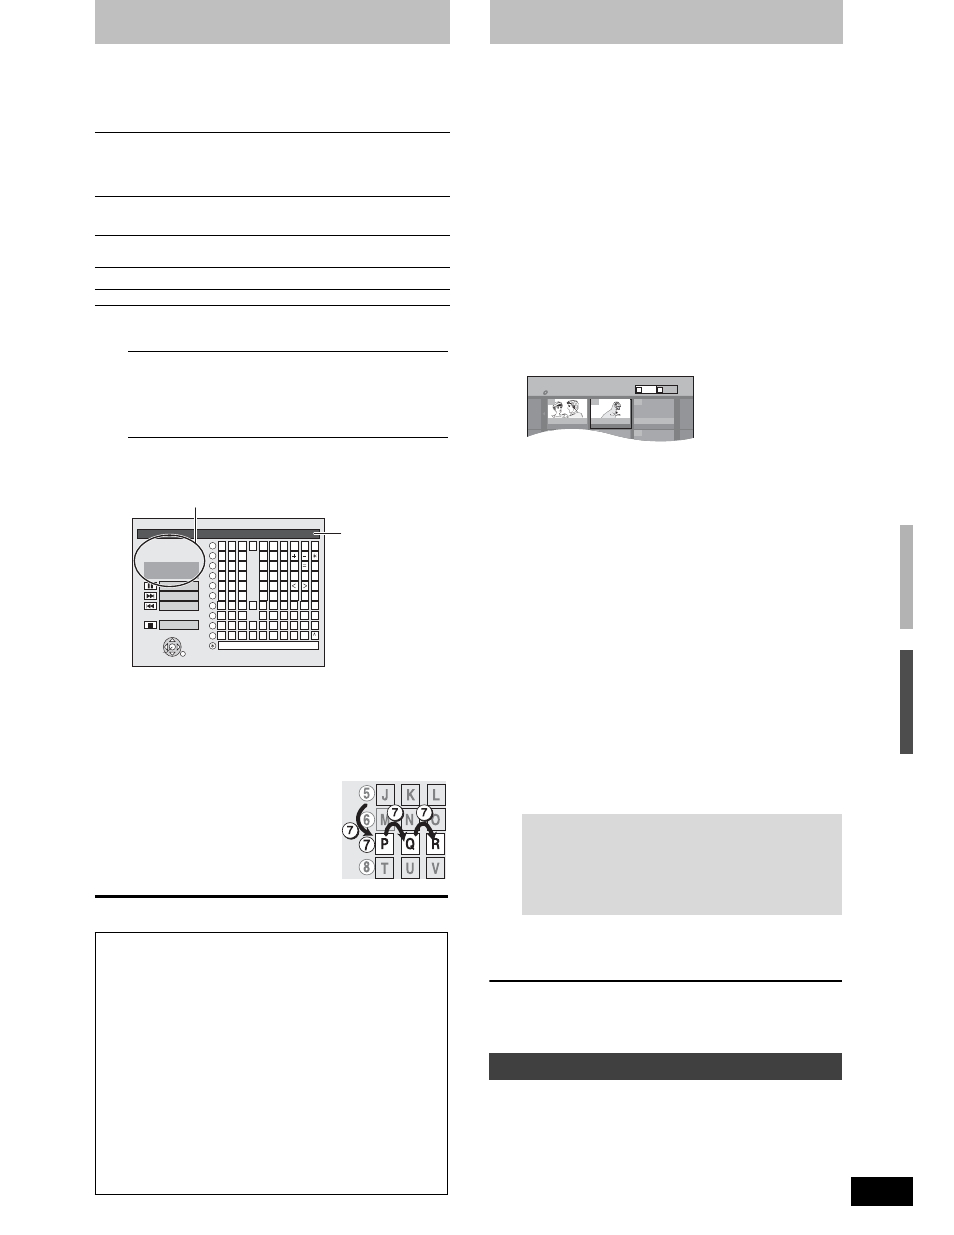
e.g., entering the letter “R”
Press [7] to move to the 7th row.
Press [7] twice to highlight “R”.
Press [ENTER].
pTo enter a space
Press [CANCEL
_] and press [ENTER].
3
Press [
w] (Set).
Returns to the previously displayed screen.
To end partway
Press [RETURN]. (Text is not saved.)
[RAM]
Characters
Title
64 (44*)
Playlist
64
Album of still pictures
36
Disc
64
[-R] [-R]DL] [-RW‹V›] [+R] [+R]DL] [+RW]
Characters
Title
44
Disc
40
[SD]
Characters
Album of still pictures
36
Title (scheduled recording)
(
➡ page 14, step 3)
Title
(
➡ page 22, step 3)
Playlist
(
➡ page 25, step 5)
Disc
(
➡ page 32, “Providing a disc with a name”)
Album of still pictures
(
➡ page 26, step 3)
w To save frequently used phrases
You can add frequently used phrases and recall them later.
Maximum number of saved phrases: 20
Maximum number of characters per phrase: 20
After entering the phrase (
➡ above, steps 1–2)
1 Press [
] while the phrase to be saved is shown in the name field.
2 Press [
] to select “Save” and press [ENTER].
To cancel saving phrase
Press [RETURN].
w To recall a saved phrase
1 Press [
].
2 Press [
, , , ] to select the phrase to be recalled and
press [ENTER].
w To erase a saved phrase
1 Press [
].
2 Press [
, , , ] to select the phrase to be deleted and
press [SUB MENU].
3 Press [ENTER].
4 Press [
] to select “Erase” and press [ENTER].
5 Press [RETURN].
_
Title Name
1
2
3
4
5
A
B
C
a
D
E
F
d
G
H
I
N
O
g
J
K
L
j
M
m
6
7
8
9
0
b
c
e
f
/
%
h
i
$
#
&
k
l
@
n
]
_
o
[
Space
P
Q
R
S
p
T
U
V
t
W
X
Y
Z
w
q
r
s
(
)
u
v
{
}
-
x
y
z
`
|
!
?
\
. ,
"
'
:
;
1
2
3
4
5
6
7
8
9
0
ENTER
Phrase Save
Erase
Phrase List
Set
Top Menu Preview
(Finalized Disc)
Name field:
shows the text you
have entered.
[-R] [-R]DL] [-RW‹V›] [+R] [+R]DL]
If you enter a long name, only part of it is shown in the Top
Menu after finalization (
➡ page 33). When entering a title
name, the name that will appear in the Top Menu can be
previewed in “Top Menu Preview (Finalized Disc)” window.
Delete Navigator
Refer to the control reference on page 30.
[RAM] [-R] [-R]DL] [-RW‹V›] [+R] [+R]DL] [+RW] [SD]
(You cannot delete items on finalized discs.)
pA title or a still picture cannot be restored once it is deleted.
Make certain before proceeding.
pYou cannot delete while recording or copying.
p
[RAM] [SD] If you delete a recorded title (or a still picture), the space
deleted becomes available for recording.
p
[-RW‹V›] [+RW] Disc space increases only when the last recorded
title is deleted.
p
[-R] [-R]DL] [+R] [+R]DL] Available space does not increase after deletion.
Preparation
pPress [THEATER] to switch the remote control to operate this unit.
pPress [DRIVE SELECT] to select the DVD or SD drive.
p
[RAM] [SD] Release protection (➡ page 32).
1
While stopped
Press [FUNCTIONS].
2
Press [
, ] to select “Delete” and
press [ENTER].
[RAM] To switch to the other view
Press [B] to select Album View.
Press [A] to select Title View.
3
Deleting a title:
Press [
, , , ] to select the title
and press [ENTER].
Deleting an album:
Press [
, , , ] to select the album
and press [DELETE].
Deleting a still picture:
Press [, , , ] to select the
album which contains the still picture
to delete and press [ENTER].
Press [, , , ] to select the still
picture and press [ENTER].
You can confirm the titles or pictures etc. that you have
selected using the sub menu.
pRefer to sub menu operations for the “Title View” (
➡ page
22, step 3).
pRefer to sub menu operations for the “Picture View” or
“Album View” (
➡ page 26, step 3).
4
Press [
] to select “Delete” and press
[ENTER].
The title, the album or the still picture is deleted.
To return to the previous screen
Press [RETURN].
To exit the screen
Press [RETURN] several times.
1
While playing
Press [DELETE].
You cannot delete a still picture during a slideshow.
2
Press [
, ] to select “Delete” and
press [ENTER].
The title or the picture is deleted.
To show other pages
Press [
, , , ] to select “Previous” or “Next” and
press [ENTER].
pYou can also press [, ] to show other pages.
Multiple deleting
Select with [
, , , ] and press []. (Repeat.)
pA check mark appears. Press [] again to cancel.
Deleting a title or a still picture during play
DELETE Navigator
DVD-RAM
Title View
10 10/27 Mon
07
08
--
--
--
--
8
10/27 Mon
Video
Picture
B
A
Co
pyi
ng
f
rom
a vi
de
o ca
sset
te
r
e
cor
der
/
Ent
e
ri
ng
te
xt
/
Del
e
te
Navi
g
a
to
r