Igb russo – Ardo CO3012BA-S User Manual
Page 12
12
126
I
GB
Russo
POSIZIONAMENTO E MESSA IN OPERA
POSITIONING AND INSTALLATION
кДбеЦфЦзаЦ а ЗЗйС З щдлигмДнДсаы
кДбеЦфЦзаЦ а ЗЗйС З щдлигмДнДсаы
кДбеЦфЦзаЦ а ЗЗйС З щдлигмДнДсаы
кДбеЦфЦзаЦ а ЗЗйС З щдлигмДнДсаы
кДбеЦфЦзаЦ а ЗЗйС З щдлигмДнДсаы
2
c
2
b
2
a
A
B
2b
2a
2c
1)
When unpacked, check that the mains voltage is the same as that indicated on the
data plate.
2)
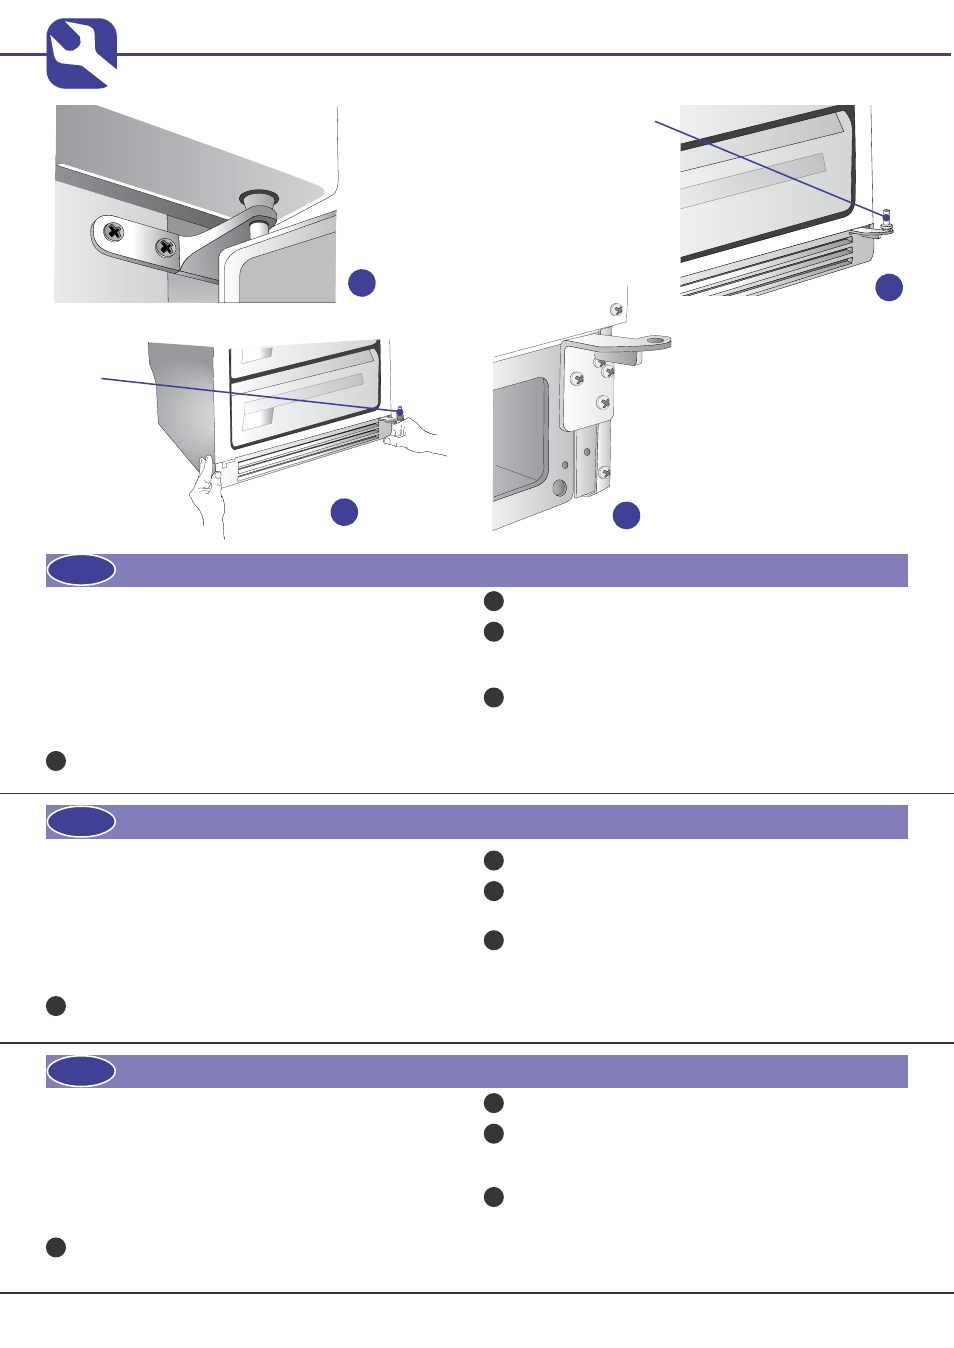
If the door opening is as required, pass to Point 3. If not, invert the hinge points. It is
advisable to position the appliance horizontally for this operation, carefully and
very gently placing it on its back, using special stoppers to prevent squashing the
condenser and damaging the compressor unit.
Dismount the central hinge and simultaneously remove the upper door and the lower
door, close the slot using the cover positioned on the oposide side.
Remove the pin “A” and the washer of the lower hinge.
Dismount the lower plinth pulling lightly on the whole surface, cover the slot “B” of
the hinge with the cap supplied and remove the opposite cap.
Remove the lower hinge and remount the one supplied on the opposite side.
1)
Una volta sballato controllare che la tensione di rete sia la stessa indicata sulla
targhetta caratteristiche.
2)
Se l’apertura delle porte è secondo l’esigenza passare al Punto 3.
In caso contrario invertire i punti di incernieramento. Per questa operazione è
consigliabile posizionare l’elettrodomestico in orizzontale adagiandolo molto deli-
catamente sullo schienale, usando appositi spessori per evitare lo schiacciamento
del condensatore e il danneggiamento del gruppo compressore.
Smontare la cerniera centrale e togliere simultaneamente la porta superiore e la
porta inferiore, chiudere l’asola utilizzando il coperchio posizionato sul lato opposto.
Togliere il perno “A” e la rondella dalla cerniera inferiore.
Smontare lo zoccolo inferiore esercitando una lieve trazione sù tutta la superficie,
coprire l’asola “B” della cerniera con il tappo in dotazione ed estrarre il tappo
opposto.
Togliere la cerniera inferiore e rimontare sul lato opposto quella fornita in dotazio-
ne.
1)
к‡ТФ‡НУ‚‡‚ ФЛ·У Ы·В‰ЛЪВТ¸, ˜ЪУ ТВЪВ‚УВ М‡ФflÊÂÌË ТУУЪ‚ВЪТЪ‚ЫВЪ
БМ‡˜ВМЛ˛, ЫН‡Б‡ММУПЫ М‡ Ф‡ТФУЪМУИ Ъ‡·ОЛ˜НВ.
2)
ЦТОЛ ТЪУУМ‡ УЪН˚‚‡МЛfl ‰‚ВВИ З‡Т ЫТЪ‡Л‚‡ВЪ, ЪУ З˚ ПУКВЪВ ФВВИЪЛ
Н ФЫМНЪЫ 3. З ФУЪЛ‚МУП ТОЫ˜‡В З‡П МВУ·ıУ‰ЛПУ ÔÓÏÂÌflÚ¸ ПВТЪ‡ПЛ ФВЪОЛ.
СОfl ‚˚ÔÓÎÌÂÌËfl ‰‡ММУИ УФВ‡ˆЛЛ ВНУПВМ‰ÛÂÚÒfl ЫТЪ‡МУ‚ЛЪ¸ ФЛ·У ‚
„УЛБУМЪ‡О¸МУВ ФУОУКВМЛВ, УТЪУУКМУ ФУОУКЛ‚ В„У М‡ Б‡‰М˛˛ ТЪВМНЫ Л
ФУОУКЛ‚ ÒÔÂˆË‡О¸М˚В ФУ‰НО‡‰НЛ ‚У ЛБ·ВК‡МЛВ ‡Б‰‡‚ОЛ‚‡МЛfl
НУМ‰ВМТ‡ЪУ‡ Л ФУ‚ВК‰ÂÌËfl НУПФВТТУМУИ „ЫФФ˚.
к‡Б·ВЛЪВ ˆÂÌÚ‡О¸МЫ˛ ФВЪО˛ Л У‰МУ‚ВПВММУ ТМЛПЛЪВ ‚ВıМ˛˛ Л
МЛКМ˛˛ ‰‚ВЛ, Б‡Н˚‚ ФУЫ¯ЛМЫ ФЛ ФУПУ˘Л Н˚¯НЛ, ЫТЪ‡МУ‚ОВММУИ М‡
ФУЪЛ‚УФУОУКМУИ ТЪУУМВ.
лМЛПЛЪВ УТ¸ “Д” Л ¯‡И·Ы Т МЛКМВИ ФВЪОЛ.
лМЛПЛЪВ МЛКМЛИ ˆÓÍÓθ, ТОВ„Н‡ ÔÓÚflÌÛ‚ В„У ФУ ‚ТВИ ФУ‚ВıÌÓÒÚË,
Б‡НУИЪВ ФУЫ¯ЛМЫ ФВЪОЛ“З” ФЛ ФУПУ˘Л ФЛО‡„‡ВПУИ Б‡„ОЫ¯НЛ Л
ЛБ‚ОВНЛЪВ ФУЪЛ‚УФУОУКМЫ˛ Б‡„ОЫ¯НЫ.
лМЛПЛЪВ МЛКМ˛˛ ФВЪО˛ Л ЫТЪ‡МУ‚ЛЪВ М‡ ФУЪЛ‚УФУОУКМЫ˛ ТЪУУМЫ
‰Ы„Ы˛, ‚ıУ‰fl˘Ы˛ ‚ НУПФОВНЪ ФВЪО˛.
2
d
2d
2b
2a
2c
2d
2b
2a
2c
2d