Single mode operation, 6/6: mode select & 1/6: single mode setup, Main menu 6/6: mode select – Sanyo POA-HDTM01 User Manual
Page 22: Transmitter
When using a pair of transmitter and receiver for the first time
Select the installation mode according to the situation in which the projector is installed.
When using in the single mode, it is necessary to perform the mutual authentication be-
tween the transmitter and the receiver. Setup them side by side as described below.
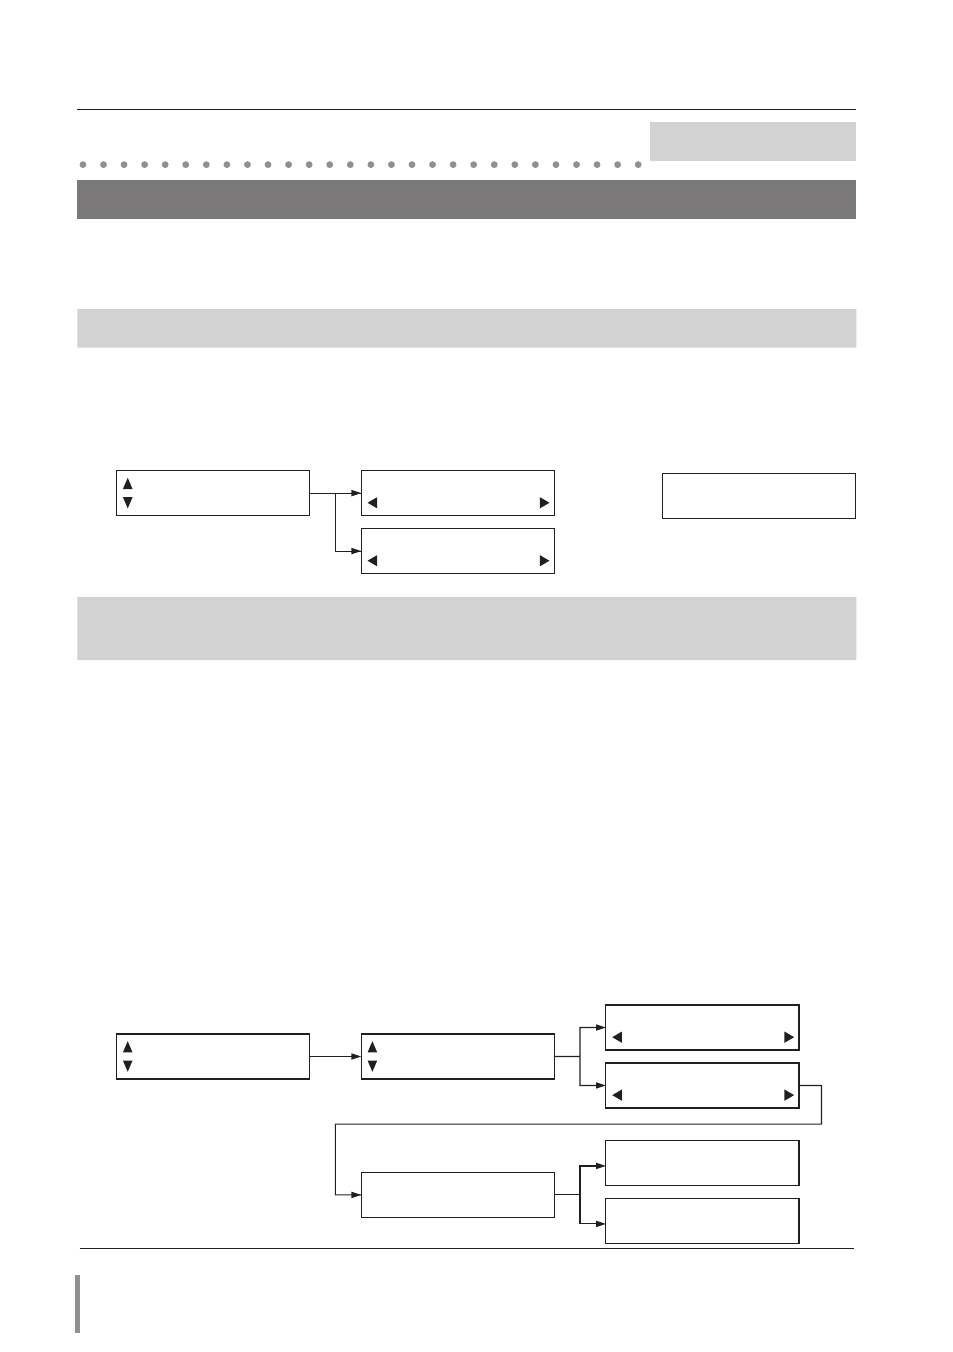
Main Menu 6/6: Mode Select
1. Press the MENU button to show the Menu. Press the Point de buttons to select Main
Menu 6/6: Mode Select and then press the SELECT button.
2. Press the Point 7 8 buttons to select the Single Mode.
3. Input signal will be displayed [S] in the lower left-hand corner.
Main Menu 1/6: Single Mode Setup
a
Sub Menu 1/2: Authentication
1. Press the MENU button to show the Menu. Press the Point de button to select Main
Menu 1/6: Single Mode Setup and then press the SELECT button.
2. Press the Point de buttons to select Sub Menu 1/2: Authentication and then press the
SELECT button.
3. Press the Point 7 8 buttons to move the bracket to [YES] and then press the SELECT
button to perform the authentication.
4. The message "Please wait ..." will be displayed and the transmitter is waiting for the
response from the receiver.
5. Set up the authentication of the receiver.
6. If the authentication is completed, the message "Success" will be displayed for 5 seconds
and the LINK indicator lights orange.
If it is not completed within about 5 minutes, the message "Failure" will be displayed for
5 seconds.
Authentication
[YES] NO
Authentication
YES [NO]
Authenti- 1/2
cation
Please wait...
SingleMode 1/6
Setup
Initialize 2/2
Initialize
[YES] NO
Success
Failure
SingleMode 1/6
Setup
Single Mode Operation
TRANSMITTER
Single
Mode
Mode 6/6
Select
Broadcast
Mode
6/6: Mode Select & 1/6: Single Mode Setup
INPUT SIGNAL >>
Link On
RF Freq. **.*MHz
Authentication
[Yes] NO
Authentication
Yes [NO]
Authenti- 1/2
cation
Transmission
[OK] NG
Phase 1/2
INPUT SIGNAL >>
[S]
Input Lock Key
[#]### OK
Input Lock Key
#[#]## OK
Input Lock Key
##[#]# OK
INPUT SIGNAL >>
INPUT SIGNAL >>
INPUT SIGNAL >>
INPUT SIGNAL >>
INPUT SIGNAL >>
Wireless 2/5
Setup
Wireless 3/5
Initial Setup
Information 4/5
Key Lock 5/5
Key Lock 5/5
Video 1/5
Setup
Hello
HD Data Wireless
INPUT SIGNAL >>
INPUT SIGNAL >>
INPUT SIGNAL >>
INPUT SIGNAL >>
INPUT SIGNAL >>
H Freq.
V Freq.
H Rez. ****
V Rez. ****
Initialize 2/2 Initialize
[YES] NO
Initialize
YES [NO]
Transmission
OK [NG]
H Position 2/2
INPUT SIGNAL >>
[S] XGA 1
Input Lock Key
###[#] OK
Input Lock Key
#### [OK]
INPUT SIGNAL >>
[B] XGA 1
INPUT SIGNAL >>
INPUT SIGNAL >>
INPUT SIGNAL >>
INPUT SIGNAL >>
✐
If you press Menu button during authentication, the authentication will be cancelled.