Setup menu, E-83, Setup menu configuration – JVC BD-X200E User Manual
Page 50: E-84 setting the setup menu, English
E-83
English
Setup Menu
Setup Menu Configuration
The Setup Menu screen is displayed on both the monitor and LCD display. As shown below, this screen is used to access the
BD-X200’s setup menus.
MENU
STYLE
TYPE1
1
1
TITLE PATTERN
CHAPTER PATTERN
PRESET STYLE MENU
MENU
HOST NAME
bdx200
STATIC
IP ADDRESS SETTING
255..255.255.0
192.168.0.254
192.168.0.2
IP ADDRESS
SUBNET MASK
DEFAULT GATEWAY
MAC ADDRESS
NETWORK MENU
MENU
REMOTE SELECT
OFF
OFF
REC CONTROL
REMOTE MENU
MENU
FINALIZE
CANCEL
CANCEL
CANCEL DISC FINALIZATION
CANCEL
DISC ERASE (QUICK)
CANCEL
DISC ERASE (FULL)
DISC MENU
MENU
DUBBING
EXIT
DISC MENU
INPUT SELECT
SYSTEM
PRESET STYLE
RECORDER
REMOTE
DISPLAY
CLOCK ADJUST
DUBBING
NETWORK
MENU
INPUT SELECT
LINE
INPUT SELECT MENU
MENU
TEST SIGNAL
OFF
FACTORY SETTING
CANCEL
KEYBOARD STYLE
ENGLISH
EDIT MENU
ENABLE
TOTAL RECORDING TIME
5 Hour 30 Min
SYSTEM MENU
MENU
CHAPTER CREATION
MANUAL
SET INTERVAL
Every05Min
TOTAL CONTENTS TIME
01Hour 08Min
AUTO CHAPTER (REC PAUSE)
ON
ENCODE QUALITY (Mbps)
8.0
AUDIO ENCODE
DOLBY DIGITL
ASPECT
AUTO
RECORDER MENU (1/2)
BACK
Y/C TERMINAL MODE
S1
THUMBNAIL FORM
NORMAL
AUDIO CHANNEL (DV)
AUDIO REC VOLUME MODE
BOTH
DISC IN ACTION
MENU
TITLE END
MENU
DVD MENU TYPE
TOP+MENU
INTRODUCTION TITLE
OFF
RECORDER MENU (2/2)
MENU
DISPLAY
ON
TITLE/CHAPTER
ON
RECORDER MODE
TIME+DATE
ON
TIME/DATE
REMAIN
ON
DATE STYLE
DD/MM/YY
CANCEL
DISPLAY MENU
MENU
DATE
04/12/04
10:00
TIME
CLOCK ADJUST MENU
FF/REW
REM FF/REW MODE
DVD
DVD
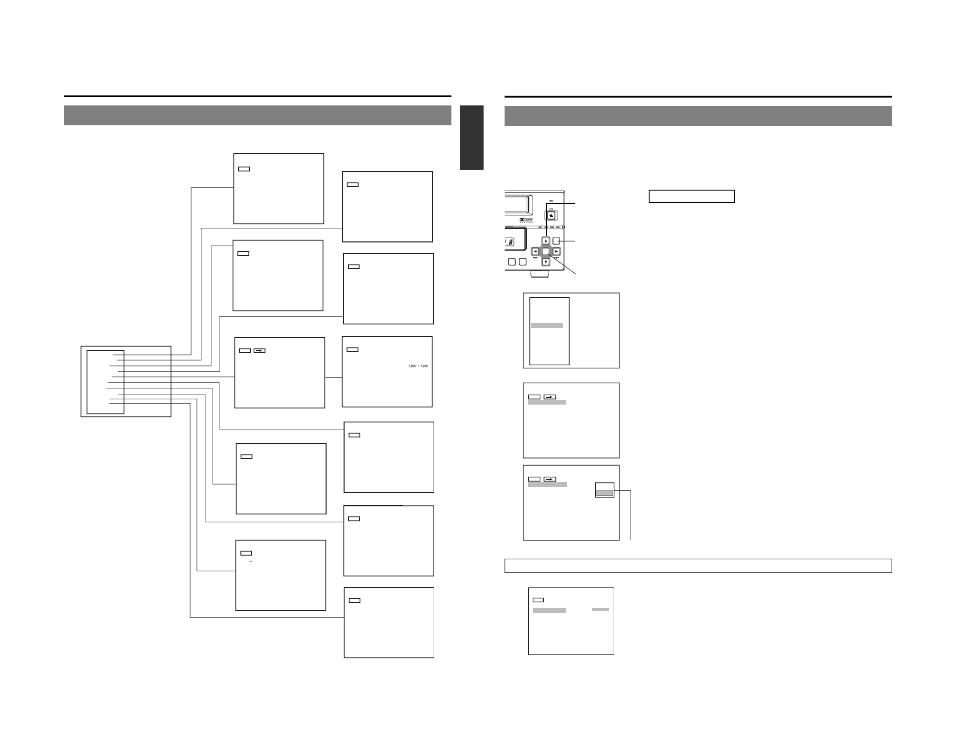
Setup Top Menu
DISC MENU Screen
SYSTEM MENU Screen
RECORDER MENU (1/2) Screen
DISPLAY MENU Screen
DUBBING MENU Screen
INPUT SELECT MENU Screen
PRESET STYLE MENU Screen
RECORDER MENU (2/2) Screen
REMOTE MENU Screen
CLOCK ADJUST MENU Screen
NETWORK MENU Screen
E-84
Setting the Setup Menu
Settings made in the setup menus are stored in the BD-X200’s internal memory and will be retained even when the power is turned
off. It is also possible to return to default settings whenever so required.
In addition to the buttons on the front panel, a keyboard and mouse can also be used to perform operations on these menus. The
following section, however, will describe operations performed using the front panel buttons.
Keyboard : Select using the arrow keys (
∞ and √), and confirm the selection using the Enter key.
Mouse
: Left click the required item.
Setup menu operations are carried out while monitoring the display on the monitor
connected to the VIDEO LINE OUT terminal. In addition, setup menu content also
appears on the LCD display.
Ⅵ Stop the DVD recorder.
1.
Open the Setup Menu screen.
To do this, press the SET UP button
2.
Open the setup menu in which settings are to be modified.
q Use the 6 and 7 buttons to select the required screen.
w Press the SET button
* The EXIT option can be selected to return to the normal screen display.
3.
Make the required settings in the setup menu.
q Use the 6 and 7 buttons to select the parameter to be set.
w Press the SET button
● A list of setting values will appear.
e Use the 6 and 7 buttons to select the required value from the list and then
press the SET button.
● The setting value will be modified accordingly.
r Repeat steps q through e until all of the required settings have been
made.
Ⅵ To return to the Setup Menu, select MENU and press the SET button.
Ⅵ To move to the next menu screen, select the † button at the top of the current
screen and press the SET button.
Ⅵ To return to the original menu screen, select either MENU or BACK and press
the SET button.
4.
Use either of the following methods to return to the normal screen
display.
Press the SET UP button.
or
Select EXIT from the Setup Menu and press the SET button.
Settings
MENU
TEST SIGNAL
OFF
FACTORY SETTING
EXECUTE
KEYBOARD STYLE
ENGLISH
EDIT MENU
ENABLE
TOTAL RECORDING TIME
5 Hour 30 Min
SYSTEM MENU
Restoring to Default Settings
All settings from the various setup menus can be returned to the corresponding
default settings by setting FACTORY SETTING from the SYSTEM MENU screen
to EXECUTE and by then pressing the SET button.
BUSY
OPEN/CLOSE
TOP
MENU
MENU
OPTION DV
Y/C LINE
SET UP
SET
EXIT
DISC MENU
INPUT SELECT
SYSTEM
PRESET STYLE
RECORDER
REMOTE
DISPLAY
CLOCK ADJUST
DUBBING
NETWORK
MENU
CHAPTER CREATION
MANUAL
SET INTERVAL
Every05Min
TOTAL CONTENTS TIME
AUTO CHAPTER (REC PAUSE)
01Hour 08Min
ON
ENCODE QUALITY (Mbps)
8.0
AUDIO ENCODE
DOLBY DIGITAL
ASPECT
AUTO
RECORDER MENU (1/2)
MENU
CHAPTER CREATION
SET INTERVAL
AUTO CHAPTER (REC PAUSE)
RECORDER MENU (1/2)
MANUAL
AUTO
TOTAL CONTENTS TIME
01Hour 08Min
ENCODE QUALITY (Mbps)
8.0
AUDIO ENCODE
DOLBY DIGITAL
ASPECT
AUTO
SET button
Cursor buttons
(
6, 7, 8 and t)
SET UP button
Setup Menu
RECORDER MENU (1/2) screen
Setting list
SYSTEM MENU screen
Setup Menu