Synchronous recording, E-75, English – JVC BD-X200E User Manual
Page 46: Setting the optimum bit rate, Starting the record process, Saving an edit list, Ending the record process
E-75
English
IN POINT
OUT POINT
EXIT
REMOTE CONTROL SCREEN ( DV SLAVE )
1
:
4
7
h
:
m
:
s
f
2
:
5
8
3
6
9
h
:
m
:
s
f
:
h
:
m
:
s
f
CHAPTER
MANUAL
BITRATE
8.0 Mbps
DISC REMAIN
000 min
EDL
TC CANCEL
ADJ
FINALIZE
00:00:00:00
00:00:00:00
00:25:00:00
00:40:00:00
00:15:00:00
00:30:00:00
00:45:00:00
00:20:00:00
00:35:00:00
00:50:00:00
00:10:00:00
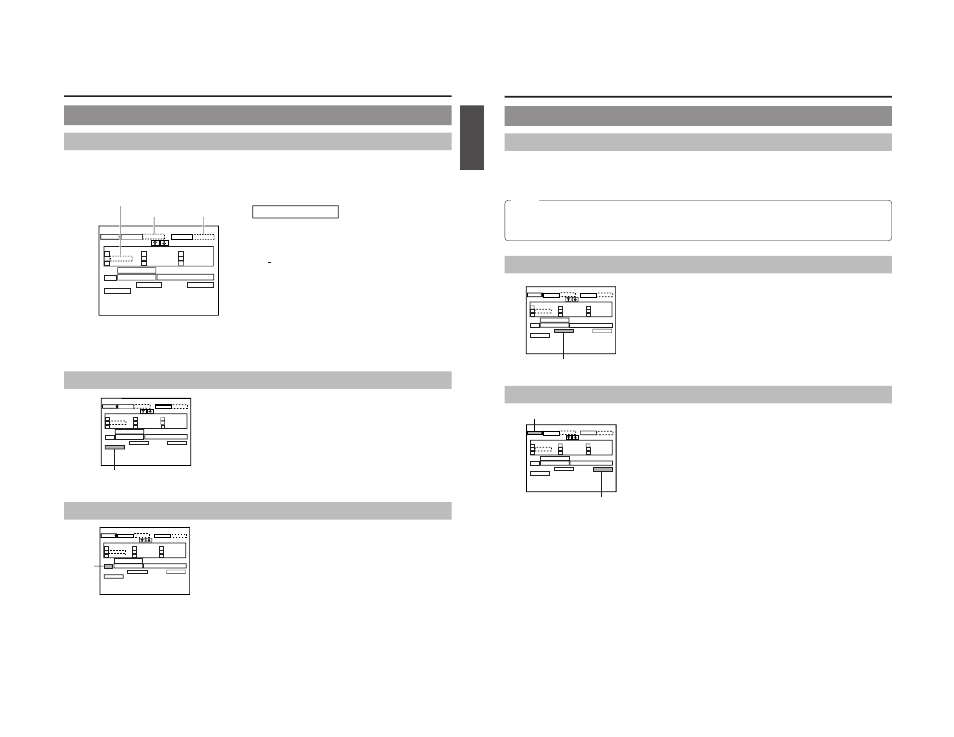
1. Registering the In Point, Out Point, and Chapter Marks
Use the keyboard to directly enter the In Point, Out Point, and chapter marks.
Registering chapter marks : In order to register chapter marks using the REMOTE CONTROL screen, it will first of all be necessary
to set CHAPTER CREATION from the RECORDER MENU (2/2) screen to MANUAL. If this parameter
is set to AUTO, chapter marks will be automatically setup at specific intervals. The current setting for
CHAPTER CREATION is indicated in this screen’s CHAPTER field.
q Press the cursor keys (†, ©, ∞, √) to move the cursor to the
point you want to set (IN POINT, OUT POINT, or chapter point),
then press the “Enter” key.
● The column for the selected point will be underlined.
00:00:00:00
∞
Underline
w Enter the time code from the keyboard (hour: minute: second:
frame).
e Press the “Enter” key.
● The underline at the selected point will disappear, and the time
code will be set.
● When a time code is registered for a chapter mark, the chapter
list will be sorted from the smallest time-code values, and the
newly registered point will be highlighted.
Procedure
2. Deleting the In Point, Out Point, and Chapter Marks
q Press the cursor keys (†, ©, ∞, √) to move the cursor to the
point you want to delete (IN POINT, OUT POINT, or chapter point),
then press the “Enter” key.
w Press the cursor keys (†, ©, ∞, √) to move the cursor to the TC
CANCEL item on the screen, then press the “Enter” key.
● The selected point (i.e., In Point, Out Point, or a chapter mark
from the chapter list) will be deleted.
● Whenever a chapter mark is deleted, the chapter list will be
sorted.
Chapter mark
IN POINT
OUT POINT
IN POINT
OUT POINT
EXIT
REMOTE CONTROL SCREEN ( DV SLAVE )
1
:
4
7
h
:
m
:
s
f
2
:
5
8
3
6
9
h
:
m
:
s
f
:
h
:
m
:
s
f
CHAPTER
MANUAL
BITRATE
8.0 Mbps
DISC REMAIN
000 min
EDL
TC CANCEL
ADJ
FINALIZE
00:00:00:00
00:00:00:00
00:25:00:00
00:40:00:00
00:15:00:00
00:30:00:00
00:45:00:00
00:20:00:00
00:35:00:00
00:50:00:00
00:10:00:00
TC CANSEL
3. Setting the Optimum Bit Rate
ADJ
ADJUST can be used to set the optimum bit rate (i.e., the amount of data per
second) for the remaining space on a disc based on the recording time (or duration)
between the In Point and the Out Point.
● DISC REMAIN displays an estimate of the available space for recording on the
current disc.
● BIT RATE displays the current bit-rate setting.
To set the bit rate that best suits the remaining disc capacity, select ADJ and
then press the SET button.
IN POINT
OUT POINT
EXIT
REMOTE CONTROL SCREEN ( DV SLAVE )
1
:
4
7
h
:
m
:
s
f
2
:
5
8
3
6
9
h
:
m
:
s
f
:
h
:
m
:
s
f
CHAPTER
MANUAL
BITRATE
8.0 Mbps
DISC REMAIN
000 min
EDL
TC CANCEL
ADJ
FINALIZE
00:00:00:00
00:00:00:00
00:25:00:00
00:40:00:00
00:15:00:00
00:30:00:00
00:45:00:00
00:20:00:00
00:35:00:00
00:50:00:00
00:10:00:00
E-76
Editing Operations on the REMOTE CONTROL (9PIN REC/DV SLAVE) Screen (continued)
4. Starting the Record Process
Ⅵ Use the non-linear editor to control the DVD recorder.
● Each recording will be stored on the disc as a single title.
● Recording of video and audio to the DVD will be carried out from the In Point to the Out Point with chapters being automatically
created as specified.
5. Saving an edit list
Notes
● If no In Point has been set, recording will start in response to REC commands; however, since time codes are set for chapter
marks as relative values with respect to the In Point, chapters may not be created as intended. It is recommended, therefore,
that an In Point always be specified when chapters are to be created.
● When the chapter auto-create function is used, chapters will be created at specific intervals.
EDL item
Edit lists can be saved on the EDL MANAGER screen of this machine. Also, edit
lists registered on the EDL MANAGER screen can be read into the REMOTE
CONTROL screen.
Ⅵ Select the EDL item on the screen, press the “Enter” key and the EDL MANAGER
screen will be displayed.
☞ Refer to page 69 for details on how to use the EDL MANAGER screen.
Synchronous Recording
6. Ending the Record Process
FINALIZE
Ⅵ If you intend to play the recorded disc on this DVD recorder or on another player,
select FINALIZE and press the SET button.
Once finalizing has been carried out, no addition recordings can be made on
the disc.
Ⅵ Select the EXIT item on the screen, press the “Enter” key, and the REMOTE
CONTROL screen will disappear.
Ⅵ To remove the recorded disc from your BD-X200, press the OPEN/CLOSE button
on the front panel.
IN POINT
OUT POINT
EXIT
REMOTE CONTROL SCREEN ( DV SLAVE )
1
:
4
7
h
:
m
:
s
f
2
:
5
8
3
6
9
h
:
m
:
s
f
:
h
:
m
:
s
f
CHAPTER
MANUAL
BITRATE
8.0 Mbps
DISC REMAIN
000 min
EDL
TC CANCEL
ADJ
FINALIZE
00:00:00:00
00:00:00:00
00:25:00:00
00:40:00:00
00:15:00:00
00:30:00:00
00:45:00:00
00:20:00:00
00:35:00:00
00:50:00:00
00:10:00:00
EXIT item