JVC BD-X200E User Manual
Page 47
E-77
English
MONITOR
EDITSEARCH
FILTER
STATUS
SHUTTER
MENU
AUTO IRIS
BACK L
NORMAL
SPOT L
STRETCH
NORMAL
COMPRESS
FULL AUTO
BLACK
LOLUX
MODE
POWER
ON
OFF
VTR
OPEN
VTR
CAM
1
3200K
5600K
5600K
5600K
ND
/
/ ND
2
.3
.4
1 8
1 64
CH-1
AUDIO INPUT
AUDIO SELECT
CH-2
CH-1
CH-2
FRONT
REAR
AUTO
MANUAL
AUDIO
LEVEL
CH-1
CH-2
PULL
OPEN
LCD BRIGHT
DISPLAY
VIDEO
AUDIO
IN
IN
OUT
IN
OUT
CH1
CH2
REMOTE
USB
DV IN/OUT
SIGNAL
LAN
GND
DC 19V
4dB
8dB
INPUT
LEVEL
LINE
Y/C
Recording Operations Using a DV Camera Trigger
By connecting a camera featuring a DV terminal to this DVD recorder, audio and video from the camera can be easily recorded to
a disc. In this type of situation, the DV camera’s trigger button is used to control the BD-X200.
Supported cameras: GY-DV5000 and GY-DV5001.
Signal Connections
● Connect the DV IN/OUT terminal on the rear of your BD-X200 to the DV terminal on the GY-DV5000 or GY-DV5001 using a DV
(IEEE1394) cable. One of the commercially-available cables indicated above should be used for this purpose.
● Connect the DVD recorder’s VIDEO LINE OUT and AUDIO OUT terminals to the monitor’s video in and audio in terminals.
Setup Procedures
● Insert a recordable disc into your BD-X200.
Settings
GY-DV5000 or GY-DV5001 : Set DV REC TRIGGER from the OTHERS MENU (1/2) screen to ON.
BD-X200
: Set REMOTE SELECT from the REMOTE MENU screen to DV(TRIGGER).
Input will automatically be DV.
● The BD-X200 will adopt Slave mode. (It will not be possible to control recording
operations from the DVD recorder.)
TV set or monitor
GY-DV5000
VIDEO OUT
AUDIO OUT
DV IN/OUT terminal
MENU
REMOTE SELECT
DV(TRIGGER)
OFF
REC CONTROL
FF/REW
REM FF/REW MODE
REMOTE MENU
REMOTE MENU screen
DV terminal
(video, audio, and control signals)
DV cables:
VC-VDV204 (2 m, 4P-4P) from JVC
VC-VDV206 (2 m, 4P-6P) from JVC
Rear panel
Procedure
ⅥRecording on the BD-X200 will start and stop in response to operation of the trigger button on the GY-DV5000 or GY-DV5001.
* When using, make sure triggers are at least 1 second apart.
Note
Not compatible with the REPLICATION feature of BR-DV6000.
E-78
VIDEO
AUDIO
IN
IN
OUT
IN
OUT
CH1
CH2
REMOTE
USB
DV IN/OUT
SIGNAL
LAN
GND
DC 19V
4dB
8dB
INPUT
LEVEL
LINE
Y/C
POWER
ON
I
OFF
O
M
H
F
S
REC
MENU
PLAY
PAUSE/STILL
REW
STOP
FF
EJECT
PHONES
CH1
CH2
CH3
CH4
REC
PLAY
PULL FOR VARIABLE
TRACKING
CH1
CH1
CH2
CH3
CH4/
TRACKING
SET
HOLD
PB
PB/EE
COUNTER
UB
CONDITION
AUDIO
INPUT
VIDEO
INPUT
AUDIO
MONITOR
PULL
RELEASE
RESET
VCON
REMOTE
TOP
VIDEO
AUDIO
OTHERS
ON SCREEN
TIME CODE
SERVO/SYS
USER
INSERT
STAND BY
PLAYER
SEARCH
VAR
P.PLAY
DA3
DA2
DA1
VIDEO
ASSEM
IN
ENTRY
OUT
CANCEL
SHIFT
REVIEW
METER MODE
TRACKING
FINE
PREVIEW
AUTO EDIT
PREROLL
TC
RECORDER
DA4
VIDEO CASSETTE RECORDER
STILL
X-1
REV
FWD
X1
CH2
CH3
CH4
CH1
CH2
CH3
CH4
CH1
CH2
CH3
CH4
SIF
SDI
AES/EBU
AUDIO INPUT / AUDIO MONITOR SELECT
LINE
CPN
L
ANALOG
R
PULL
RELEASE
CTL
P.READ
AUTO OFF
V.VAR
REMOTE
PB/EE
16:9
TC UB DF SERVO
GEN
CF
AP
525
OVER
–60
–2
–4
+2
+4
0
–40
–30
–20
–10
0
dB
dB
R
P
OVER
–60
–2
–4
+2
+4
0
–40
–30
–20
–10
0
dB
dB
R
P
OVER
–60
–2
–4
+2
+4
0
–40
–30
–20
–10
0
dB
dB
R
P
OVER
–60
–2
–4
+2
+4
0
–40
–30
–20
–10
0
dB
dB
R
P
625
Variable Motion
L A P
I N
O U T
S E R V O
L A P
I N
O U T
S E R V O
LAP
RESET
LAP
RESET
TOTAL
RECORDER
EJECT
PLAYER
EJECT
P
AUX
CONTINUE
START
END
V.SPEED
EVENT
RENUMBER
RIPPLE
MAN.TAKE
LEARN
MENU
REC
REW
FF
STOP
STB OFF
SEARCH
PAUSE
/STILL
PLAY
REC
REW
FF
STOP
STB OFF
SEARCH
PAUSE
/STILL
PLAY
ASSEM
VIDEO
AUD-1
AUD-2
SPLIT
TC
SPLIT
CANCEL
LAST
ED
REC
EE
OUT
IN
OUT
IN
ENTRY
PREVIEW
AUTO EDIT
GOTO
REVIEW
SHIFT
ALL STOP
MAX
MIN
MONITOR
MAX
MIN
MONITOR
FWD
REV
STILL
X-1
X1
FWD
REV
STILL
X-1
X1
R E C O R D E R
P L A Y E R
HOUR
MIN
SEC
FRAME
HOUR
MIN
SEC
FRAME
P
R
VITC
LTC
CTL
VITC
LTC
CTL
BUMP
PREROLL
7
5
3
ON
OFF
EVENT No.
V.SPEED
A.SPLIT
DURATION
IN
OUT
IN
OUT
E D I T I N G C O N T R O L U N I T
R M — G 8 2 0
+
–
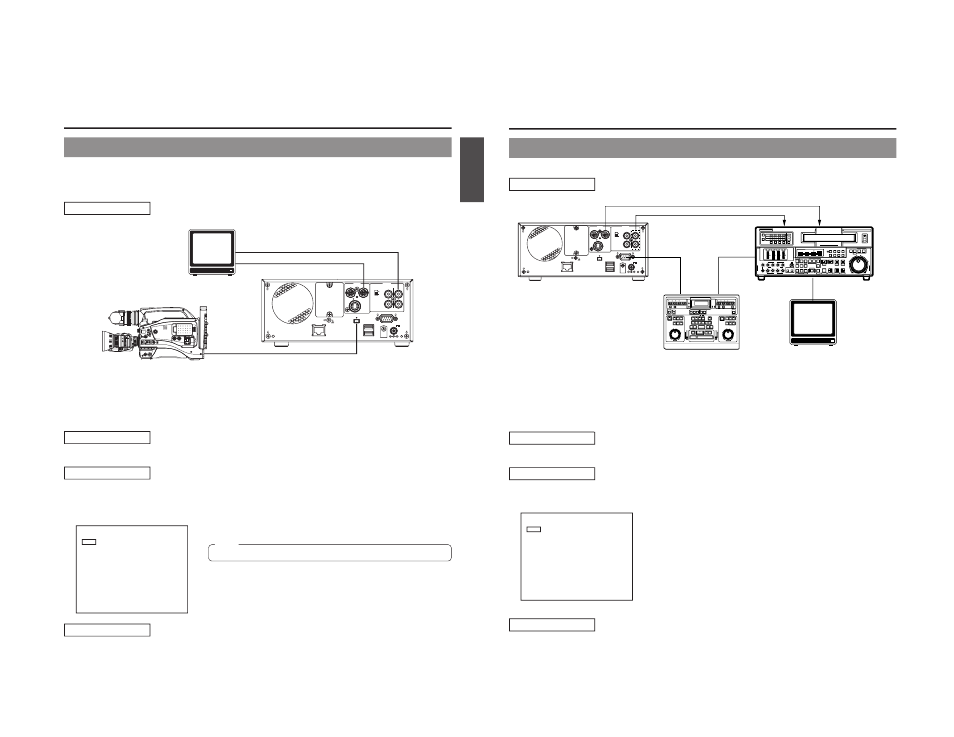
Using This Machine as a PLAYER with RS-422 Control
This machine can be used as a PLAYER with RS-422 control.
Connection
● Connect the REMOTE terminal in the rear of this machine to the REMOTE (RS-422) terminal of the edit remote control with an
RS-422 cable.
● Connect the REMOTE terminal of the RECORDER with the REMOTE (RS-422) terminal of the edit remote control with an RS-
422 cable.
● Connect the video/audio output terminal of this machine with the video/audio input terminal of the VCR.
● Connect the MONITOR OUT terminal of the RECORDER with the video/audio input terminal of the monitor.
Preparation
● Insert a disc for playback into this machine.
Setting
This machine’s settings
: Set the REMOTE SELECT item of the REMOTE MENU screen to 9PIN (PLAY).
AUDIO OUT
[PLAYER]
VIDEO OUT
Monitor
MENU
REMOTE SELECT
9PIN(PLAY)
OFF
REC CONTROL
FF/REW
REM FF/REW MODE
REMOTE MENU
REMOTE MENU screen
VCR with RS-422 terminal
Operation
ⅥPlayback operation of this machine is controlled by RS-422 control.
Synchronous Recording
Rear face of
this machine
VIDEO OUT
AUDIO IN
[RECORDER]
REMOTE
REMOTE
MONITOR OUT
RS-422 compliant edit remote control
VIDEO IN