Dvd dubbing – JVC BD-X200E User Manual
Page 48
E-79
English
DVD Dubbing
Dubbing DVDs Using the LAN Terminal
When the LAN terminal is used to join two BD-X200 DVD recorders via an Ethernet connection, audio and video from a sender
DVD can be dubbed onto a DVD on the receiver device.
Connected devices : One BD-X200 SENDER (used for playback of the master DVD)
One BD-X200 RECEIVER (used for DVD recording)
Signal Connections
All connection and disconnection of cables should be carried out with the power turned off.
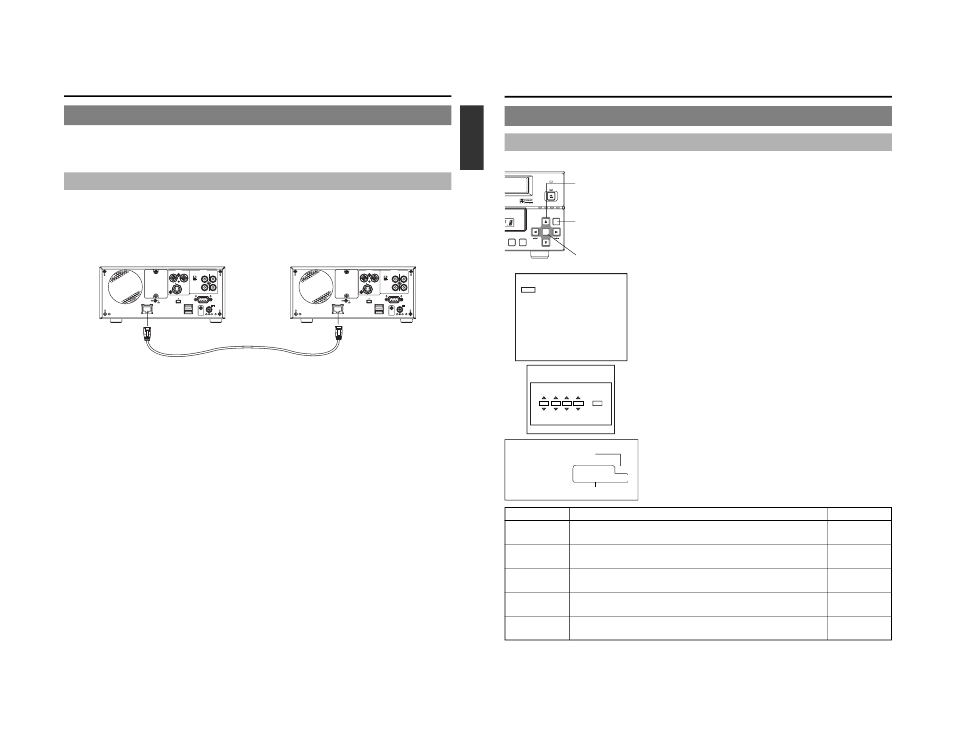
Ⅵ Direct connection of two BD-X200s
Connect an Ethernet cable between the LAN terminals of the sender and receiver devices.
A Category 5, cross-wired Ethernet cable should be used in this case.
VIDEO
AUDIO
IN
IN
OUT
IN
OUT
CH1
CH2
REMOTE
USB
DV IN/OUT
SIGNAL
LAN
GND
DC 19V
4dB
8dB
INPUT
LEVEL
LINE
Y/C
VIDEO
AUDIO
IN
IN
OUT
IN
OUT
CH1
CH2
REMOTE
USB
DV IN/OUT
SIGNAL
LAN
GND
DC 19V
4dB
8dB
INPUT
LEVEL
LINE
Y/C
CAT-5 cross-wired cable
Sender BD-X200
LAN terminal
LAN terminal
Receiver BD-X200
E-80
DVD Dubbing
1.
Press the SET UP button to display the Setup Menu.
2.
Select NETWORK from the Setup Menu and then press the SET
button.
● The NETWORK MENU screen will appear.
3.
Use the following parameters from the NETWORK MENU screen
to make settings required for dubbing.
Select the item and press the SET button, and the setting screen for each item
will be displayed.
Ⅵ HOST NAME
Use the
6 and 7 cursor buttons or the ∞ and √ arrow keys to select this
parameter, and then input the BD-X200’s network name using the USB
keyboard.
(Names may be up to 20 characters in length.)
Ⅵ IP ADDRESS, SUBNET MASK, and DEFAULT GATEWAY
Refer to the following table for more details regarding these parameters.
q Select the required parameter using the 6 and 7 cursor buttons or the
∞ and √ arrow keys.
w Select the digit to be set using the t and 8 cursor buttons or the †
and
© arrow keys.
e Change the selected digit using the 6 and 7 cursor buttons or the ∞
and
√ arrow keys.
● The number can be directly input from the keyboard.
r Repeat steps w through e to make all of the required settings, and
then press the SET button or Enter key.
4.
To return to the Setup Menu after all settings have been made,
select MENU from the NETWORK screen, and then press the SET
button or the ENTER key.
5.
Press the SET UP button to return to the normal screen display.
Dubbing DVDs Using the LAN Terminal (continued)
Network Settings
Use the following procedure to carry out network settings on both the sender and receiver devices.
BUSY
OPEN/CLOSE
TOP
MENU
MENU
OPTION DV
Y/C LINE
SET UP
SET
MENU
HOST NAME
bdx200
STATIC
IP ADDRESS SETTING
255..255.255.0
192.168.0.254
192.168.0.2
IP ADDRESS
SUBNET MASK
DEFAULT GATEWAY
MAC ADDRESS
NETWORK MENU
99.99.99.99.99
SET button
Cursor buttons
(
6, 7, t and 8)
SET UP button
NETWORK MENU Screen
IP ADDRESSS 192.168.100.xxx
SUBNET MASK 255.255.255.000
All devices are set to the same network.
Setting example:
This value is different for each
device.
Parameter
Description
Default setting
HOST NAME
The parameter is used to enter the BD-X200’s network name using a keyboard.
bdx200
(Names may be up to 20 characters in length.)
IP ADDRESS
This parameter cannot be set and is fixed in STATIC mode.
————
SETTING
IP ADDRESS
Use this parameter to set the IP address. Make sure, however, that no two devices
192.168.000.002
on a single network share the same IP address.
SUBNET MASK
Use this parameter to set the subnet mask. Connected BD-X200s should have the
255.255.255.000
same network setting.
DEAULT GATEWAY
Use this parameter to set the gateway address. Connected BD-X200s should have
192.168.000.254
the same address.
IP ADDRESS
192
168
000
002
SET
192:168:000:002