Connecting to the remote zone (zone 2) input, Remote zone (zone 2) main zone, And xantech – Integra DTR-7.1 User Manual
Page 24: Home theater controller rc-390m
24
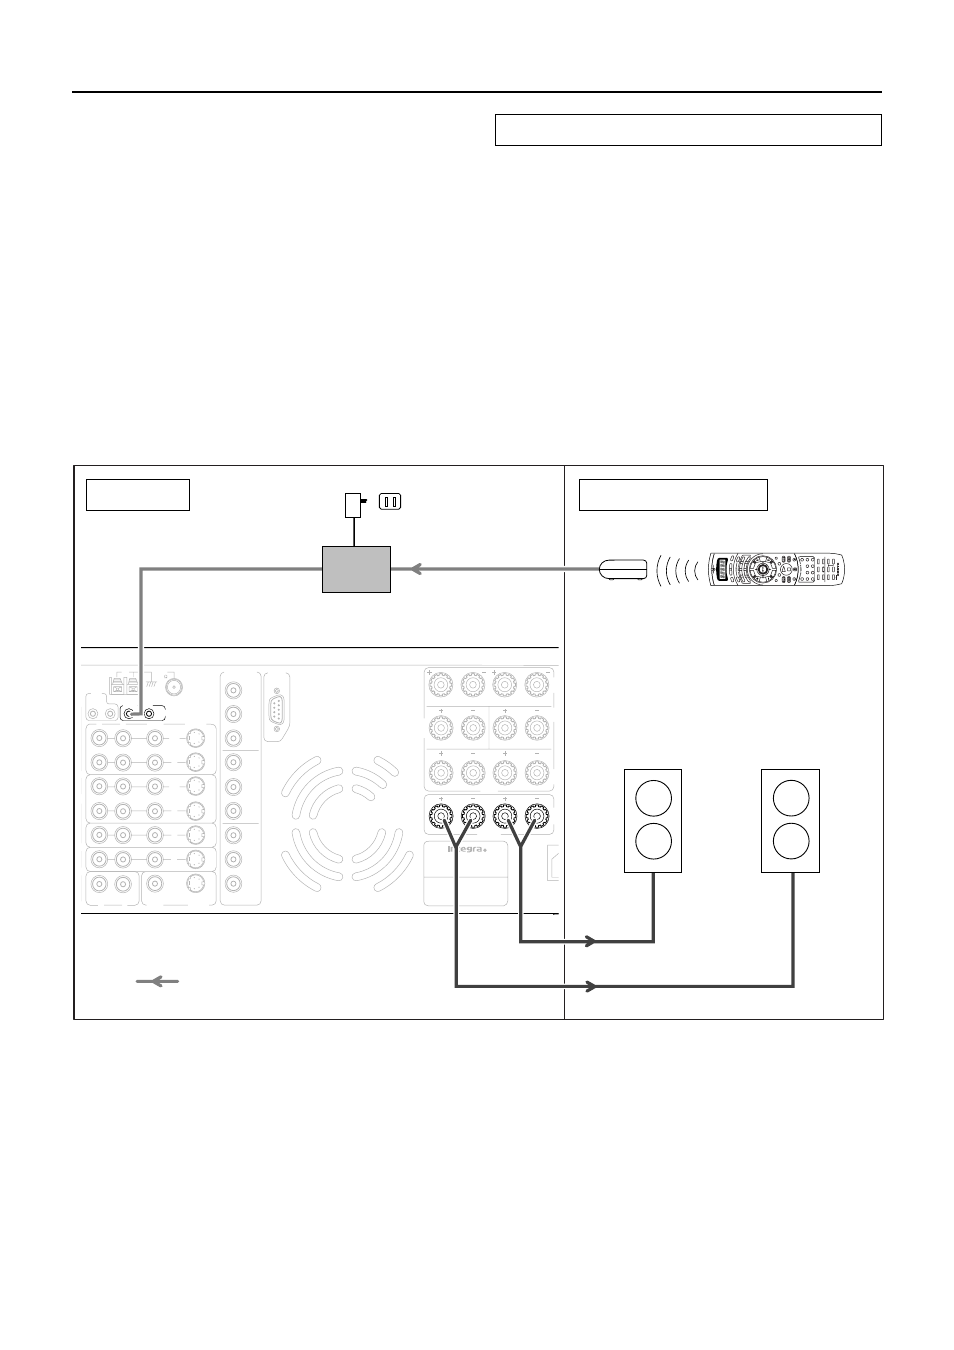
Connecting to the remote zone (Zone 2) input
When using the ZONE 2 SPEAKERS terminals
1. Connect the speaker cables from the speakres
in the remote zone (Zone 2) speaker terminals
on the DTR-7.1.
2. Install the connecting block in the main zone
and connect it to the IR IN ZONE 2 input at the
DTR-7.1.
3. Install the remote sensor in the remote zone
and connect it to the connecting block in the
main zone.
Outline
The IR IN ZONE 2 input allows you to control the DTR-7.1 from
the remote zone (Zone 2) with the remote controller even though
the remote zone is physically separated. The diagram below shows
how to make the proper connections for the remote zone.
The following equipment (sold separately) is essential for
operation from the remote zone:
• Onkyo’s Multi-Room System kits (IR Remote Controller
Extension System), or
• Multiroom A/V distribution and control systems from Niles
®
and Xantech
®
to name a few
Make connection as shown below. Do not plug the equipment into
the power source until the connection is complete.
R
R
R
L
L
L
P
B
P
R
Y
P
B
P
R
Y
P
B
P
R
Y
COMPONENT
VIDEO
ANTENNA
VIDEO
1
V IDEO
2
DVD
MON ITOR
OUT
V IDEO
3
R
L
INPUT 1
INPUT 2
OUTPUT
VIDEO
S VIDEO
VIDEO
S VIDEO
OUT
OUT
I N
I N
I N
I N
FR
SP
SU
SP
SURR
BACK
SPEAKER
ZO
SP
CE
SP
ER
MAIN
ZONE 2
AM
FM
75
12 V
TRIGGER
A
B
RS 232
MODEL NO.
DTR-7.1
AV RECEIVER
ZONE 2
MAIN
IR IN
ZONE 2
OUT
R
L
HOME THEATER CONTROLLER
RC-390M
Zone 2
left
speaker
Zone 2
right
speaker
Remote sensor
Remote controller
Connecting block
DTR-7.1
Connection example for Onkyo’s Multi-room System kit
Mini plug cable
Power supply
Signal flow
Wall outlet
Remote zone (Zone 2)
Main zone