Stall pressure calibration – Graco ULTRA AIRLESS 230-963 User Manual
Page 25
STALL PRESSURE CALIBRATION
I
I
USE EXTREME CAUTION WHEN PERFORMING THIS CALIBRATION PROCEDURE to reduce the risk of a
fluid injection injury or other serious bodily injury which can result from splashing, component rupture, electric
shock, fire, explosion, or moving parts.
This procedure sets the sprayer to 192 bar (2750 psi)
MAXIMUM WORKING PRESSURE. This procedure
must be performed whenever a
new
or
used circuit
board, or pressure control assembly is removed and
reinstalled or replaced, to be sure the sprayer is pro-
perly calibrated.
pressurize and result
in
component rupture, fire or
Improper calibration can cause the sprayer to
explosion.
It
may also prevent the sprayer from ob-
taining the maximum working pressure which would
result in poor sprayer performance.
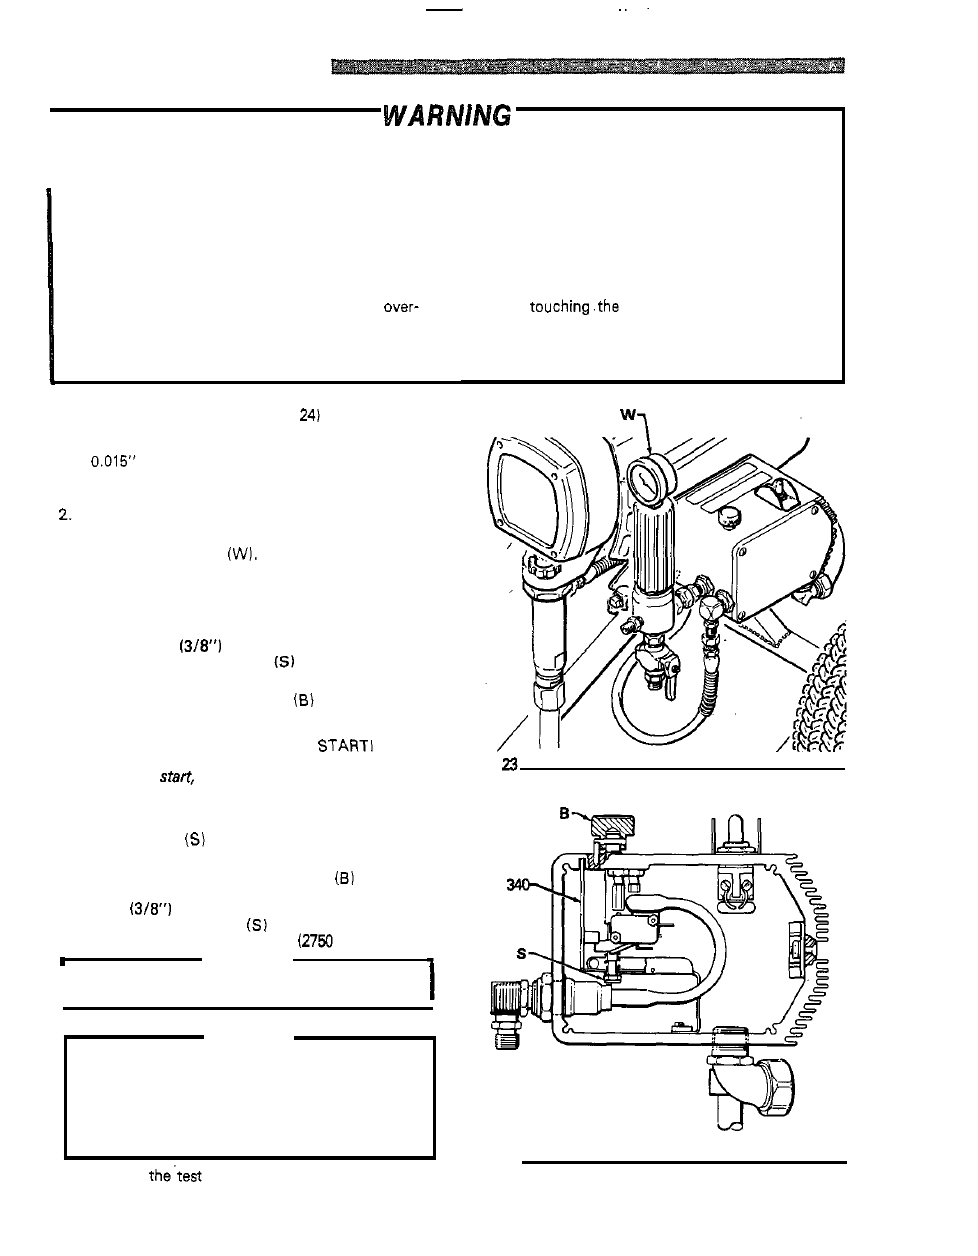
Calibration Setup
(See Fig
and
1. Follow the Pressure Relief Procedure Warning
a
spray tip in the gun. Connect the gun to a
on page 17. Remove the spray hose and gun. Install
outlet.
new test hose and connect the hose to the sprayer
Remove the pressure control screws and cover.
3. Remove the plug from the top of the
fluid filter, and
4. Place the pump suction tube
in
a
5 gallon pail of
install the test gauge
clean water.
5.
Be sure the gun safety latch is engaged.
6. Use a 9 mm
ignition wrench to turn the
pressure adjustment nut
counterclockwise
about
two
full turns. See Fig 24.
7. With the pressure control knob
at
the
minimum
setting, turn the sprayer switch ON.
THE SPRAYER SHOULD NOT
If
it
does
shut the. sprayer switch OFF,
disengage the gun safety latch, trigger
the
gun
into
a grounded waste container until pressure is reliev-
ed. Engage the gun safety latch. Turn the pressure
adjustment nut
a
little further counterclockwise.
Turn the sprayer on to be sure
it does nor
start.
8.
Slowly turn the pressure control knob
clockwise
to the maximum setting and hold
it
there. Use a
9
mm
ignition wrench to slowly turn the
pressure adjustment
nut
clockwise
until
the
test
gauge reads EXACTLY 192 bar
psi).
WARNING
I
Follow the Pressure Relief Procedure Warning
on page
CAUTION
To prevent pump corrosion,
flush the water out of
the pump, hose and gun with mineral spirits. Be
sure to close the drain valve, first. Use the lowest
pressure necessary to flush. Follow the Pressure
the mineral spirits
in
the pump to protect
it
until
Relief Procedure Warning
on page
Leave
you are ready to spray again.
9. Remove
gauge assembly and reinstall the
plug. Flush out water
with mineral spirits.
24
307-671
NEVER attempt to increase the fluid outlet pressure
by performing this calibration in any other way.
NEVER EXCEED 192 bar (2750 psi) MAXIMUM
WORKING PRESSURE. Normal operation of the
sprayer at higher pressures could result in compo-
nent rupture, fire or explosion.
AVOID
wires
in
the pressure control
assembly with your fingers or tools when the control
box cover is removed to reduce the risk of electric
shock.
Fig
Fig
24