Havis-Shields Chevrolet Van Rear Air Vent Adapter Kit KK-C-VAK User Manual
Page 4
KK-C-VAK_INST_10-07
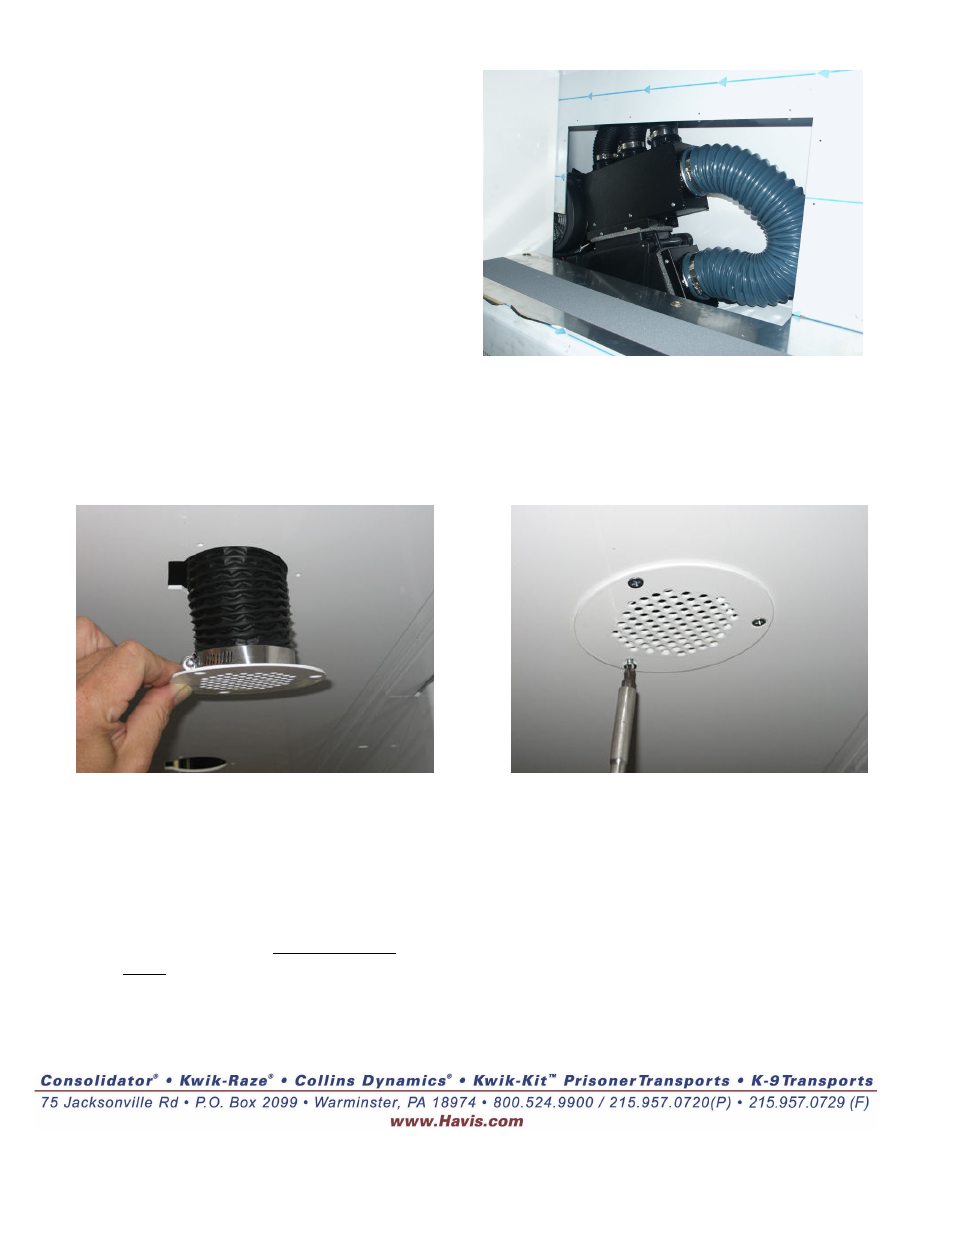
During Kwik-Kit installation you will
be prompted to return to the KK-C-
VAK instruction to attach the hose to
the vent adapter brackets. Route hose
into ceiling holes and cut off any extra
slack.. Attach the hose to the vent
bracket using a 3” hose clamp
Align the three mount holes of the vent adapter cover
with the pre-punched holes in ceiling.
Attach each vent to ceiling using #8 x 3/8” flat head
sheet metal screws.
(Screws included with standard Kwik-Kit hardware)
After Aluminum insert is installed and tested,
attach cover plate to bench / wall to cover
OEM Rear AC/Heat Unit using #10 Sheet
metal screws.
Check that airflow through hoses is
working properly.
With hoses routed to locations, proceed
to install Kwik-Kit unit until you come
to the ceiling instructions. Be sure not
to puncture the hoses with screws, drill
bits, etc…
Attach ceiling pieces on Kwik-Kit,
routing hoses into the corresponding
holes in Kwik-Kit ceiling. Pull through
to minimize slack.
Check airflow again.
- P-MFK-9 (2 pages)
- C-SM-800 (82 pages)
- KR-15XX-ALF-X (2 pages)
- Kwik-Kit KK-120-05 (22 pages)
- Telescoping Computer Base C-TCB-12 (2 pages)
- C-HK (4 pages)
- 1995-2007 Ford Crown Victoria Trak-Mount Kit C-TM-CV (2 pages)
- 2002-2008 Chevrolet Trailblazer & GMC Envoy C-TCB-32 (2 pages)
- Heavy Duty Trak Mount C-TM-F250-1 (2 pages)
- Universal License Plate Bracket C-TIR3-UNV (1 page)
- Heavy Duty Trak Mount C-TM-GMC (2 pages)
- C-VS-0812-CHGR (4 pages)
- KK-K9-C14-K-32 (5 pages)
- 2000-2005 Chevrolet Impala Trak-Mount Kit C-TM-IMP (2 pages)
- C-VS-2400-CHGR (3 pages)
- C-B23 (1 page)
- C-VS-800-CV (4 pages)
- Kwik-Kit KK-100-03 (20 pages)
- Cupholders C-CUP2 Series (2 pages)
- Dodge Charger Spare Tire Bracket C-TTB-CHGR (5 pages)
- KK-K9-C13-K-32 (5 pages)
- Heavy Duty Trak Mount C-TM-EXC (2 pages)
- KK-K9-F12-K (3 pages)
- Telescoping Computer Base Lock C-TCB-LOCK (1 page)
- Slide-Out Radio Tray C-3190 (1 page)
- Computer Laptop Mount and Accessories C-3089's (4 pages)
- 18" Vehicle Specific Console for '04-08 Ford Econoline Van E-250/E-350 (2 pages)
- Half Size Trunk Box Organizer C-TBO-CV (1 page)
- Vehicle Specific Console C-VS-1100-F150 (2 pages)
- C-VS-0309-F250 (4 pages)
- 1997-2007 Dodge Dakota Telescoping Computer Base C-TCB-28 (3 pages)
- KK-F-ST-SS (2 pages)
- GSM33060-1 (1 page)
- 1997-2008 Ford Expedition Interior Window Guards WGI-F14 (1 page)
- K9/Prisoner Transport Unit KK-K9-C20-K-PT (7 pages)
- Four Compartment Prisoner Transport Insert KK-100-07 (3 pages)
- 1996-2008 Crown Victoria Swing-Out Dash Monitor Mount S-DMM-XXX-CV-SO (5 pages)
- Impala C-SM-830 (1 page)
- Cold Cathode Compartment Light KR-CCL Series (1 page)
- Telescoping Computer Base C-TCB-34 (1 page)
- C-TCB-27 (1 page)
- C-3085-UN-1 (1 page)
- Dual In-Dash Microphone Clip Bracket 1996-2007 Ford Crown Victoria C-MCB-CV (2 pages)
- Angled Series Consoles C-AS-MMP (2 pages)
- C-TSM-CHGR-D (1 page)