Modulating the sound (lfo), Adding power and spaciousness (effects), Editing program and effect settings – Roland JD-Xi Analog/Digital Synthesizer (Black) User Manual
Page 9: Saving a sound (program) (write), Am (p. 9), Name: [ent] init program 2
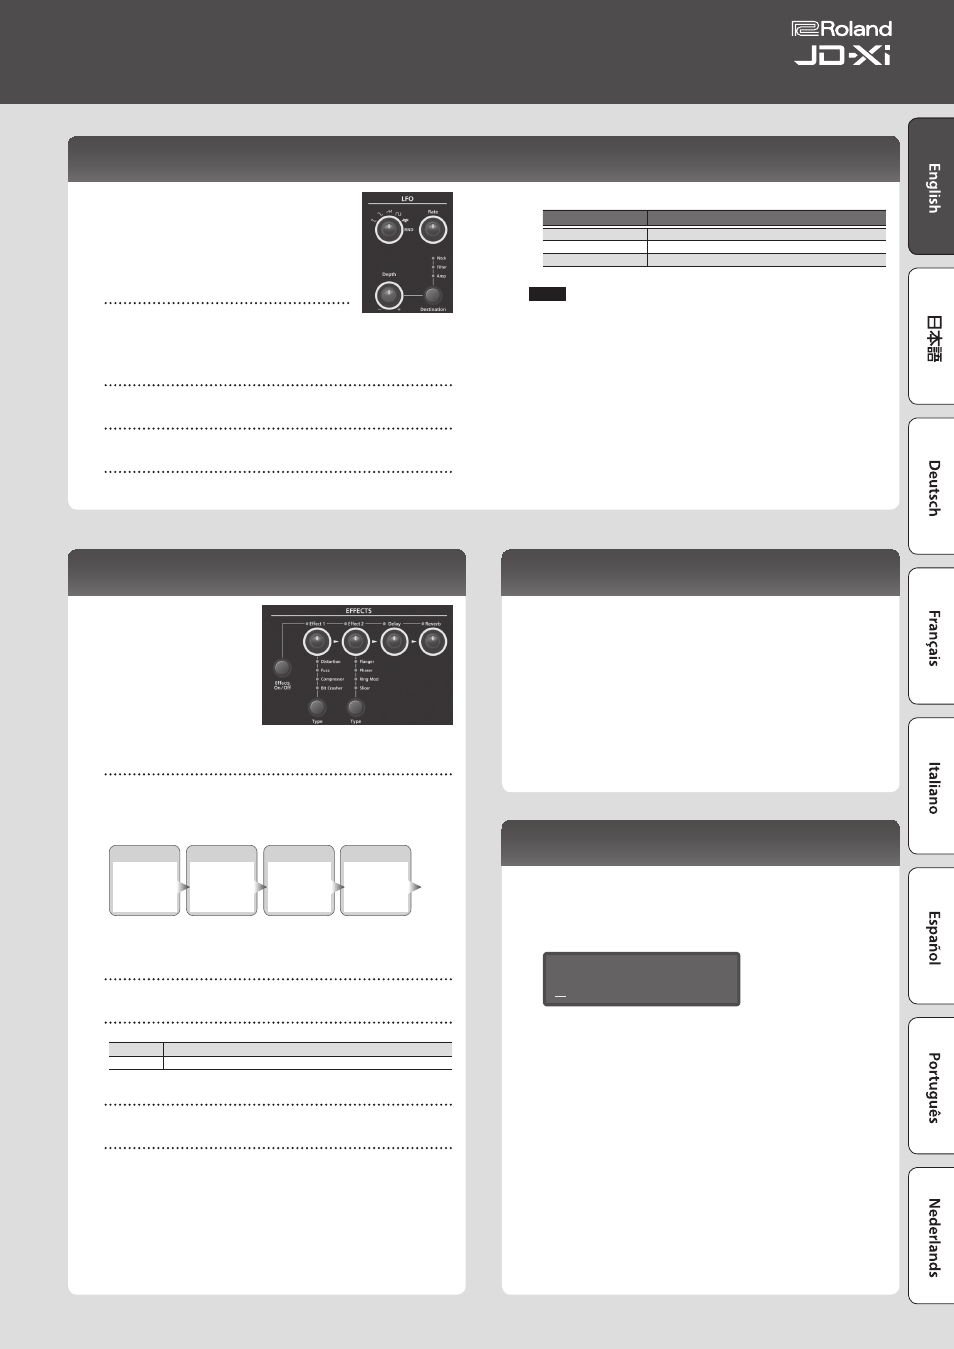
Modulating the Sound (LFO)
LFO stands for Low-Frequency Oscillator. This is an
oscillator with a very low frequency. It can output
several different waveforms, including sine wave,
triangle wave, square wave, and sawtooth wave.
By using the LFO to modulate various aspects of the
audio signal, you can apply effects such as vibrato or
tremolo.
Waveform select knob
This selects the waveform of the LFO.
The waveform whose indicator is lit is selected.
S
(Triangle wave),
R
(Sine wave),
T
(Sawtooth wave),
U
(Square wave),
W
(Sample and Hold), RND (Random wave)
[Rate] knob
This determines the speed of the LFO.
[Depth] knob
This specifies the depth of the LFO.
[Destination] knob
This specifies what the LFO will affect.
The destination whose indicator is lit is selected.
Destination
Explanation
Pitch
Applying LFO to the pitch produces vibrato.
Filter
Applying LFO to the filter produces a wah effect.
Amp
Applying LFO to the amp produces tremolo.
NOTE
The LFO effect is not applied to the Drums part.
Adding Power and Spaciousness (EFFECTS)
“Effects” allow you to modify
or enhance the sound in
various ways, such as by adding
reverberation or delaying the
sound.
[Effects ON/OFF]
button
You can specify the effects that are used by each part. The combination
changes each time you press the [Effects ON/OFF] button. The indicators at
the upper left of each knob light to indicate the available effects.
The audio passes through “Effect 1”
0
“Effect 2”
0
“Delay”
0
“Reverb” in
that order, and only the effects that are turned on will apply.
Effect 1
Distortion
Fuzz
Compressor
Bit Crusher
Effect 2
Flanger
Phaser
Ring Mod
Slicer
Delay
Delay
Reverb
Reverb
&
For details on each effect’s parameters and a routing diagram, refer to
“Parameter Guide” (PDF).
[Effect 1/2] knob
These adjust the depth of the effect.
Effect 1/2 [Type] button
These select the type of effect.
Effect 1
Distortion, Fuzz, Compressor, Bit Crusher
Effect 2
Flanger, Phaser, Ring Mod, Slicer
[Delay] knob
This adjusts the depth of delay.
[Reverb] knob
This adjusts the depth of reverb.
Effect settings are saved individually for each program.
&
“Saving a Sound (Program) (WRITE)” (p. 9)
Editing Program and Effect Settings
1
Press the [Menu/Write] button.
2
Use the Cursor [
K
] [
J
] buttons to select “Program Edit,” “Tone Edit,”
or “Effects Edit,” and then press the [Enter] button.
The edit screen for each item appears.
3
Use the Cursor [
K
] [
J
] buttons to select the parameter that you
want to edit, and use the Value [-] [+] buttons to edit the value of
that parameter.
&
For details on the parameters, refer to “Parameter Guide” (PDF).
4
When you’ve finished editing, press the [Exit] button several times
to return to the top screen.
Saving a Sound (Program) (WRITE)
A sound that you create will change if you move the knobs or if you select a
different tone or program. It will also be lost if you power-off the JD-Xi.
When you’ve created a sound that you like, you should save it as a program.
1
Hold down the [Shift] button and press the [Menu/Write] button.
The name input screen appears.
Name: [Ent]
Init Program
2
Use the Cursor [
K
] [
J
] buttons to move the cursor, and use the
Value [-] [+] buttons to select characters.
3
When you’ve specified the name, press the [Enter] button.
4
Use the Program (Pattern) Value [-] [+] buttons to select the save-
destination.
* If you specify a number in which data is already saved, the
program name is shown in the lower line. Saving to this number
will overwrite the program, erasing the previous data.
5
Press the [Enter] button.
A confirmation message appears.
6
Press the [Enter] button.
A screen indicating Complete ! appears, and the data is saved.
If you decide to cancel, press the [Exit] button.
* NEVER turn the power off while you are saving settings.
9
Owner’s Manual