Preparations, Installation, Attaching the stand – Samsung S95UA 49" 1440p HDR 120 Hz Curved Ultrawide Monitor User Manual
Page 9: Installation 9, Chapter 02
9
Preparations
Chapter 02
Installation
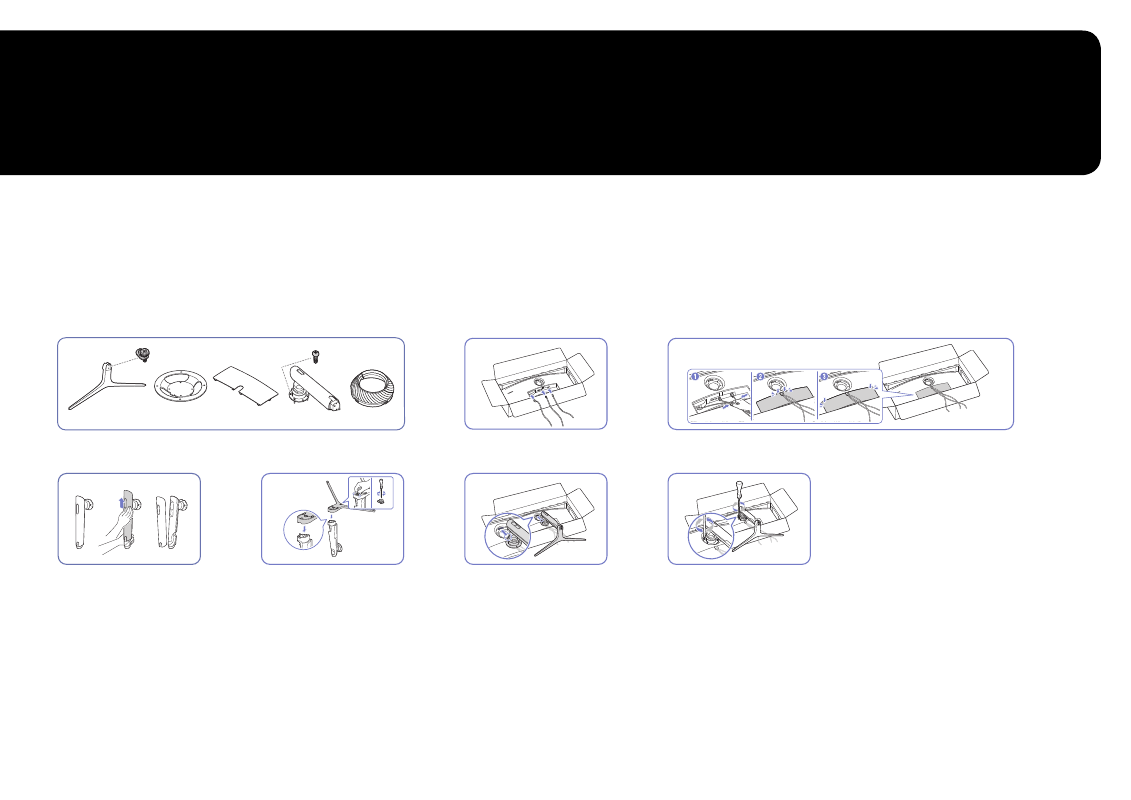
Attaching the Stand
―
Disassembly is the reverse order of assembly.
x 2
x 4
1
2
Connect the corresponding cables.
Collect cables and then align them with the center groove of COVER REAR SUB.
Assembly the COVER REAR SUB on the rear of the product.
3
4
5
6
Remove the COVER STAND BODY REAR
by pulling it in the direction as shown
in the figure.
Insert the stand base into the stand
neck in the direction as shown in the
figure.
Place the stand neck on the monitor as
shown in the figure.
Fasten the screws at the top of the
stand neck.
This manual is related to the following products:
- G40B 25" HDR 240 Hz Gaming Monitor G32A 32" 16:9 165 Hz FreeSync LCD Gaming Monitor Odyssey G51C 27" 1440p 165 Hz Gaming Monitor G52A 32" 16:9 165 Hz IPS Gaming Monitor Odyssey Neo G9 49" 32:9 Ultrawide Curved Adaptive-Sync 240 Hz HDR VA Gaming Monitor 49" Odyssey G9 32:9 240 Hz Curved HDR G-SYNC VA Gaming Monitor Odyssey G7 31.5" 16:9 240 Hz Curved VA G-SYNC HDR Gaming Monitor Odyssey G7 26.9" 16:9 240 Hz Curved VA G-SYNC HDR Gaming Monitor C32G75TQSN 31.5" 16:9 240 Hz G-Sync Curved LCD Gaming Monitor Odyssey G7 T1 Faker Edition 31.5" 16:9 Curved Adaptive-Sync 240 Hz QHD HDR VA Gaming Monitor Odyssey G5 32" 1440p HDR 165Hz Curved Gaming Monitor G5 Odyssey 34" 21:9 Curved 165 Hz FreeSync WQHD HDR VA Gaming Monitor S4 24" 16:9 FreeSync IPS Monitor with Pop-Up Webcam LS24C770TS-ZA S3 27" Curved Display ViewFinity S70A 32" 16:9 4K VA Monitor Viewfinity S80TB 27" 4K HDR Monitor Odyssey G70B 28" 4K HDR 144 Hz Gaming Monitor 398 Series C27F398 27" 16:9 Curved LCD Monitor C49RG9 49" 32:9 120 Hz Curved FreeSync HDR VA Gaming Monitor 390 Series C24F390 24" 16:9 Curved FreeSync LCD Monitor