Quick start guide — mvc 121, cont’d, Step 3, Caution – Extron Electronics MVC 121 User Manual
Page 6
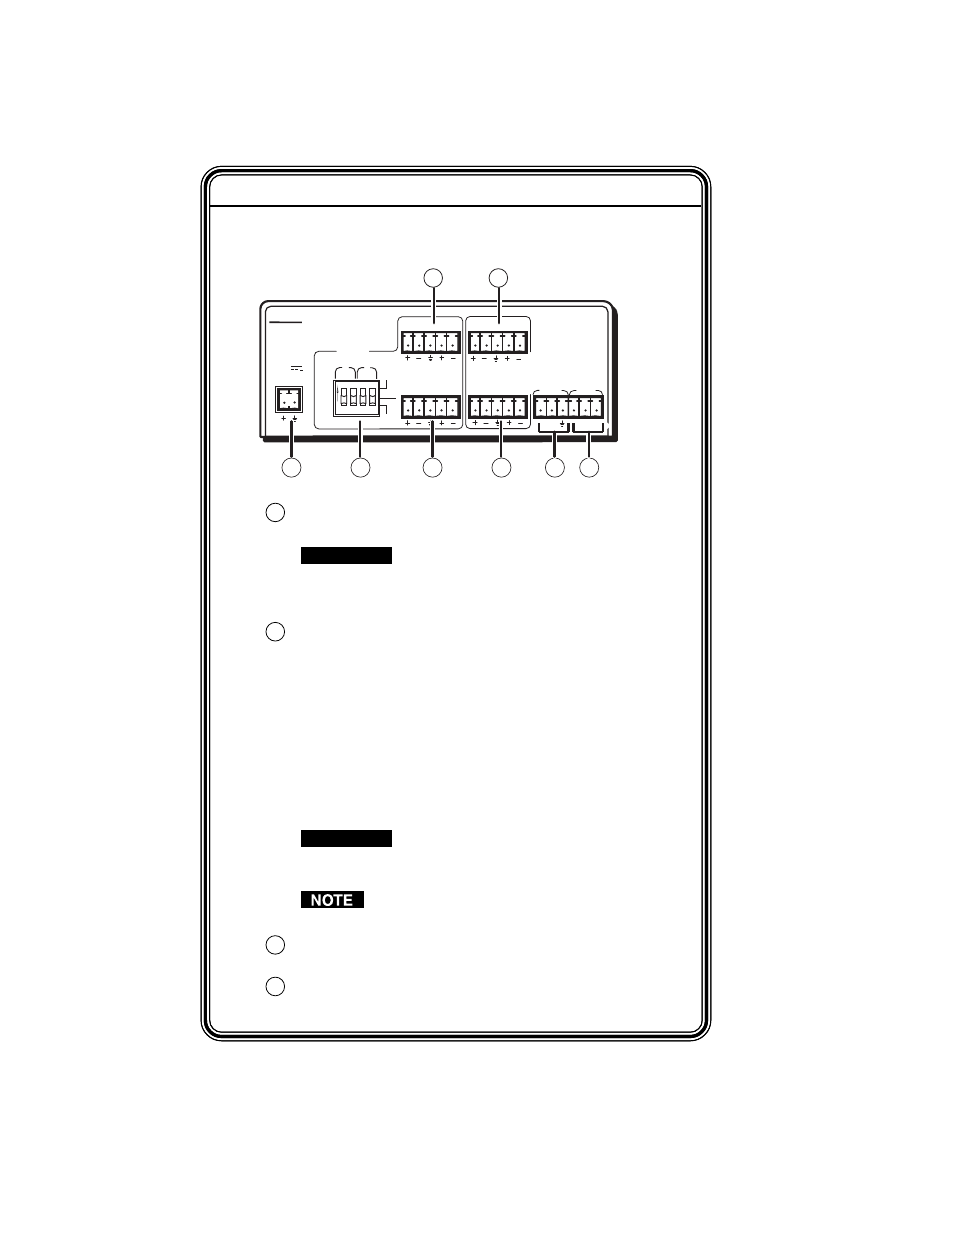
Quick Start Guide — MVC 121, cont’d
MVC 121 • Quick Start Guide
QS-2
Step 3
Attach the cables and set the DIP switches.
MVC 121
ON
INPUTS
OUTPUT
S
LEVEL
48V
ON
OFF
MAIN 3
LINE
MIC
RS-232
MUTE
Tx Rx
POWER
12V
0.5A MAX
L
1
2
R
3
1
2
3
4
1 2 1 2
MIXER/VOLUME
CONTROLLER
FIXED
L
R
MIC 1
MIC 2
VARIABLE
L
R
7
8
1
2
3
5
4
6
1
Power connector
— Connect the 12 VDC external power
supply.
CAUTION
When connecting the power supply, voltage
polarity is extremely important. Applying power
with incorrect voltage polarity could damage the
power supply and the MVC 121.
2
Mic input DIP switch
— Mic 1 and Mic 2 inputs are controlled
via the DIP switch.
1.
Set the mic input Level according to the mic type:
a.
Wireless mic: Set the mic’s DIP switch to Line (On).
b.
Wired mic: Set the mic’s DIP switch to Mic (Off).
2.
Set the 48V phantom power according to the mic type:
a.
Condenser mic: Set the mic’s DIP switch to On.
b.
Dynamic mic: Set the mic’s DIP switch to Off.
CAUTION
Never set a dynamic microphone to 48V, doing so
may damage the microphone. For condenser mics,
verify that the mic will safely operate at 48VDC.
When the DIP switch is set to line level, 48V phantom
power is disabled regardless of its DIP switch position.
3
Mic 1 and Mic 2 input connector
— Up to two mono
microphones, balanced and/or unbalanced, may be connected.
4
Main 3 line level input connector
— Connect a line level audio
source.