Sk krája cesnaku, Návod na obsluhu – Ernesto Meat Tenderiser User Manual
Page 6
6
GB
We offer the statutory 3-year warranty on this product.
Claims can only be processed in conjunction with the
purchase receipt. Parts subject to wear and consuma-
bles are not subject to claims under warranty. The ser-
vice life depends on individual usage and application
of the product and is therefore variable.
Important: In order to ensure prompt and effective
processing, please always contact our service team in
the fi rst instance. Many things can be remedied by
telephone, which helps you and us to save time and
costs.
If you have any questions about replacement parts, que-
ries on the operation or function of our articles, please
send them by email to [email protected].
Enjoy your meals!
Rub the metal ring in the lower part and the thread with cooking oil. This increases the sliding property and
the container with the cutting sieve turns more easily.
Did you forget to clean the Garlic Cutter or can it only be opened or turned with diffi culty? No problem: place
the Garlic Cutter until the locking screw for approximately 5 minutes in hot water. The garlic juice loses its
sticking property - you can easily dismantle the device for cleaning.
Tip
As a basic principle the complete Garlic Cutter can be cleaned in the dishwasher. To avoid that dishwater
penetrates in the upper part, you should take care that the upper part is placed vertically in the dishwasher.
In case of water ingress you have to shake the liquid out.
After cleaning and reassembly of the Garlic Cutter, always leave the locking screw open, this way the locking
clip in the upper part remains elastic.
Important!
The transparent perforated plate at the stamp
(see fi gure 3) is cleaned automatically (only clean
with water or in the dishwasher) and must not
be removed in any case. If not observed the de-
vice is no longer functional.
Figure 3:
19
SK
Krája cesnaku
SK
Návod na obsluhu
Otvorením areta ného krúžka a vytiahnutím vrchnej asti je krája cesnaku znovu otvorený a môžete ho
opä
naplni cesnakom.
Vážená zákazní ka, vážený zákazník,
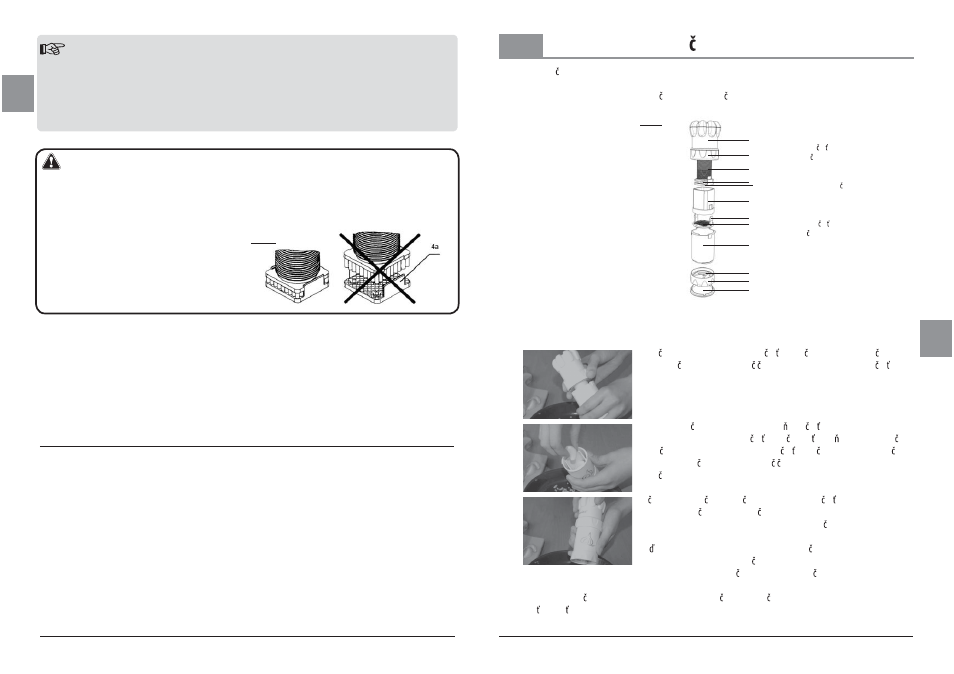
(1) vrchná as
(2) areta ný krúžok
(3) závit
(4) razidlový lis
(4a) priesvitná došti ka s dierami
(5) nádobka
(6) spony ostrej mriežky na rezanie
(7) ostrá mriežka na rezanie
(8) spodná as
(9) prie ny nôž
(10) spodný krúžok
(11) uzatváracie veko
1
2
3
4
4a
6
5
7
8
9
10
11
skica 1:
gratulujeme Vám k zakúpeniu Vášho krája a cesnaku. Krája pozostáva z nasledovne popísaných jednotlivých
dielov:
Krája cesnaku držte za spodnú as , areta ným krúžkom otá ajte proti
smeru otá ania hodinových ru i iek a pritom vytiahnite vrchnú as (pozri
obrázok 1).
Ošúpaný strú ik cesnaku (tvrdú kore ovú as najprv odrežte nožom)
vložte do nádobky a vrchnú as krája a opä zasu te do spodnej asti.
Areta ný krúžok postavte na spodnú as krája a a upenite ho oto ením
proti smeru otá ania hodinových ru i iek na doraz.
Krája cesnaku je teraz zatvorený a pripravený na krájanie.
To ením vrchnej asti krája a doprava (spodnú as pritom držte pevne
v ruke) sa strú ky cesnaku tla ia ces ostrú mriežku, kde sa krájajú na
pravoúhle pásiky. Tieto sa potom krájajú prie nym nožom, ktorý sa
nachádza v spodnom krúžku, na malé, pravidelné kocky.
Ke sa plastové kolíky razidlového lisu pretla ia celkove cez otvory ostrej
mriežky, tak bol cesnak pretla ený na 100% a nádobka je úplne prázdna.
Dorazový bod chráni krája cesnaku pred preto ením.