Gb garlic cutter, Instructions for use – Ernesto Meat Tenderiser User Manual
Page 4
4
GB
Garlic Cutter
GB
Instructions for use
By opening the locking screw and withdrawing the upper part, the Garlic Cutter can be opened again
and refi lled.
Dear customer,
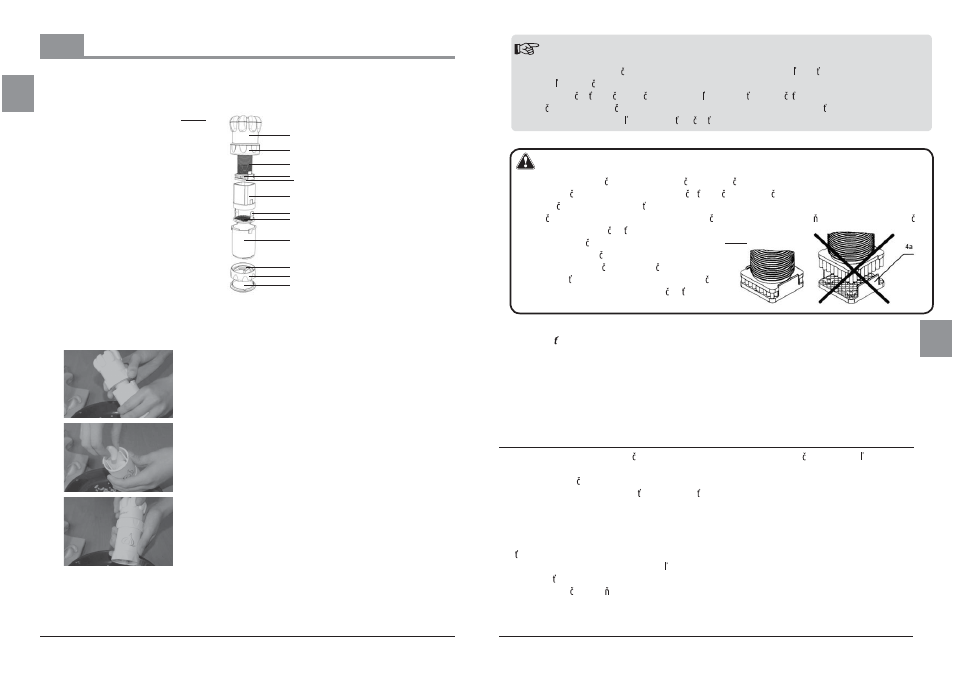
(1) Upper part
(2) Locking screw
(3) Thread
(4) Stamp
(4a) Transparent perforated plate
(5) Container
(6) Clips of the cutting sieve
(7) Cutting sieve
(8) Lower part
(9) Transverse cutter
(10) Lower ring
(11) Cover
1
2
3
4
4a
6
5
7
8
9
10
11
Figure 1:
Congratulations on the purchase of your garlic cutter. It consists of the parts described in the following:
Hold the Garlic Cutter at the lower part, untwist the locking screw counter
clockwise and remove the upper part (see fi gure 1).
Put the peeled garlic clove (cut off the hard end of the garlic clove with a
knife beforehand) into the container and slide the upper part again in the
lower part. Place the locking screw on the lower part and turn clockwise
until the end stop.
Now the garlic cutter is closed and ready for use.
By turning the upper part clockwise (hold the lower part with the hand)
the garlic clove is cut into rectangular strips with the cutting sieve. These
are cut in small even cubes by the transverse cutter of the lower ring.
After the plastic pins of the stamp have been pressed completely through
the openings of the cutting sieve, the garlic is used 100 % and the con-
tainer completely empty. The stop pin prevents an over twisting of the
Garlic Cutter.
21
SK
Tento výrobok podlieha povinnej záru nej lehote 3 rokov.
Nároky zo záruky vybavujeme iba po predložení potvr-
denia o kúpe. Na sú iastky podliehajúce opotrebeniu
a na spotrebné tovary sa záruka nevz ahuje. Životnos
závisí od spôsobu zaobchádzania a používania výrob-
kov a je preto variabilná.
Dôležité upozornenie: Aby sme reklamácie mohli vy-
bavi rýchle a efektívne, prosíme Vás, spojte sa zásad-
ne najprv s naším servisným oddelením. Ve a vecí je
možné vybavi vopred telefonicky a to nám ako aj
Vám ušetrí mnoho asu a pe azí.
Objednávky náhradných astí, otázky oh adne obsluhy
alebo funkcie naších výrobkov zašlite prosím písomne
na emailovú adresu: [email protected].
Dobrú chu !
Kovový krúžok v spodnej asti a závit namažte jedlým olejom. To zvýši k zavos a nádobka s ostrou mriežkou
sa o to ahšie otá a.
Zabudli ste o isti krája a krája sa preto nedá ahko otvori resp. otá a ? To nie je žiadny problém: Postavte
krája cesnaku po areta ný krúžok na cca 5 minút do horúcej vody. Cesnaková š ava tým stratí svojú lepiacu
silu - a Vy môžete prístroj ahko rozobra a o isti .
Rada
Zásadne je celý krája cesnaku vhodný na istenie v my ke na riad. Na zamedzenie vniku oplachovacej vody
do vrchnej asti dbajte na to, aby vrchná as krája a bola v my ke postavená kolmo. Ak vnikne voda do
vrchnej asti musíte ju odstráni vytrepaním.
Krája na cesnak uchovávajte s otvoreným areta ným krúžkom, aby si upev ovacia spona vo vrchnej asti
zachovala svoju elasti nos .
Pozor!
Priesvitná došti ka s dierami na razidlovom lise
(pozri skicu 3) sa istí automaticky (oplachujte
ju iba vodou alebo istite ju v my ke na riad) a
niesmie by na žiadny prípad odstránená. V opa
nom prípade prístroj stratí svoju funk nos .
skica 3: