Ò³ãæ 20, Timer recording, Play mode – Curtis DVD2100 User Manual
Page 20
19
a. If you select
Weekly
, press the
SELECT
button to confirm.
Move the cursor to the right control unit in the row, and press the
SELECT
button to pop up a week lis t, as shown in the chart. Select
a proper value according to your need.
b. If you select
Daily
press the
SELECT
button, the date input
editor box will appear on the right. Highlight the box and press the
SELECT
button, then use the number butt ons to e nter the dat e in
the form of
MM/DD/YY
, press the
SELECT
button to confirm.
If the input is illegal, the system will prompt an input error message. At the same time, the
Date Input Editor
Box
will be left empty. Please enter the date again.
Timer Recording
6. Set up the starting time of recording:
In the
Item Editor
dialog box, use the arrow buttons and the
SELECT
button to highlight the
Start
option and the input box. Enter a value between 0:00 and 23:59 with the number buttons and press the
SELECT
button to confirm. This function is used to set up the starting time of the recording. If the input value is beyond the
range of 0:00-23:59, the system will give an invalid message..
7. Setup the end time of recording.
The operation is similar to Step 8.
This setting means: when the end time is reached, the recording process
will be stopped and the unit turns to standby status.
Item Editor
OK Cancel
Ch029
Source
Quality
Mode
Date
Start
End
SP
Weekly
0 1 / 0 1 / 0 5
1 2 : 3 1
1 3 : 0 1
Weekly
Item Editor
OK Cancel
Ch029
Source
Quality
Mode
Date
Start
End
SP
Weekly
0 1 / 0 1 / 0 5
1 2 : 3 1
1 3 : 0 1
Weekly
Item Editor
OK Cancel
Ch029
Source
Quality
Mode
Date
Start
End
SP
Weekly
0 1 / 0 1 / 0 5
1 2 : 3 1
1 3 : 0 1
Weekly
8. After completing setup of various parameters of timer recording, highlight
the OK location, press the
SELECT
button, and finish setting up a timer
recording schedule.
9.Press the
TIMER
button to exit the timer recording setup menu.
10.After setting up the timer recording schedule, configure the system
according to the schedule and make sure the system is in standby or
working status.
11.If the system is conducting another operation five minutes before the
schedule time, it will pop up an information box, prompting you whether
to start recording or not. If the recording condition is met, highlight the
OK button and press the
SELECT
button to confirm.If the information box is left attended, the system will take
it as a consent to record. After a while, it will start the recording according to the set schedule.
12.If the system is in standby status, it will enter the recording mode automatically 2 minutes in advance and start
recording to the set schedule.
13.After completing the recording, the system will restore the status before the recording automatically.
The system must be properly configured with the set values before completing expected recording jobs.
Select any timer recording item and press the
ADD/CLEAR
button to delete it.
Do not use the finalized DVD+R disc
Note
01MP3
04MP3
1
2
Track 1
Track 1
Track 2
Track 2
Track 3
Track 4
Track 5
Track 6
Track 7
Track 8
1
2
1
2
MP3
VCD
DVD
CD
28
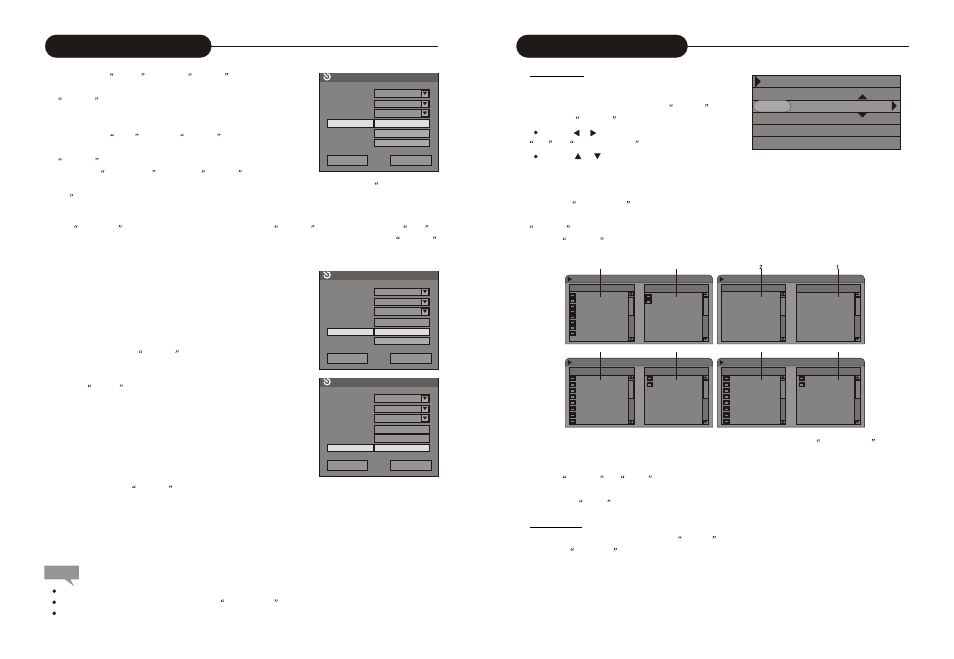
This function enables the system to play designated title,
chapter or track according to the order you set.
1. Select the Play Mode Control value as
Program
,
and press the
SELECT
button.
Press the or button to move the cursor between
File
an
Favorite/Program
.
Press the or button to move the cursor up and down within a certain list box.
1) In the Program Play List Box, you can add your favorite content.
2) This is the Disc Content List Box.
2. Press arrow buttons to move the cursor in the Disc Content List Box to your favorite item.
3. Press the
ADD/CLEAR
button and the item will appear in the Program List Box.
If the item you select in the Disc Content List Box contains sub items, such as a title of a DVD disc, press the
SELECT
button and the sub item list will pop up in the Content List Box. If you select the first item in the list,
press th e
SELECT
button and the Content List Box will restore its original content. For detailed operations,
see the following charts
Program Play
Play Mode
File Play
File Type: Audio
Mode: Program
Trick: Play
Audio: Stereo
Time: 00:02:48-00:51:25
01.MP3
02.MP3
03.MP3
04.MP3
05.MP3
06.MP3
07.MP3
08.MP3
File Play - Stop 0:00:08-0:01:48 Edit Program List
File Play
Favorite/Program
Title01 Title01 Chapter01
Title02 Title02 Chapter02
Title03
Title04
Title05
Title06
Title07
Title08
Title Favorite/Program
VCD Edit Program List
Track Favorite/Program
Track01 Track 01
Track02 Track 02
Track03
Track04
Track05
Track06
Track07
Track08
CD DA.....Play 00:00:18-00:02:34
FilePlay Favorite/Program
4. Press the arrow buttons to select an item in the Program List Box, and press the
ADD/CLEAR
button to
delete the item.
1.After adding the content you desired to the Program List Box, move the cursor to the Program List Box, and
press the
SELECT
or
PLAY
button. The system then will play the content in the Program List Box in
Normal Play mode.
2.Pressing the
PROG
button directly is another way program play operation.
1. Set the value of the menu control item as
Random
. The system will start Random Play.
2. Press the
RANDOM
button and the system will alternate between Random Play and Normal Play.
In this mode, the system will randomly play the chapters or tracks of the disc.
Random Play