Ò³ãæ 19, Timer recording, Play mode – Curtis DVD2100 User Manual
Page 19
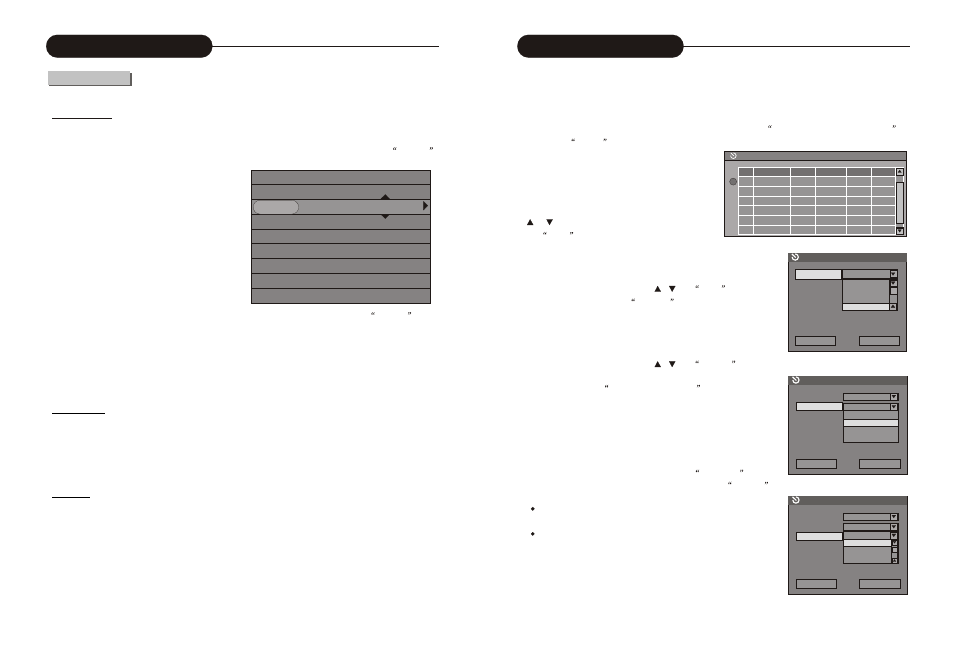
Timer Recording
18
This function enables the unit to start recording according to the preset requirement once the scheduled time is
reached. After the recording is done, the unit is in standby status. To start timer recording, set up a recording
schedule at first and configure the system according to the requirement.
If you are busy and you don't want to miss interesting programs, the unit can satisfy your need. Before setting
up the timer recording, set the system clock first.(For instructions, see
ystem Setup: System Clock Setting
).
1. Press the
TIMER
button to enter the timer recording schedule setup menu, as shown in the chart to the
right.
There are 8 records in this menu. Each
record represents a recording schedule.
2. In the timer recording setup menu, use the
or button to select a record, and press
the Select
button.
3. Setup the input source
In the Item Editor dialog box, use the , and
Select
buttons to select the value of
SOURCE
.
1
2
3
4
5
6
W
Record scheduler
Signal Source Quality Date Start End
Ch007 SP 12/01/03 14:41 15:11
Item Editor
Source
Quality
Mode
Date
Start
End
OK Cancel
Ch009
1 2 : 5 3
1 3 : 2 3
Rear CVBS
Rear S-VIDEO
SCART
Ch009
4. Set up the recording quality
In the Item Editor dialog box, use the , and
SELECT
buttons to select the quality value. For more in formation about
recording quality, see
Basic Information: Terms
for reference.
HQ, SP, EP, SLP.
5. Setup the recording date
This setting is done with the third control unit in
Item Editor
dialog box. Move the cursor, select the row, and press the
SELECT
button to initiate the drop-down menu, as shown in the chart.
The setting may arrange a timer recording everyday, or on
some day of every week, or on a certain day of the year.
There are three options in the list. Their meanings are as
follows.
Weekly: recording every week.
Daily: recording everyday
Once: recording on a certain date
Item Editor
OK Cancel
Ch009
SP
HQ
SP
EP
SLP
1 3 : 2 3
Source
Quality
Mode
Date
Start
End
Item Editor
OK Cancel
Ch009
1 3 : 2 3
Source
Quality
Mode
Date
Start
End
SP
Once
Once
Daily
Weekly
29
Play Mode
Play Process Control
In this section, we will introduce how to control the play process.
Menu Operation
Most of the play process control operations can be done through the menu. The operations are as follows.
1. Enter the play control bar menu, use the arrow buttons to select the status-play item and press the
SELECT
button.
DVD
MODE Normal
TRICK Play
TILTE 01/01
CHAPTER 02/14
AUDIO 01/03-OTH
SUBTITLE 01/01-OTH
ANGLE 01/01
T-TIME 00:02:48-00:51:25
2. Use the arrow buttons to select corresponding values according to your need, and press the
SELECT
button.
The Process Control Item has the following values. Each value corresponds with an operation. Some discs might
not contain all the values as follows.
Play, FFx2~FFx32 (The numbers indicate the speed of fast forward play),
Stop, FBx2~FBx32 (The numbers indicate the speed of fast back play),
Pre-stop, Slow 1/2~ Slow 1/8(The fractions indicate the speed of slow play),
Pause,
1. Press the button, the system will go forward to the next chapter (DVD) or the next track (VCD, etc.) and start
playing.
For DVD discs, only the forward operation within a title is allowed.
2. Press the button, and the system will play fast forward. With every press, the forward play sp eed will gai n. F or
MP3 discs, such operation is invalid.
1. Press the button of the remote controller, the system will go back to the previous chapter (DVD) or the previous
track (VCD, etc.) and start playing.
2. Press the button, and the system will play fast backward. With every press, the backward play speed will reduce
gradually.
Back Play
Forward Play