Ò³ãæ 12, System setup, System connection – Curtis DVD2100 User Manual
Page 12
36
System Setup
Screen Saver
The Screen Saver function means that when the unit is idle (or without monitored output) for some time, some
interesting picture screen saver pictures will appear automatically.
1. In the General Settings menu, use the or button to move the cursor and select the Screen Saver
item.
2. Press the
SELECT button and the
Screen Saver
item will drop down a list as shown in the chart.
3. Use the or button to move the cursor, and select
ON
or
OFF
.
4. Press the
SELECT
button to enable or disable the Screen Saver
function.
When the screen saver appears, press any button to exit it.
7. Press the
RETURN
button to return to the upper level menu
and set up other items.
Progressive/Interlace
1. In the General Settings menu, use the or button to move the
ursor, select the
Progressive/Interlace
item and press the
SELECT
button.
2. Select the Progressive or Interlace option for video scan output
mode, and press the
SELECT
button to confirm.
* This function can do by press
PS/IS
button in the remote controller.
Video Output Format
1. In the General Settings menu, select the
Video Output Format
item and press the
SELECT
button to drop down a menu.
2. Select PAL or NTSC.
3. Press the
SELECT
button to confirm.
This setting must be in accordance with the TV system, Otherwise the
video output might not work properly.
Restore Factory Settings
1. In the General Settings menu, use the or button to select
the
Restore Factory Settings
item and press the
SELECT
button. The OSD will display as follows.
2. Use the or button to select
OK
.
3. Press the SELECT
button to restore all default settings.
When your unit doesn't work properly, it may probably result
from some wrong settings. Please try the
Restore Factory
Setting
function to see if the unit can restore to its normal
working status.
1
System Setup (General)
Screen Saver
Progressive/Interlace
Video Output Format
Restore Factory Settings
ON
ON
OFF
OK
1
System Setup (General)
Screen Saver
Progressive/Interlace
Video Output Format
Restore Factory Settings
On
Interlace
Progressive
Interlace
1
System Setup (General)
Screen Saver
Progressive/Interlace
Video Output Format
Restore Factory Settings
On
Interlace
NTSC
PAL
NTSC
1
System Setup (General)
On
Interlace
NTSC
OK
OK
Cancel
Screen Saver
Progressive/Interlace
Restore Factory Settings
System will reset all setup
item to the default values.OK
to confirm.Cancel to exit.
11
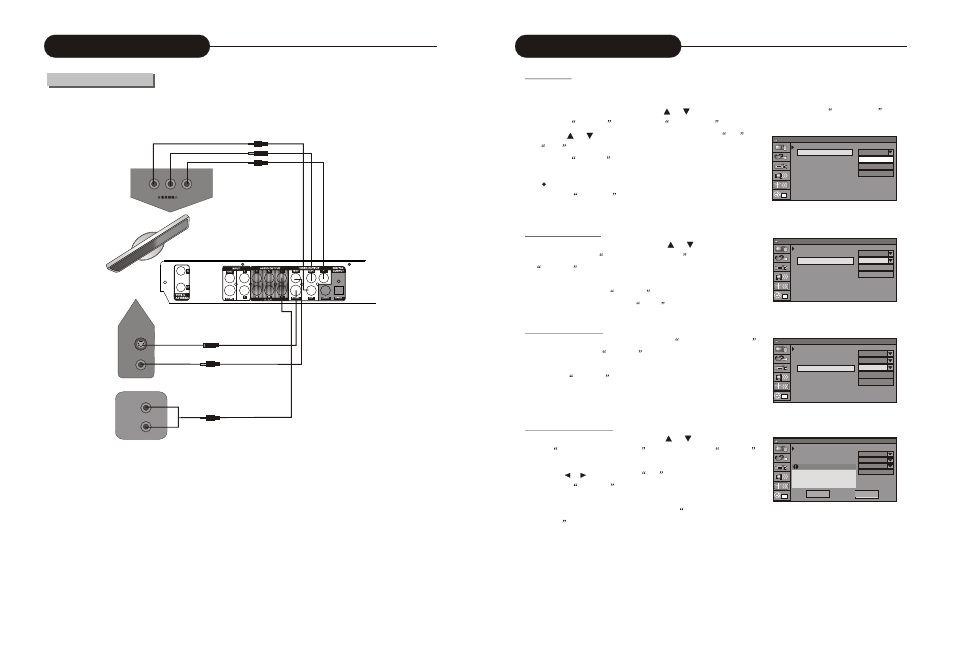
System Connection
Connected to a TV
Before the system connection, be sure to switch off the power source of this unit and other devices.
lThere are three kinds of video outputs in the unit, namely component video, S-Video and composite video.
You can select one of the available video outputs of the TV and then make the connection.
lIn terms of picture quality, the component video is the best; S-Video comes next, while the composite
video is less satisfying.
lWhen connecting the audio output of the unit to the TV, connect the left and right audio outputs to the TV
audio inputs of the same group as the connected video inputs.
Cr
Cb
Y
S-video
Video input
Rear Panel of the Unit
S-Video /Input
Video Input
TV
Audio input