Operation nd 1100 quadra-chek setup – HEIDENHAIN ND 1100 Quick Start User Manual
Page 4
2
Preparing to probe position
1. Power up the ND 1100
• Check connections to the ND 1100.
• Press the POwER SwITCH to power
the ND 1100. Then press the FINISH
key to display the DRO screen.
2. Find machine zero (otional)
Move the stage to cross reference
marks or find hard stops if your system
was set up to establish machine zero at
startup.
Note:
A repeatable machine zero is required
when SLEC error correction is used.
Refer to the User’s Guide for detailed
information.
3. Select a unit of measure
Press the IN/MM soft key to toggle
between inches and mm.
4. Select a datum
Press the ABS/INC soft key to toggle
between absolute and incremental
datum.
Creating a datum
A current probe position can be zeroed
or preset to a value and then used as a
datum.
1. Zero a position
Move the crosshairs
or touch probe to the
desired datum position
and press an AXIS key to
zero the position on the
corresponding axis.
2. Preset a position
• Move the crosshairs or touch probe to
the desired datum position and press
the PRESET soft key.
• Press the Axis key corresponding to
the axis to be preset.
• Enter a preset value and press the
ENTER key.
Probing a position
Position is probed with crosshairs or
with a touch probe.
1. Probing with crosshairs
Move the stage to position the crosshairs
over the desired point. The position will
be shown on the LCD screen.
2. Probing with touch probe
• Move the touch probe to the desired
point. The position will be shown on
the LCD screen.
• when PRINT EDGES is enabled in the
PRINT setup screen, the position will
be printed upon touch probe contact.
Reporting Results
Press the SEND key to print
probed positions on a USB
printer or send position data
to a PC over the RS-232 serial
connection. The report format
is specified in the PRINT Setup
screen.
Operation
ND 1100 QUADRA-CHEK
Setup
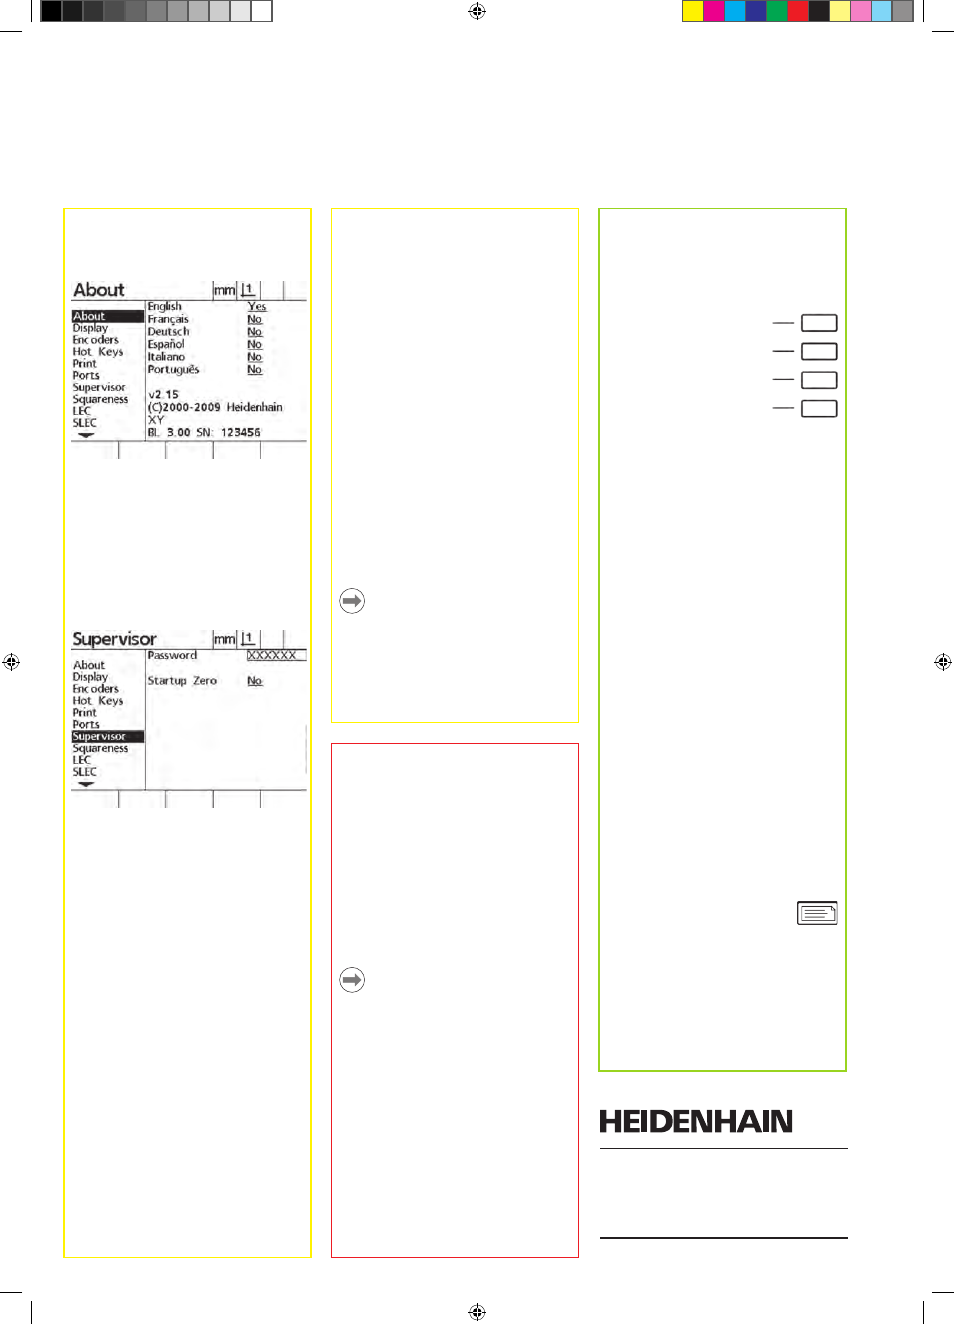
2. Select the language
Highlight the desired language field
press the YES soft key and then press
the ENTER key.
3. Enter Password
• Use the ARROw CURSOR keys to
navigate to the SUPERVISOR setup
screen.
• Highlight the PASSwORD field,
enter the password and then press
the ENTER key.
• Enable STARTUP ZERO if a machine
zero will be used for SLEC error
correction.
4. Encoder setup
• Use the ARROw CURSOR keys to
navigate to the ENCODERS setup
screen.
• Select an axis and enter the required
encoder parameters
• Repeat setup for all axes.
5. Touch probe printing (optional)
when touch probes are used, positions
can be printed upon probe contact.
• Use the ARROw CURSOR keys to
navigate to the PRINT setup screen.
• Enter the desired edge detection
parameters for printing axis position
when the probe makes contact.
6. Calibrate stage squareness
• Align the squareness calibration
artifact to the reference axis.
• Press the MENU soft key, press the
SETUP soft key and then navigate to
the Squareness screen.
• Choose a MASTER AXIS, enter the
calibration artifact ANGLE, and press
the TEACH soft key.
• Follow instructions on the screen.
7. Error correction
Linear and segmented linear error
correction methods can be used to
compensate for encoder and machine
errors. Refer to the ND 1100 User Guide
for instructions.
8. Measurement scaling
Linear measurement scaling can be
applied when measuring parts that
expand or shrink.
• Press the MENU soft key, press the
SETUP soft key and then navigate to
the SCALE FACTOR screen.
• Enter the desired MULTIPLIER,
highlight the ACTIVE field and press
the YES soft key to enable scaling.
9. Display formatting
• Press the MENU soft key, press the
SETUP soft key and then navigate to
the DISPLAY SCREEN.
• Enter the desired display resolutions
and other parameters.
Note:
Many more setup functions are available
beyond the minimum parameters
discussed here. Refer to the ND 1100
User Guide for detailed instructions.
DR. JOHANNES HEIDENHAIN GmbH
Dr.-Johannes-Heidenhain-Straße 5
83301 Traunreut, Germany
{ +49 8669 31-0
| +49 8669 5061
E-mail: [email protected]
www.heidenhain.de