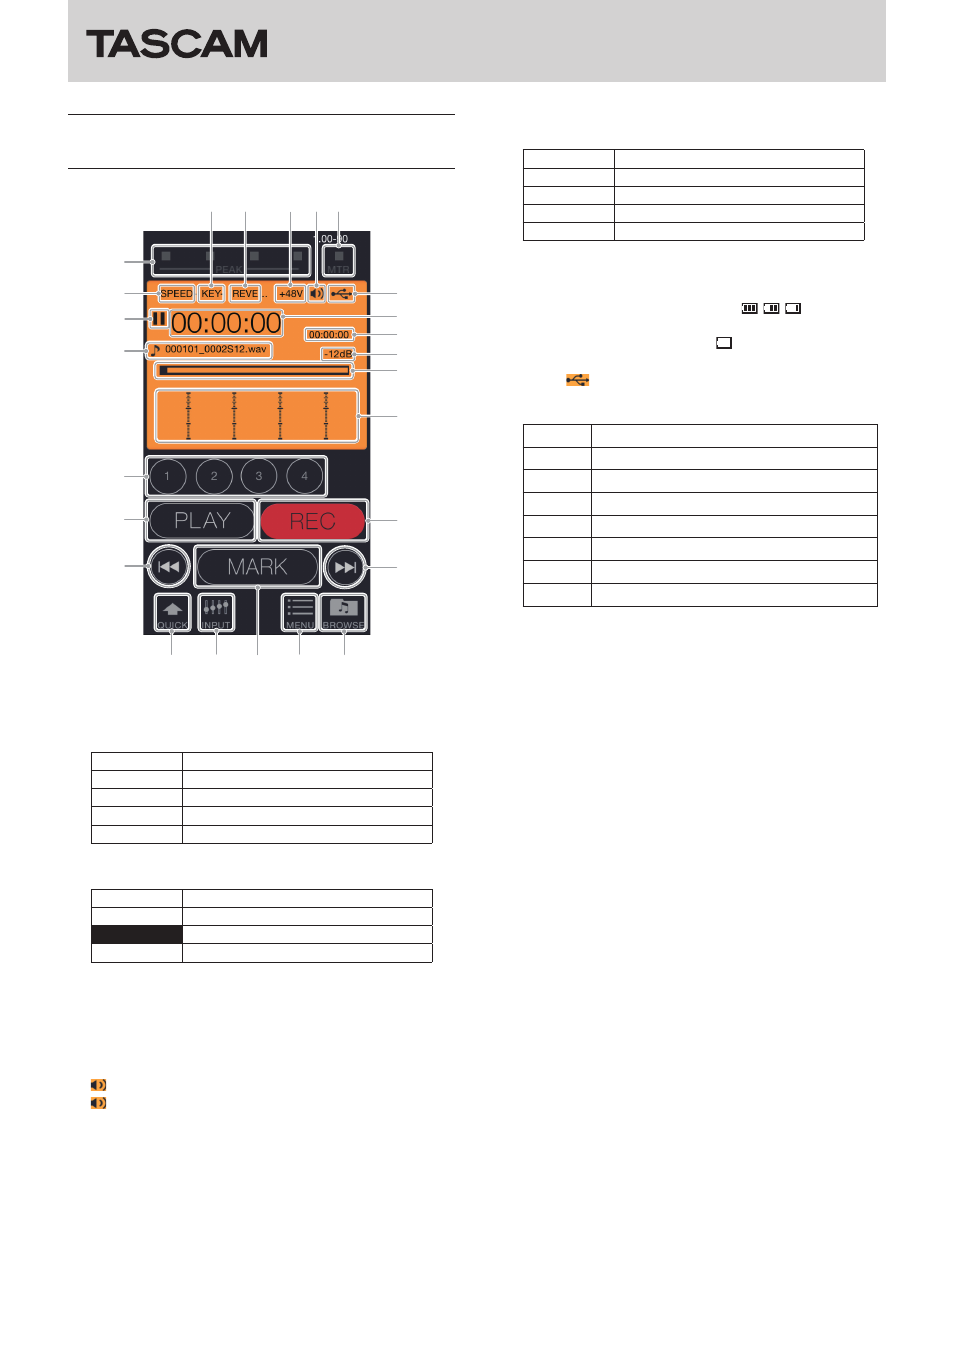
Dr-44wl tascam dr control home screen, Tascam dr control – Teac DR Control User Manual
Page 7
TASCAM DR CONTROL
7
TASCAM DR CONTROL
DR-44WL TASCAM DR CONTROL Home
Screen
p
i
a
s
f
g
d
0
e
t
r
8
q
2
3
4 5 6
9
w
7
1
u
o
y
1
PEAK indicators
This shows the status of the PEAK indicators on the unit.
2
Key control function on/off status
This shows the key control function status of the unit.
Icon
On/off status
No indicator Key control off
KEY È
Key control on (Higher)
KEY ─
Key control on (Lower)
KEY Ï
Key control on (function disabled)
3
Reverb on/off status
This shows the status of the unit reverb.
Icon
On/off status
No indicator Reverb off
REVERB
Reverb on (recorded)
REVERB Reverb on (used for monitoring)
4
Phantom power status
This shows the phantom power supply status of the DR unit.
No icon: Phantom power off
+48V : 48V phantom power supplied
+24V : 24V phantom power supplied
5
Speaker output
shown: speaker output on
not shown: speaker output off
6
MTR indicator
This appears when the DR unit is in MTR mode.
7
Playback speed setting status
This shows the playback speed status of the unit.
Icon
Playback speed
No indicator Playback speed not changed
SPEED È ×1.1 – ×2.0
SPEED ─ ×0.5 – ×0.9
SPEED Ï When playback speed not controllable
8
Power supply status
This shows the power supply status of the DR unit.
When a battery is being used, a battery icon shows the
amount of power remaining in bars ( , , ).
The battery is almost dead and the power will soon turn off
(standby) if the icon has no bars .
When using the included GPE053B AC adapter or USB bus
power,
appears.
9
Recorder operation status
This icon shows the DR unit's operation status.
Indicator Meaning
8
Stopped
9
Paused
7
Playing back
,
Searching forward
m
Searching backward
/
Skipping to the beginning of the next file
.
Skipping to the beginning of the previous file
0
Elapsed time
This shows the elapsed time in hours: minutes: seconds.
q
Remaining time
This shows the remaining time in hours: minutes: seconds.
w
File name
This shows the name of the file being played or recorded.
e
Peak value in decibels (dB)
This shows the peak value in decibels (dB) of the DR unit.
r
Playback position/slide bar
The unit's playback position is shown by a bar. You can drag
the slide bar to change the playback position.
t
Level meters
These show the unit's level meters.
y
TRACK/INPUT buttons
Press these buttons during recording (4CH mode) or
recording standby (MTR mode) to select recording channels
on the DR-44WL.
Selected buttons blink.
When the “INPUT SETTING” screen is open, press one of these
buttons to show the track to set.
u
PLAY/PAUSE/STOP button
Use this button to start and stop playback of the DR unit.
When playback is stopped, press this button to start playback.
Press this button during playback to pause playback at the
current position.
Press when recording to stop recording.
i
REC/REC PAUSE button
Press this button to stop recording by the unit.
When stopped, press this button to put the unit into recording
standby. The button will start to blink.
When in recording standby, press this button to start
recording.
Press when recording to pause recording. The button will
start to blink.
o
. button
Press to return to the beginning of a file that is playing or
stopped in the middle.
Press and hold this button to search backwards.