Rear panel – Measurement Computing 6224 User Manual
Page 8
1-2 General Information
6224
User’s Manual
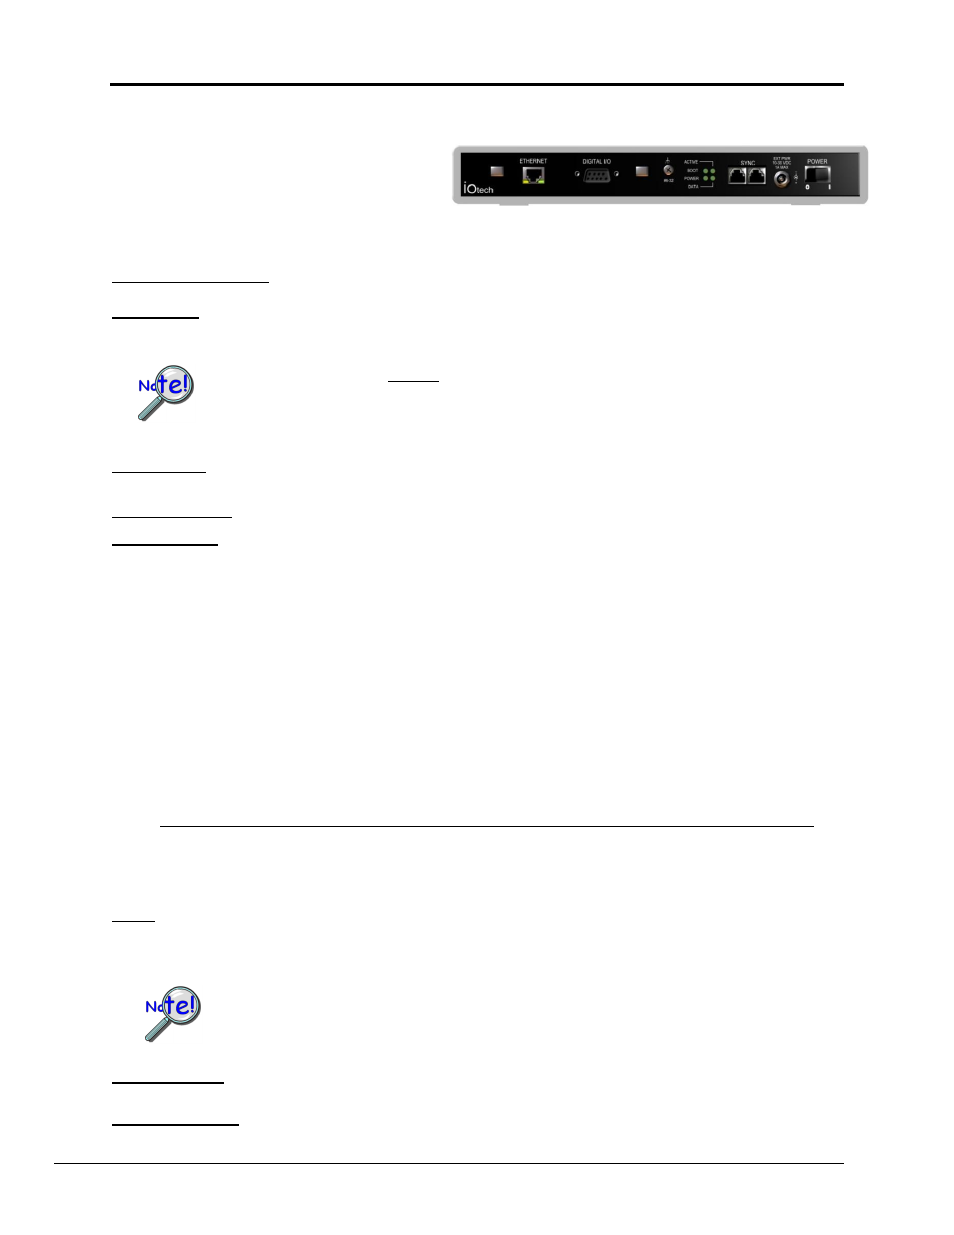
Rear Panel
The following items reside on the rear panel; from
left to right: 1
st
cable tie mount, Ethernet jack,
DB9-Digital I/O port, 2
nd
cable tie mount, #6-32
chassis ground screw, four status LEDs, two
synchronization jacks, a power input jack, and a
power switch. A description of each follows.
CABLE TIE MOUNTS: Two cable tie mounts are present to provide for strain relief of cables.
ETHERNET: The 10/100BaseT Ethernet port can connect to the Ethernet port of the host PC, or to an Ethernet
network. The Ethernet connector has two built in LEDs that indicate traffic flow on the network.
Refer to Accessories in the Specifications chapter for Ethernet cables available from Measurement Computing.
When connecting the unit directly to a PC (i.e., when not connecting to a network hub) you
will need to use an Ethernet crossover cable.
Ethernet cable length must be <3 m (9.8 ft) in order for the system to be CE Compliant.
DIGITAL I/O: Eight digital I/O lines are accessible via a 9-pin, female DSub connector. For details, refer to the
Digital I/O section of the Specifications chapter.
GROUND (#6-32): Provides a connection point for Chassis Ground via use of a #6-32 machine screw.
STATUS LEDS:
Power
„ON‟ when the device is connected to a sufficient power source and the power switch is
in the „l‟ (On) position.
Boot
During initial power up, the Boot light will be On to signal the first stage boot process.
When this has completed successfully, the Boot light will remain Off. If an internal
error is detected during this first stage boot process, this light will be blinking. Contact
Measurement Computing to arrange repair service.
Active
During initial power up, the Active light will be Off during the boot process, including
network configuration. The process will complete with a fast Blink, and then steady On
condition. With both the Power and Active lights On, the device is in the Ready state.
After this, the Active light will signal communications with a host computer at a slower
blink rate.
Data
The Data light will be On any time the device is acquiring channel data that is available
to the host PC control software.
Note:
After turning on the device, it can take up to 2 minutes to reach ready state, depending on
network settings. This can be monitored by the LED sequence:
Power Light On Boot Light On then Off Active Light Off, then Blinking, then On.
SYNC: Two “synchronization ports” provide a means of synchronizing units regard to pre-trigger data and post-
trigger scanning. Note that each 6000 Series device is capable of being designated as a Master Unit, Slave Unit, or
Terminating Slave Unit. The assignment is made in Encore. Refer to the following section, Synchronization, for
details. Refer to Accessories in the Specifications chapter for SYNC cables available from Measurement Computing.
Up to nine units can be synchronized. The total combined length of the SYNC cables is not
to exceed 2.438m (8 ft).
POWER INPUT: +19 VDC to +30 VDC, through a connector on the chassis. Power is typically supplied to the
device via a TR-60U, 24VDC universal power supply.
POWER SWITCH: A switch with a “0” label for Power Off, and a “ ” for Power On.