Ivoclar Vivadent OptraGate User Manual
Page 2
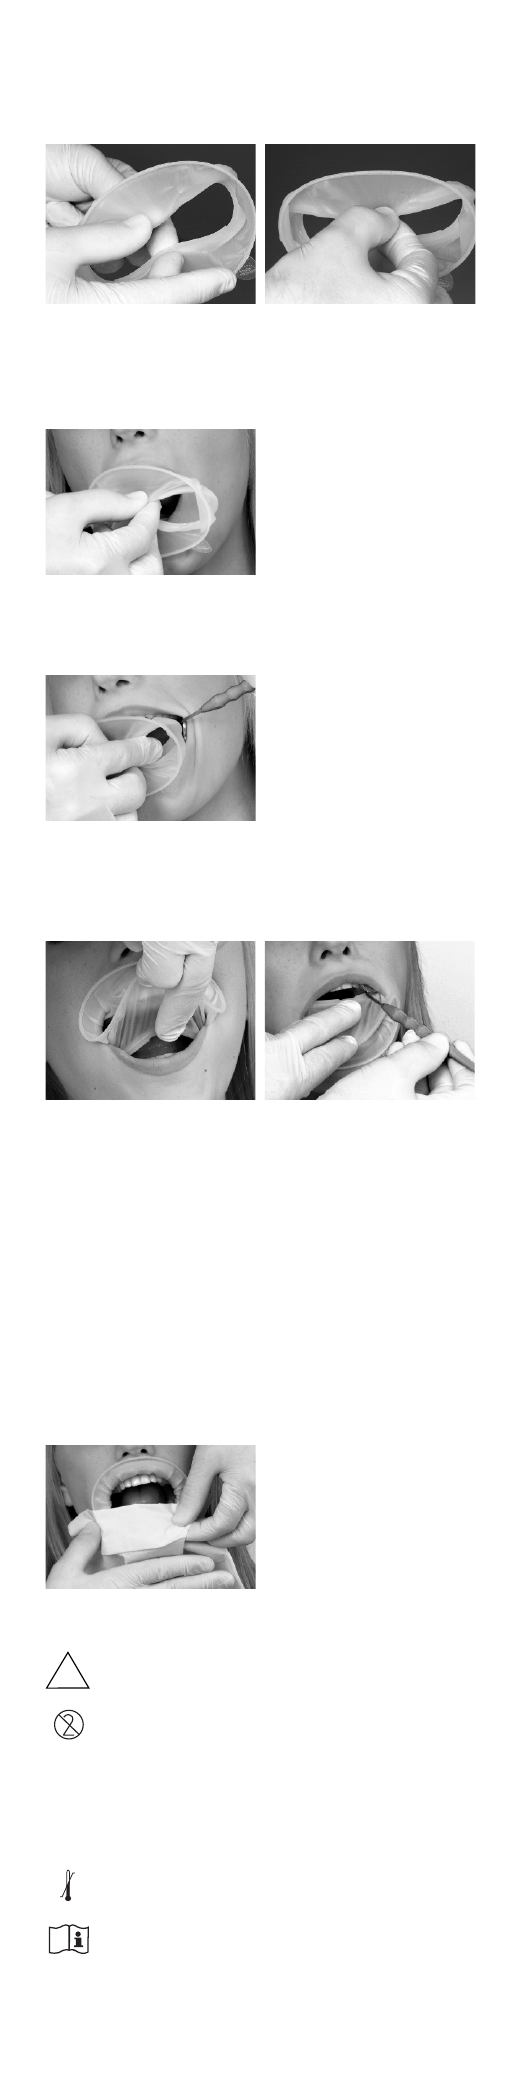
2. OptraGate may be inserted from both the 12 o’clock position with the
patient lying down, or from the 8 o’clock position with the patient sitting
upright (or, the 4 o’clock position if the clinician is left-handed).
3. To ease placement, with the tabs pointing downward, the operator
should grasp the thicker intraoral ring by reaching through the thinner
extraoral ring. The inner ring should be held between the thumb and
middle finger and pressed together slightly (see Figure 2).
Fig 2: Correct hold on the intraoral ring with thumb and middle finger.
The intraoral ring is slightly compressed in the process.
4. The slightly compressed intraoral ring is then inserted into the buccal
corridor on one side, so that the elastic component embraces the corner
of the mouth and the outer ring is still located extraorally (see Figure 3).
Fig 3: The thicker intraoral ring is positioned between the teeth
and the corner of the mouth.
5. As soon as the OptraGate is securely in place on one side, the other side
is inserted in the same manner by slightly bending it (see Figure 4).
Fig 4: The intraoral ring is positioned behind the two corners of the mouth.
6. Subsequently, the intraoral ring is placed behind the lower and upper
lips and thus OptraGate assumes its final, stable position (see Figure 5).
The intraoral ring can be inserted with more ease if the patient’s mouth
is relaxed.
Fig 5: Final positioning behind the lower and upper lip.
If, in individual cases, the intraoral ring should show a tendency to slip out of
the gingivobuccal fold if the mouth is closed completely, positioning of the
intraoral ring deeper inside the vestibule is usually sufficient to solve the
problem. Sometimes, the use of another size may also be a solution.
The securely positioned OptraGate improves the overall view and accessibility
of the working field. Lateral movements of the mandible and opening of the
mouth to various degrees may provide additional space and access to the
treatment area. OptraGate may even be left in place when checking
occlusion.
7. To remove OptraGate, grasp the extraoral ring in the lower area with
the help of a paper towel and lift it slightly so that the intraoral ring is
loosened from the lower gingivobuccal fold (Figure 6). The intraoral ring
can then be easily removed from the upper gingivobuccal fold and
hygienically disposed of using the paper towel.
Fig 6: Removal of OptraGate
Notes
–
OptraGate is not sterile and thus not suitable for use with oral
surgical or implantological procedures.
–
OptraGate is for single use only.
–
It cannot be reused. The material is not suitable for sterilization. Cleaning
and disinfecting agents may have a detrimental effect on the material
and lead to undesirable reactions in the patient.
–
When used in tooth whitening procedures, care should be taken that no
bleaching material gets caught between OptraGate and the oral soft
tissues to prevent an irritation of the skin and mucous membrane.
–
OptraGate should be stored at 2–28 °C / 36–82 °F.
–
These Instructions for Use are also available at the website of
Ivoclar Vivadent AG (www.ivoclarvivadent.com).
Keep out of the reach of children!
For use in dentistry only!
NON
STERILE
2°C
36°F
28°C
82°F
2