Installing the back supply plenum, Ductwork, Continuous capture plenum hoods – Greenheck Canopy Hoods (452413 IOM) User Manual
Page 9: Install the supply duct collar, Hang the plenum, Exhaust, Supply
Kitchen Hoods • Type I and Type II
9
®
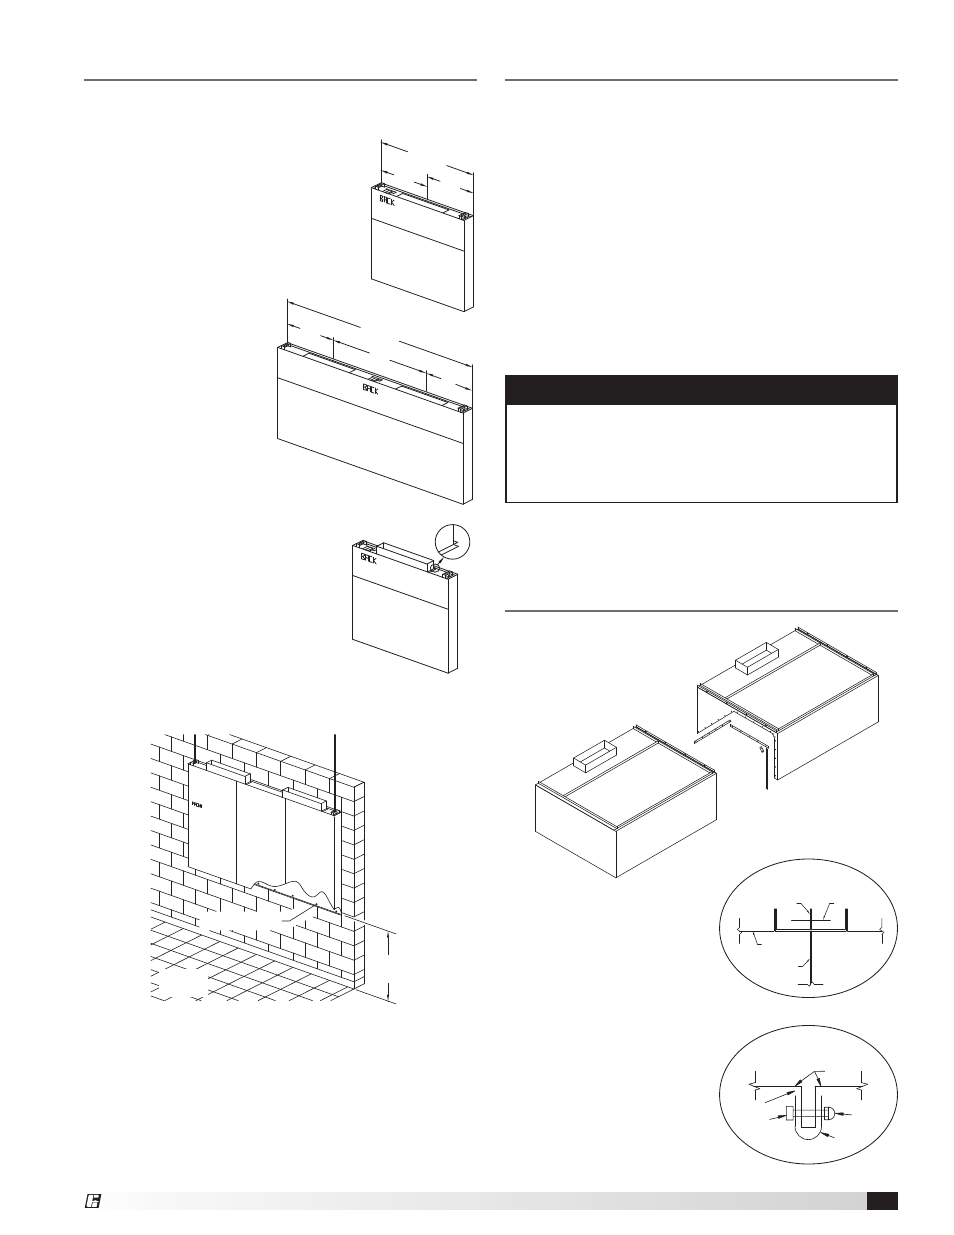
Installing the Back Supply Plenum
Install the Supply Duct Collar
1. Find the center of the back supply plenum.
2. If the back supply plenum is to have
one opening, cut the opening such
that it is centered at L /2 from the
plenum end. (Fig. 1)
3. If the back supply plenum is to have
two openings, cut openings such
that they are centered at L /4 from
each end of the plenum.
(Fig. 2)
4. Place the duct
collar(s) over the
opening(s), fastening
with screws or
tack-welds every
4 to 6 in. (10.16 to
15.24 cm). (Fig. 3)
Hang the Plenum
5. Hang the back
supply plenum
from the ceiling.
The back supply plenum
needs to be mounted 31.25 in.
(79.375 cm) above the finished
floor. This is measured from the
lowest rear edge of the back
supply plenum to the finished
floor. (Fig. 4)
Hang using threaded rod
placed through the hanger brackets.
6. Fasten the back supply to the wall, going through the
lower back supply wall.
•
These fasteners are to help maintain the location of
the back supply, and are not intended to hold the
weight of the back supply unit.
•
The fasteners should not interfere with the
removable air diffusers.
Ductwork
Exhaust
- As specified in NFPA 96, Ch. 7.5 (latest
edition), exhaust duct systems must be constructed in
the following manner:
Materials: Ducts shall be constructed of and supported
by carbon steel not less than 1.37 mm (0.054 in.) (No.
16 MSG) in thickness, or stainless steel not less than
1.09 mm (0.043 in.) (No. 18 MSG) in thickness.
Installation: All seams, joints, penetrations, and duct to
hood collar connections shall have a liquid-tight external
weld. If you have an automatic fire damper, please refer
to that manual for installation instructions now.
Supply
- Supply ductwork (where applicable) should
be connected to the hood in a manner approved by the
local code authorities.
For proper installation of duct collars when they are
shipped unattached, see page 8.
NOTE
For hoods with fire dampers in the exhaust and
supply duct collars, an access panel for cleaning and
inspection shall be provided in the duct. This panel
shall be as close to the hood as possible but should
not exceed 18 in. (45.72 cm).
Continuous Capture Plenum Hoods
1. Remove the support angles
provided for support during
shipping on the open
end panels. Install
and level both
hoods.
2. After leveling, secure the
hoods together by tack-
welding and/or bolting the
angles that are located at
the top of the hoods along
its width (Fig. 5).
3. Next, fasten the hoods
together at its inside
plenum profile using
u-clips and bolts (Fig. 6).
Caulk this joint with NSF
Approved silicone caulk
(GE SCS1009 or its
equivalent). The caulk is
not provided.
Fig. 5
BOLT OR WELD
HOOD TOP
HOOD END
SUPPORT ANGLES
CAULK
BOLT
U-CLIP
HOOD
ACORN
NUT
Fig. 6
Fig. 3
L (MODULE LENGTH)
L/2
L/4
L/4
Fig. 2
L/2
L/2
L (MODULE LENGTH)
Fig. 1
FASTENERS HOLDING THE
BACKSUPPLY TO THE WALL
31.25 INCH
CRITICAL
DIMENSION
Fig. 4
2. RAIS
AND
3. FAST
4. FAST
5. CAU
& CAP
1. REM
HOOD FRONT
HOOD FRONT
REMOVE
SUPPORT
ANGLES ON
THE OPEN
END PANEL