9 positioner functions (no display required), 1 live manual tuning (adjusting the gain), 2 local control of valve position – Flowserve 500+ Series Logix User Manual
Page 30: 3 command source reset, 4 factory reset, 5 viewing version numbers, Positioner functions (no display required), Anual, Uning, Djusting the
User Instructions - Logix® 500+ Series Digital Positioners FCD LGENIM0105-10 11/13
flowserve.com
30
9 POSITIONER FUNCTIONS (No
Display Required)
The following features can be performed using the local
interface. No display is required for these features.
Additional features are offered with the use of a display,
Handheld or DTM.
NOTE: In order to prevent unintentional adjustments of
the configuration, tuning, or control of the valve, the Tamper
Lock feature may be used. This is set in the DTM and
disables the buttons and menus except for the ability to view
the status of the positioner. When locked, the positioner may
be temporarily unlocked by entering a PIN. (An LCD is
required to enter the PIN.) Or, the positioner can be
unlocked from the DTM.
9.1
Live Manual Tuning (Adjusting the
Gain)
Use the Selectable GAIN Switch to adjust the gain at any
time during operation. This adjustment takes effect
immediately. For faster response select settings above “E”
(F-J). For more stable response, select settings below “E”
(B-D). See Error! Reference source not found. on page
Error! Bookmark not defined..
9.2
Local Control Of Valve Position
To manually adjust the position of the valve regardless of the
input command (analog or digital)
, press and hold the ▲Up,
▼Down and ◄ BACK buttons for about 3 seconds. The
▲Up, ▼down buttons can then be used to position the valve.
While in this mode the LED‘s will flash a GRRY (green-red-
red-yellow) sequence. To exit the local control mode and
return to normal operation, briefly press the ►
ACCEPT/QUICK-CAL button.
CAUTION: When operating using local control of the
valve, the valve will not respond to external commands.
Notify proper personnel that the valve will not respond to
remote command changes, and make sure the valve is
properly isolated.
9.3
Command Source Reset
Performing a command source reset will reset the command
source to analog if it has been inadvertently left in digital
mode. This is done by holding down both the
▲Up and
▼Down
buttons, then briefly pressing the
►ACCCEPT/QUICK-CAL button.
9.4
Factory Reset
To perfor
m a factory reset, hold ► ACCEPT/QUICK-CAL
button while applying power. All of the internal variables
including calibration will be reset to factory defaults. The
positioner must be re-calibrated after a factory reset. Tag
names and other user configured limits, alarm settings, and
valve information will also be lost and need to be restored. A
factory reset will always reset the command source to analog
4-20 mA.
NOTE: Once the Multi-Function Card (MFC) type has
been configured, the type selection will still remain after a
factory reset.
CAUTION: Performing a factory reset may result in the
inability to operate the valve until reconfigured properly.
Notify proper personnel that the valve may stroke, and make
sure the valve is properly isolated.
9.5
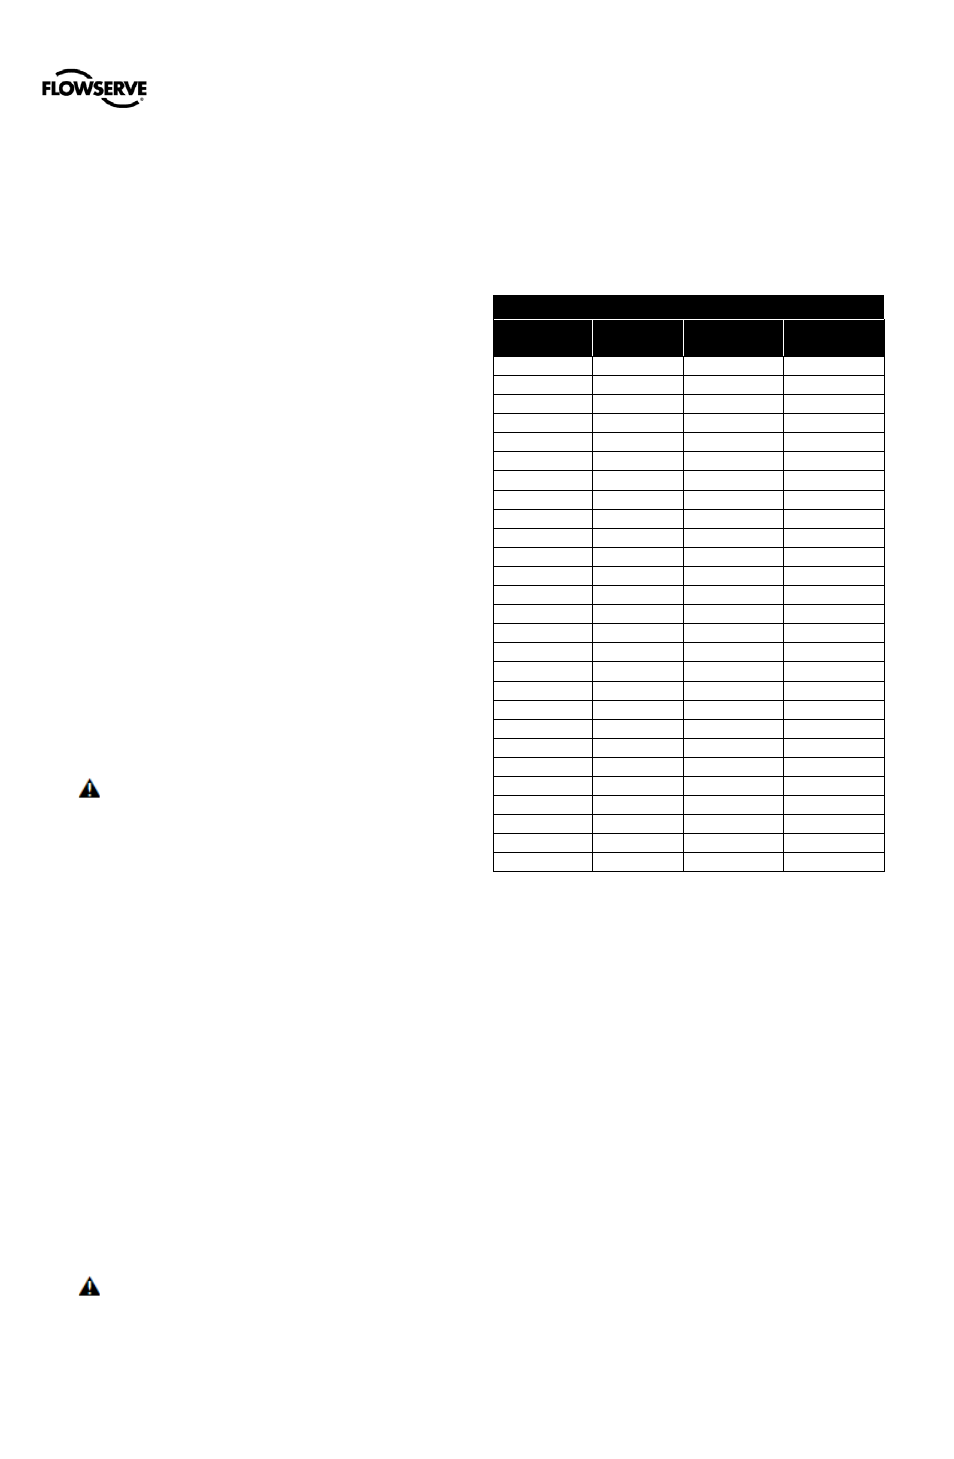
Viewing Version Numbers
The version number of the embedded code may be checked
at any time except during a calibration. To see the major
version number, hold the ▲Up button. This will not alter the
operation of the unit other than to change the blink sequence
to 3 blinks indicating the major version number. Holding the
▼Down button will give the minor version number without
affecting operation. The version codes are interpreted
according to the following table:
Table 16: Viewing Version Numbers
First
Blink Color
Second
Blink Color
Third
Blink Color
Version
Number
G
G
G
0
G
G
Y
1
G
G
R
2
G
Y
G
3
G
Y
Y
4
G
Y
R
5
G
R
G
6
G
R
Y
7
G
R
R
8
Y
G
G
9
Y
G
Y
10
Y
G
R
11
Y
Y
G
12
Y
Y
Y
13
Y
Y
R
14
Y
R
G
15
Y
R
Y
16
Y
R
R
17
R
G
G
18
R
G
Y
19
R
G
R
20
R
Y
G
21
R
Y
Y
22
R
Y
R
23
R
R
G
24
R
R
Y
25
R
R
R
26
For example, if holding the
▲Up button gave a G-G-R code,
and holding the
▼Down gave a Y-Y-G code then the
resulting version number would be 2.12.