Installation – Fire Magic 36-VH Vent Hood User Manual
Page 11
REV 2 - 1502191555
L-C2-387
11
THIS VENT HOOD IS FOR OUTDOOR, WALL MOUNT
INSTALLATION ONLY.
To ensure safety and proper performance; the vent hood
installation must be done by a qualifi ed professional
service technician. Reference the INSTALLATION
REQUIREMENTS section during the course of the install
for dimensions and overall orientation.
If possible, the gas grill should be removed for ease of
installation and to prevent damage to the grill.
Important: Prior to starting installation, the baffle
(inside of vent hood) and the wall mount
bracket (rear of vent hood) must be removed.
Be sure to retain all hardware removed. See
Fig. 11-1 and 11-2.
SPACER
Fire Magic offers a spacer specifi cally designed for your
vent hood. Contact your dealer for ordering information.
Alternatively, a custom spacer can be constructed for your
setup. Follow the appropriate section for your spacer type.
Fire Magic Spacer:
The Fire Magic spacer comes ready to be mounted. It should
be installed 30-33" above the grill, centered, and level.
See Fig. 11-3.
Important: Be sure to allow for the proper clearance above
the spacer for the soffi t / duct cover that is to be
installed at a later time.
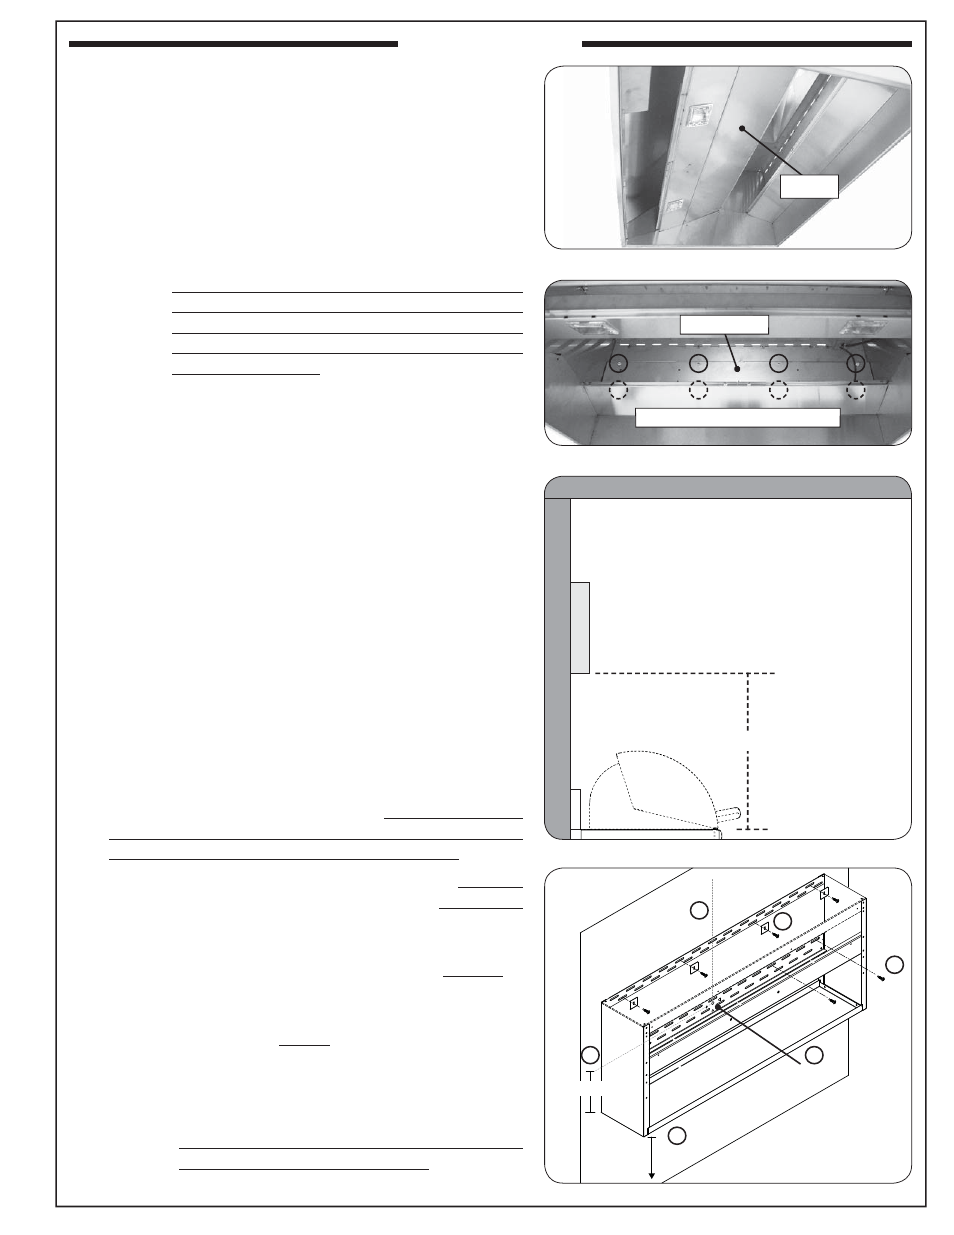
1. Locate and mark the REAR WALL studs.
2. Determine the install location of the spacer (30-33" above
the grill). Locate the "left-to-right" center, and pencil a
vertical line on the rear wall. Then pencil a horizontal line
7.5" up from the bottom of the spacer (see Fig. 11-4, A-C).
3. Place the spacer over the two lines. Use the alignment
notches found on spacer's center-rear bracket to aid in
proper location and leveling (see Fig. 11-4, D).
4. Using appropriate mounting hardware for the rear wall
construction; secure the spacer (via the center-rear
bracket) into the rear wall (see Fig. 11-4, E).
5. Next use additional mounting hardware, and the support
plates (supplied with spacer), to secure the top-rear of
the spacer into the rear wall (see Fig. 11-4, F).
Important: THE SPACER MUST BE SECURED INTO
MULTIPLE WALL STUDS, USING THE
APPROPRIATE HARDWARE, TO ENSURE
PROPER SUPPORT. METAL FRAMEWORK
WILL REQUIRE ADDITIONAL WALL STUDS
AND SCREWS FOR PROPER SUPPORT.
CONSULT A PROFESSIONAL CONTRACTOR
FOR YOUR INDIVIDUAL SETUP.
Fig. 11-3 Fire Magic spacer orientation
• Allow for proper soffi t / duct cover
clearance above
R O O F
S
P
A
C
E
R
R
E
A
R
W
A
L
L
30 - 33"
• Spacer must be properly secured
into REAR WALL studs.
• Spacer has slots & alignment tabs
to aid in leveling / installing
(remove grill
if possible)
INSTALLATION
Fig. 11-1 Remove baffl e
Fig. 11-2 Remove wall mount bracket
Baffl e
Remove two rows of screws
Wall mount
Fig. 11-4 Install Fire Magic spacer (36" shown)
30 - 33"
A
B
D
E
7.5"
mark
center
C
align
F