Warning, Service & maintenance, Sharpening chipper blades – Echo Bear Cat 70385 User Manual
Page 39: Important
Page 33
Bear Cat Chipper Shredder Operator’s Manual
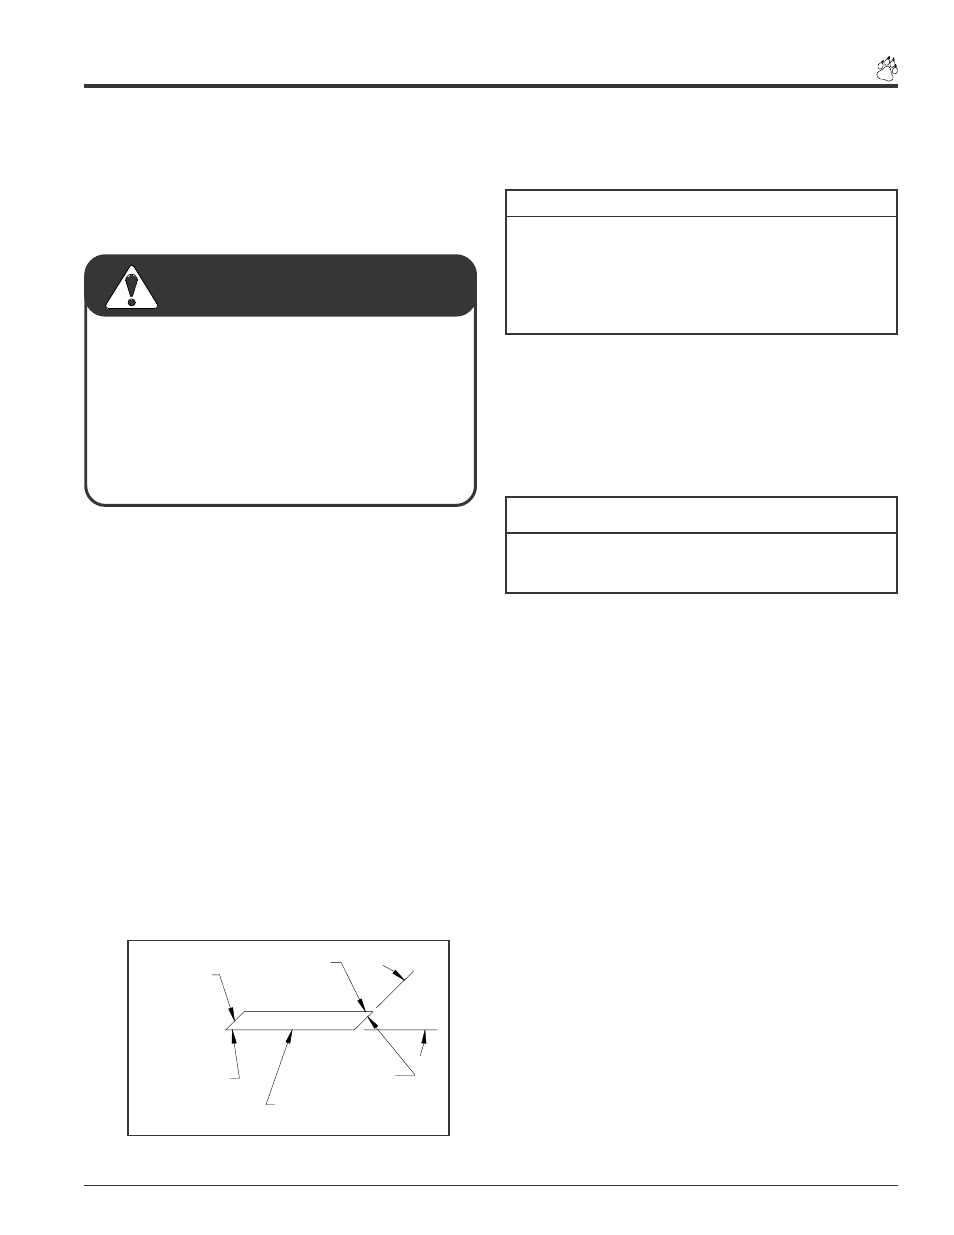
Fig. #42 Blade Sharpening diagram
SHARPENING CHIPPER BLADES
The chipper blades will eventually become dull, making chip-
ping difficult and adding extra strain on the machine. Sharpen
the chipper blades every 5-15 hours of chipper opera-
tion. To remove the chipping blades for sharpening, follow
the procedure below:
Removing The Blades:
1. Flip the discharge cover up.
2. Remove the 5/16” bolt and nylock nut holding the shred-
der screen.
3. Disconnect and remove the shredder screen from the
machine.
4. Remove the two 5/16” hex head bolts holding the chipper
blade itself. Repeat for the second blade.
5. Inspect blades to see if cracks or nicks are visible. If
cracks are present, replace the blades. If nicks can not
be removed by sharpening blade, replace the blade.
Sharpening the Blades:
1. When sharpening the blades grind the angled edge of the
chipping blade to 45 degrees. This is best accomplished
on a slow-speed wet grinder. If you use a bench grinder
be careful when grinding so that the blade material does
not get too hot and change color–this will remove the
blade's special heat treated properties.
2. Be sure to use short grinding times and cool with water
between grinding.
3. Try to remove an equal amount off each blade to maintain
balance.
4. The maximum that can be ground off the blades is .30
inches, after this the blades must be replaced. For refer
ence, new blades are 2”.
Reinstalling the blades:
1. Place a blade back on the rotor and attach with 5/16”
bolt. Repeat for the second blade.
2. Reinstall the shredder screen on the unit.
3. Attach the shredder screen to the machine with the 5/16”
bolt and nylock nut.
4. Place the discharge cover in the normal operating posi-
tion.
Service & Maintenance
Do not exceed the recommended torque value of 20 ft.
lbs. when tightening the bolts for the chipper blades.
IMPORTANT
Never sharpen or grind on the back side of the chipper
blade. This will cause the edge to roll and damage will
occur to the chipping blade, causing poor chipping and
feeding of material. Small imperfections, nicks, burrs, etc.
on the flat side of the blade will not affect performance of
the machine.
NOTE
45°
MOUNTING
SURFACE
DO NOT GRIND
SHARPENED
SURFACE
SHARPENED
SURFACE
MOUNTING
SURFACE
DO NOT GRIND
CHIPPER
BLADE
To prevent personal injury or property damage: Shut off
engine, disconnect spark plug wire, remove ignition key
(if applicable), disconnect the driveline from the source
providing power and make sure that all moving parts have
come to a complete stop, before servicing, adjusting or
repairing.
The chipping blades are sharp! Use care when working
on machine to avoid injury.
WARNING
Tips
Poor chipping performance is usually a result of dull chip-
ping blades. If your chipper's performance has decreased,
check for the following symptoms. If the machine shows
these symptoms, sharpen the blades.
1. Severe vibration when feeding material into the chipper.
2. Small diameter branches do not self-feed.
3. Chips discharge unevenly or have stringy tails–especially
when chipping green branches.
Before you sharpen the chipping blades, check for perma-
nent damage. Replace the blade if:
1. The blade is cracked (especially around the bolt holes)
or the edges are too deeply chipped to be ground smooth.
2. The base of the cutting edge is worn or has been re-
sharpened so that it sits too close to the rotor chipping
slot.