6 network configuration, 3 recovering from a failed raid, 1 connecting rtx to your network or computer – CRU RTX410-IR User Manual
Page 7: 2 using the lcd to configure the config gui port
CRU
R T X 4 1 0 / 6 1 0 / 8 0 1 - I R U s e r M a n u a l A 9 - 4 6 8 - 0 0 0 5 R E V 1 . 0
- 7 -
creating a usable RAID set. Section 8 contains instructions on how to access RTX through an iSCSI
initiator.
f) Format the drive. When a hard drive is first used with RTX, or when a RAID set has been created and
the user connects to RTX through an iSCSI initiator, it will show up as a blank, unallocated drive. You’ll
need to format the drive in RTX before you can use it See Section 9 for instructions on how to format the
drive with Mac or Windows operating systems. Note that formatting a drive will erase all data on the
drive, so be sure to back up your data before installing the hard drives into this enclosure and
before beginning this operation.
5.3 Recovering from a Failed RAID
If one hard drive of a RAID set with data redundancy has failed or has been unplugged or removed, then
the status of the RAID Group will report that the RAID is degraded and RTX will automatically search for a
spare disk to rebuild the RAID. If none are found, RTX will search for a global spare disk. If neither is
found, it will wait for the user to remove the failed hard drive and insert a working replacement.
6 Network Configuration
6.1 Connecting RTX to Your Network or Computer
a) Plug an Ethernet cable into the Config GUI port on the rear of RTX.
b) Connect the other end of the Ethernet cable to your network. This usually means plugging it into a
router or hub. In an office environment, you may have a network jack built into your office wall. If a
network connection is not available, you can connect the Ethernet cable directly to an RJ45 (Ethernet)
port on your computer.
c) Connect the power cable to the rear of RTX and to a grounded electrical outlet.
d) Turn on RTX’s power using the switch on the rear panel.
6.2 Using the LCD to Configure the Config GUI Port
RTX has both an LCD interface and a GUI. The LCD interface has only basic functionality and is mainly
used to configure the IP address of the Config GUI port. Once the Config GUI has been configured, the
GUI can be used to fully configure RTX.
6.2.1 Navigating the LCD menu
Use the f
our function keys, ▲ (Up), ▼ (Down), ESC (Escape) and ENT (Enter) to manipulate the LCD
interface. After pressing ENT
(Enter) key, you can use the ▲ (Up) and ▼ (Down) keys to select a
function. If there is an alarm or error message, the LCD will display the related information.
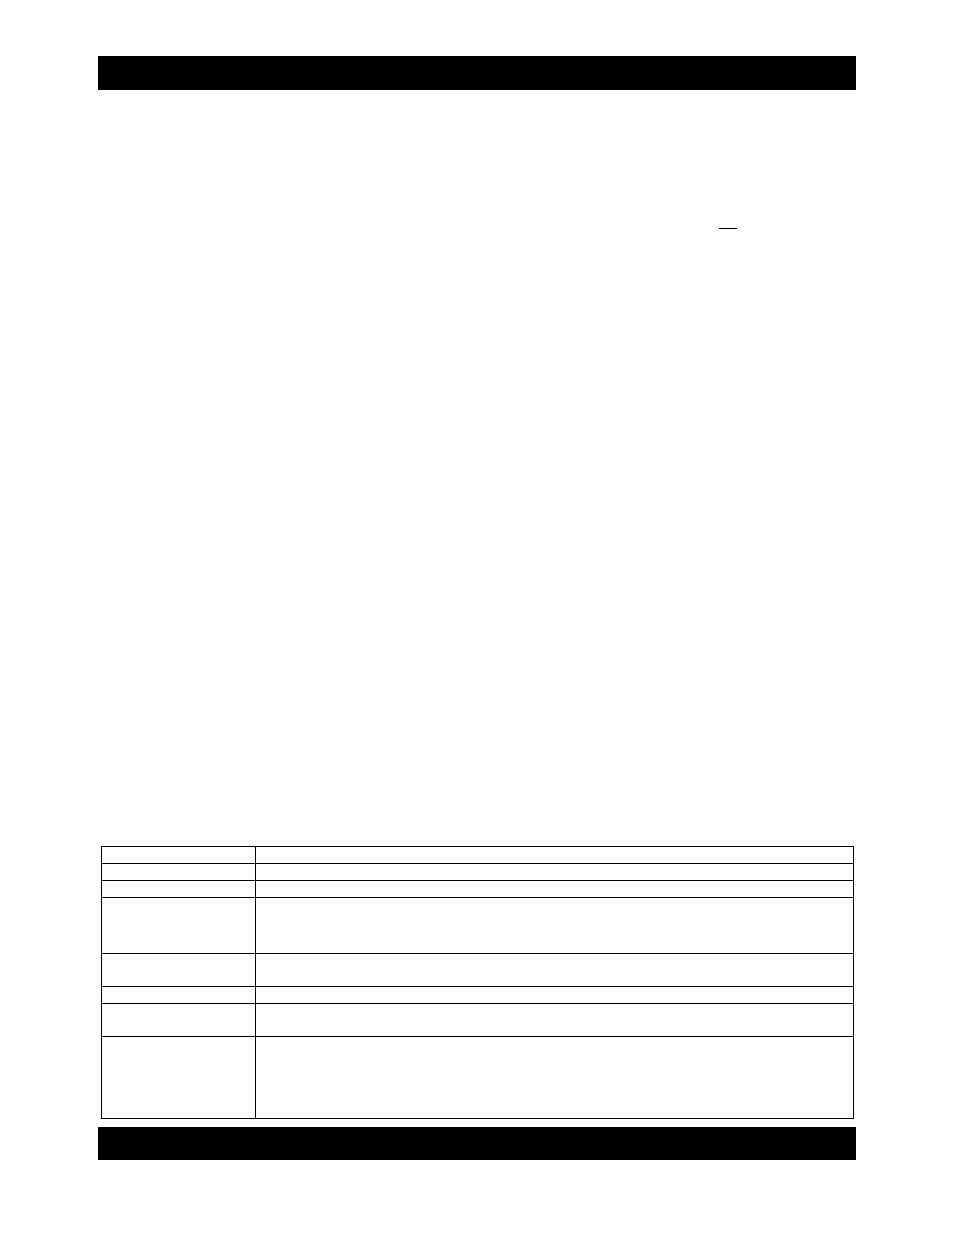
6.2.2 LCD Functions
System Info
Displays the details of RAM and firmware.
Alarm Mute
Turns off the alarm sound when an error occurs.
Reset/Shutdown
Resets or shuts down the controller.
Quick Install
To use “Quick Install” to set up a volume by three steps. CRU-DataPort does not recommend
using the Quick Install option to set up your RTX. For quick set-up of a RAID, refer to Section
7.7.1.
Volume Wizard
Smart steps to create a volume. Please refer to Section 7.7.1 for detailed operation steps in
the web GUI.
View IP Setting
Display the current IP address, subnet mask, and gateway.
Change IP Config
Sets the IP address, subnet mask, and gateway. You can choose to use DHCP server (for IP
address allocation) or manually specify the IP address.
Reset to Default
Restores factory defaults:
Default Administrator Name: admin
Default Administrator Password: 1234
Default User Name: user
Default User Password: 1234