CRU RAX210-3QJ User Manual
Page 5
PMS 711
2 cyan
85 magenta
76 yellow
10.25.12
CRU Mark
Page 5
Type (shows up in Windows XP only), Specify
Volume/Partition Size, and Assign Drive Letter or
Path dialog prompts, leaving the default settings.
e. You will now see a window that allows selection of a
file system. Choose NTFS and enter a name for the
new volume. Be sure to check the box labeled Quick
Format, which will ensure that the formatting
process takes less than a minute.
f. Click Next and then Finish to start the format
process. When the format is complete, the Drive
Properties Box will update to show the new volume
name. The new volume can now be found by double-
clicking on the My Computer icon on the desktop
(Windows XP), by clicking on the Computer button
in the Start Menu (Windows Vista, 7, Server 2008
product family), by clicking on Computer in the
navigation pane of a File Explorer window (Windows
Server 2012), or by opening a File Explorer window
(Windows 8.1, Server 2012 R2).
4.2.2 Mounting and Unmounting Volumes
If the hard drive inside of the RAX unit are already
formatted, you can begin using the volume right away.
When the RAX unit is properly connected and turned on,
a window may open to allow you access to the volume. If
no window appears, find the volume by double-clicking
on the My Computer icon on the desktop (Windows
XP), by clicking the Computer button in the Start
Menu (Windows Vista, 7, Server 2008 product family), by
clicking on Computer in the navigation pane of a File
Explorer window (Windows Server 2012), or by opening a
File Explorer window (Windows 8.1, Server 2012 R2).
Unmounting a USB or Firewire Volume
Unmount the RAX unit before powering it down by
left-clicking the green arrow icon on the task bar (in
Windows XP) or the USB plug icon with the green
checkmark on the Desktop task bar (Windows Vista, 7,
8.1, Server 2008 and 2012 product families), and then
selecting the proper device from the menu that pops
up. You may have to click on the Show Hidden Icons
arrow on the task bar to find the correct icon. Windows
will indicate when it is safe to disconnect the RAX unit.
Disconnecting the RAX unit without first ejecting it can
result in data loss.
Unmounting an eSATA Volume
If you purchased an eSATA host card that supports
hot-swapping, follow the instructions for unmounting a
USB or FireWire volume above. Many eSATA hosts do
not support this feature. However, freeware utilities are
available on the Internet that provide a similar function.
You may download one of these utilities or follow these
instructions: Ensure no file transfers are taking place by
is useful if you are only sporadically booting from the RAX
unit hard drive.
4.2 Usage with Windows Operating Systems
4.2.1 Formatting a Drive
When you first mount a drive to a Windows operating
system, a pop-up window will ask you if you would like
to format it. Click Format Disk and skip to Step E. If the
prompt does not pop up, use the Disk Management utility
by following these steps:
a. Right-click on the My Computer icon on the
desktop (Windows XP) or the Computer button in
the Start Menu (Windows Vista, 7, Server 2008 and
2012 product families), then select Manage. In the
left pane of the Computer Management window that
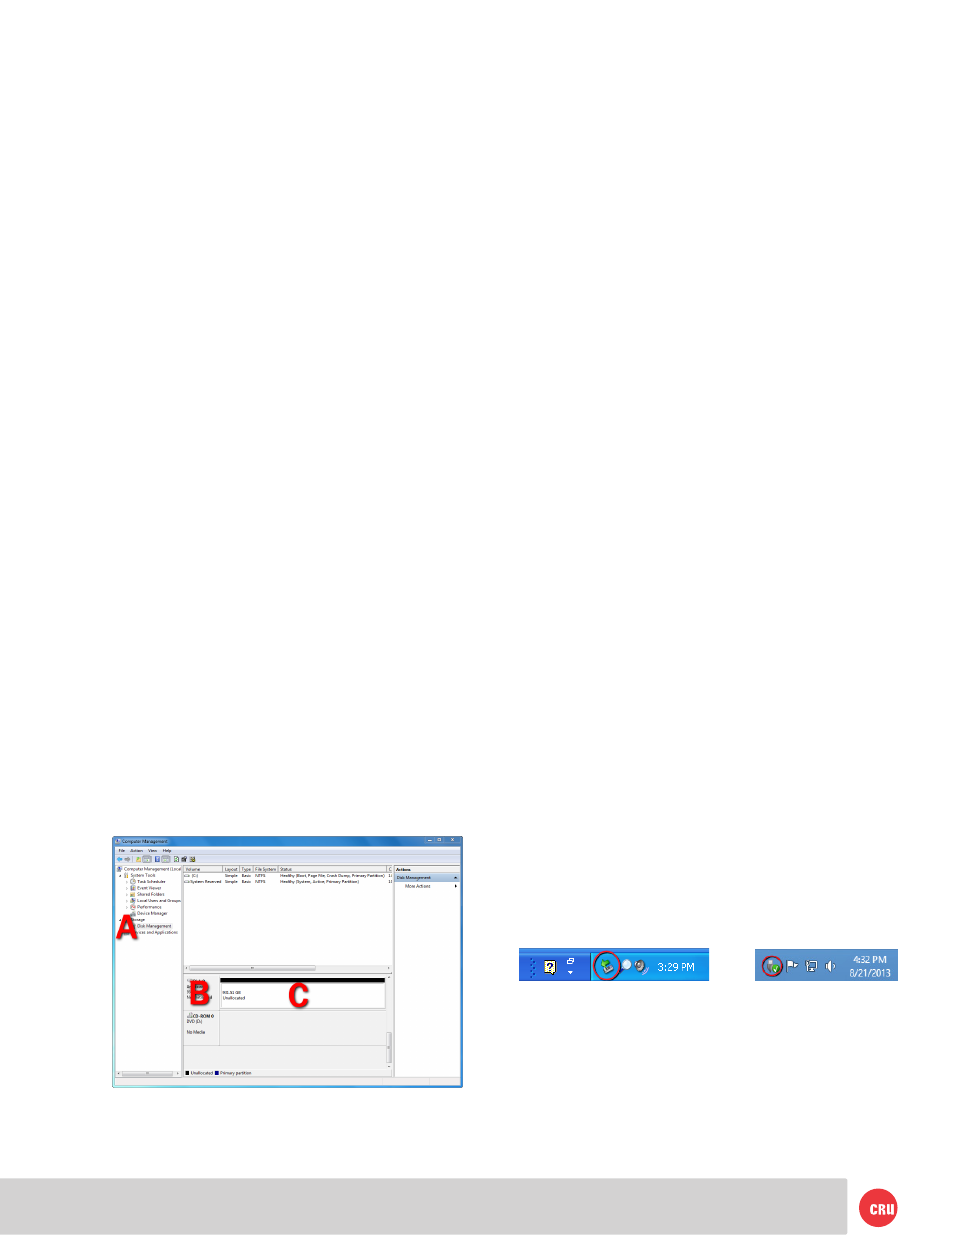
opens, left-click on Disk Management (labeled
‘A’ in the picture below). For Windows 8.1, press
WINKEY + X, then select Disk Management from
the menu that pops up.
b. The drive should appear in the list of Disks in the
lower pane. You may need to scroll down to see it.
If the drive is already formatted, you can identify it
easily by its volume name. If the Device Properties
Box (labeled ‘B’ in the picture below) says “Not
Initialized”, you’ll need to initialize the disk before
formatting it.
Right-click on the Device Properties Box and
select Initialize Disk. If you are prompted to select
a partition type, select GPT. Only select MBR if you
are formatting a bootable disk for use on a system
with a legacy BIOS or are using the RAX unit with
Windows XP.
c. To format the volume, right-click the Drive
Properties Box (labeled ‘C’ in the picture below)
and select New Partition… (Windows XP) or New
Simple Volume... (Windows Vista, 7, 8.1, Server
2008 and 2012 product families).
d. Unless you wish to customize the settings in these
dialog prompts, click Next on the Select Partition