Spreader operation 22 – PermaGreen Triumph Spread-Only User Manual
Page 26
Recheck opening and adjust if necessary.
Calibrate LOW GEAR rate setting;
Make initial LOW GEAR adjustments using the Black LOW
GEAR Rate Adjuster Knob (FIGURE 10.2-A) on the
Handlebar
Once your Pre-Calibrated LOW GEAR setting is adjusted,
reposition the stop bolt (FIGURE 10.2-C) against the Rate
Adjuster Knob (FIGURE 10.2-A) to lock in your Pre-set
location. A 5/32” Allen wrench is required.
Recheck opening and adjust if necessary.
Deflector operation:
To raise the Deflector (not shown) out of the path of the
granular spread pattern, move the Deflector Lever (A)
forward.
To lower the Deflector and interrupt the granular spread
pattern to the right of the spreader, pull the Deflector Lever
rearwards.
Third-hole pattern adjuster operation when using the Deflector:
To close the Third-hole Adjustment Plate when lowering the
Deflector, pull the Third-hole Lever rearwards.
To open the Third-hole Adjustment Plate (not shown), push
the Third-hole Lever forward.
Using the Third-hole pattern adjuster to balance the granular
spread pattern.
To reduce the amount of granular material spread towards
the right side of the machine, move the Third-hole Lever
rearward to partially close the Third-hole Adjuster Plate.
NOTE: The gray sliding Memory-Lock should be
positioned to secure the Third-hole Lever at that setting.
The Lever pops into the Memory-Lock to hold it in place.
The Lever may then be used to close the Third-hole
Adjuster Plate and return to your pre-set Memory-Lock
position.
To increase the amount of granular material spread towards
the right side of the machine, move the Third-hole Lever
forward to increase the opening of the Third-hole Adjuster
Plate.
Spreader Operation
NOTE: For proper spreading the engine RPM (measured with
the machine in NEUTRAL) MUST be maintained at 3,450 RPM,
regardless of whether the machine is in HIGH or LOW GEAR. If
engine RPMs are too low the spread width will be too narrow for
effective spreading. If too high, the spread width will be too wide.
NOTE: For proper spreading the spreader MUST be calibrated
(Refer to Spreader Calibration in this section).
For best results, It is recommended that products be applied using
one of the following methods:
Method 1: Make edging pass followed by parallel passes.
First make a trim-pass, edging around the perimeter of the
property and any ornamental beds etc.
Pull the Deflector Lever to the rear to lower the Defector
while simultaneously pulling the Third-hole Lever rearward
to close the Third-hole Adjuster Plate and reduce the spread
width by cutting off the material on the right side.
Select the appropriate gear for the terrain and turf conditions.
Use LOW GEAR on inclines, slopes and/or hills and in tight
areas.
Use HIGH GEAR on level and open areas.
Set the Rate Adjustment Knob to the pre-calibrated rate for the
gear selected.
Pull the Throttle Lever to accelerate while simultaneously
pushing the Hopper Lever forward to open the spreader and
permit granular material to flow from the Hopper.
Make the trim- pass keeping the right side of the granular
spread pattern inside the edge of the sidewalk, ornamental
beds, etc.
When it is necessary to stop the machine, simultaneously
release the Throttle Lever and pull the Hopper Lever to the rear
to stop the flow of granular material.
After making the trim-pass, stop and push the Deflector Lever
and the Third-hole Lever forward to return the Deflector to the
up position and the Third-hole Adjustment Plate to the broadcast
setting.
Change gears if desired. NOTE: Return the Rate Adjustment
Knob to the pre-calibrated rate for the gear selected.
Make a header-pass following the path of the trim-pass and
keeping the right side of the granular spread pattern inside the
edge of the sidewalk, ornamental beds, etc.
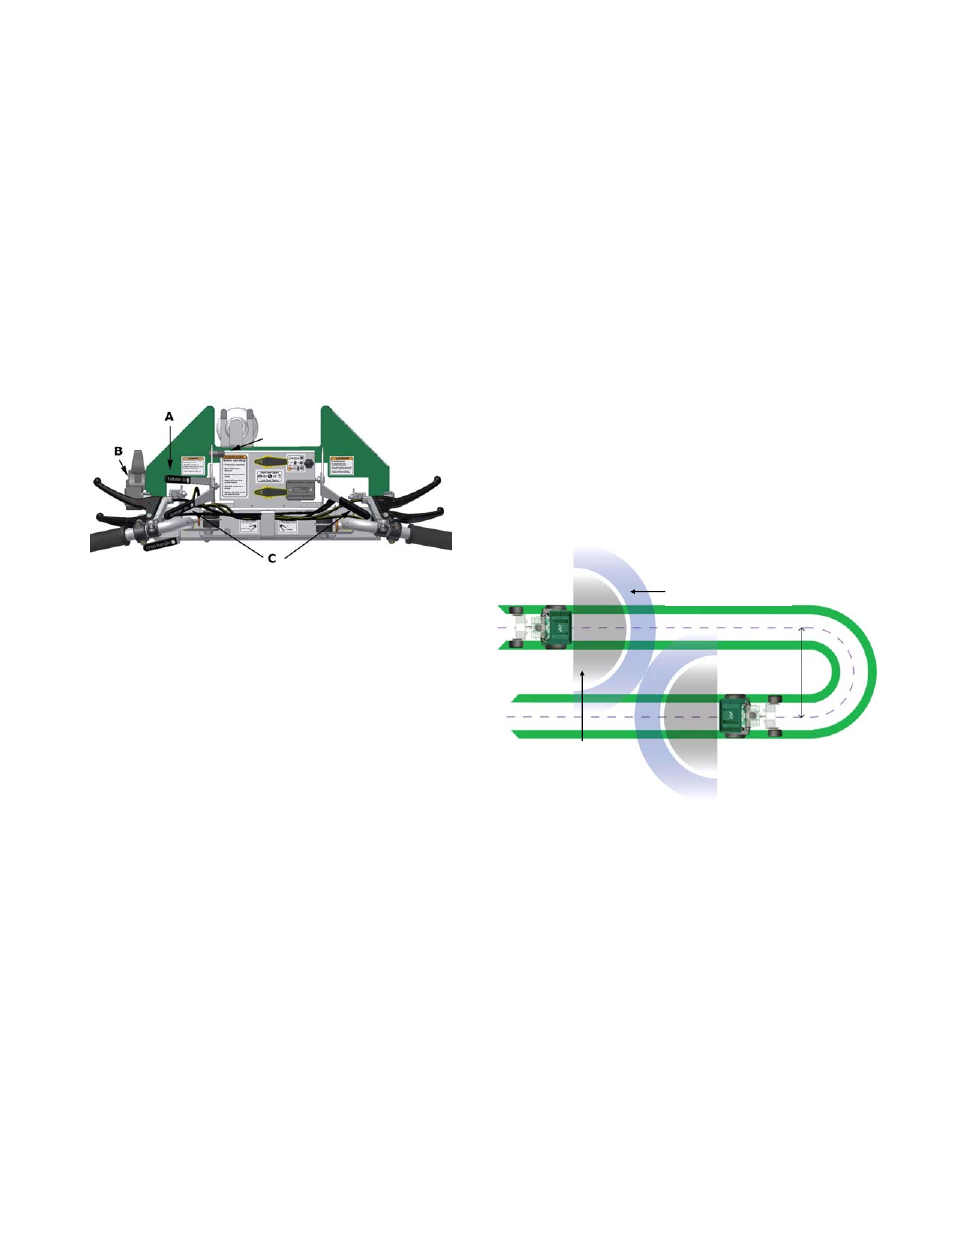
Referring to FIGURE 11, fill the center of the lawn by making
parallel passes.
Turn on 7-FOOT centers. NOTE: The edge of the spread
pattern of most granular materials will fall between the
wheel marks of a preceding pass.
The first pass should overlap back to the centerline of your
wheel tracks of one of the header-pass.
As you enter the fertilized area of the header-pass, shut off
the hopper as you make a 180-DEGREE turn.
Quickly open the hopper as you come out of the turn
heading back in the opposite direction with the fertilizer
overlapping to the center of your last parallel pass.
Repeat this process throughout the rest of the lawn.
Method 2: Make a trim-pass and header-pass as in the previous
section. Then continue filling in the center making descending
spiral passes around the periphery ending in the center. This
method helps compensate for an unbalanced pattern distribution
because the right side pattern always overlaps the left side pattern.
Either method may be used simultaneously with the spray features
on the machine. When trim-spraying the edging pass use the
appropriate trim nozzle for the gear selected and spray as needed.
When Broadcast-spraying the center area use the appropriate
Broadcast nozzle for the gear selected and spray as need
Spreader Calibration
Adjustment of the spreader establishes the correct spread pattern.
The center discharge hole establishes the center of the pattern.
The right-hand discharge hole (as viewed from the Operator
position) establishes the spread pattern on the left-hand side. The
left-hand discharge hole establishes the spread pattern on the right
-hand side. Calibration establishes the correct application rate and
balances the spreader pattern.
Spreader Operation
22
FIGURE 11, Spreader Passes
Spread Pattern
Spray Pattern
Effective Spread
Width, Example:
7-8 Foot