Optic 6 sport 2.4ghz transmitter features, Joystick controls – HITEC Optic 6 Sport 2.4 User Manual
Page 7
Page 11
Page 12
Right-hand joystick
Left-hand joystick
"SW-1" switch
"SW-2" switch
Optic 6 Sport 2.4GHz Transmitter Features
Depending on the initial set-up base-line programming you have selected, this switch can be used to lower landing gear;
operate the throttle of an electric motor (as on a powered glider); or select a flight condition mode. In Heli mode, this is the throttle hold switch.
This is your "Dual-rate" switch: The "0" position typically selects the full rate of movement of the aileron, elevator and rudder while the
"1" position selects the diminished rate you have programmed in the model setup menu. The exponential values for these control surfaces
are also selected by this switch.
"SW-3 FLT MODE" switch
This switch allows you to choose three different "flight condition modes"-an advanced programming function.
In Heli mode this switch selects the NOR, or "hover", and 2 "idle-up" or stunt modes
"Eng Cut"/"Trainer" switch
If you've activated the engine cut function in the model setup menu programming, this button serves as the kill-switch for your motor.
Otherwise, it functions as the trainer switch when your transmitter is linked via a cable to a second transmitter to act as a "buddy box"
for flight training. As long as you hold down the training button the buddy box will be flying the model-let go of the button and your transmitter
reverts to being the master.
Trim switches
Use these switches to make small offset adjustments to the servos controlled by the two joysticks.
Any adjustments will be "memorized" for this particular model so you won't have to re-trim every time you fly.
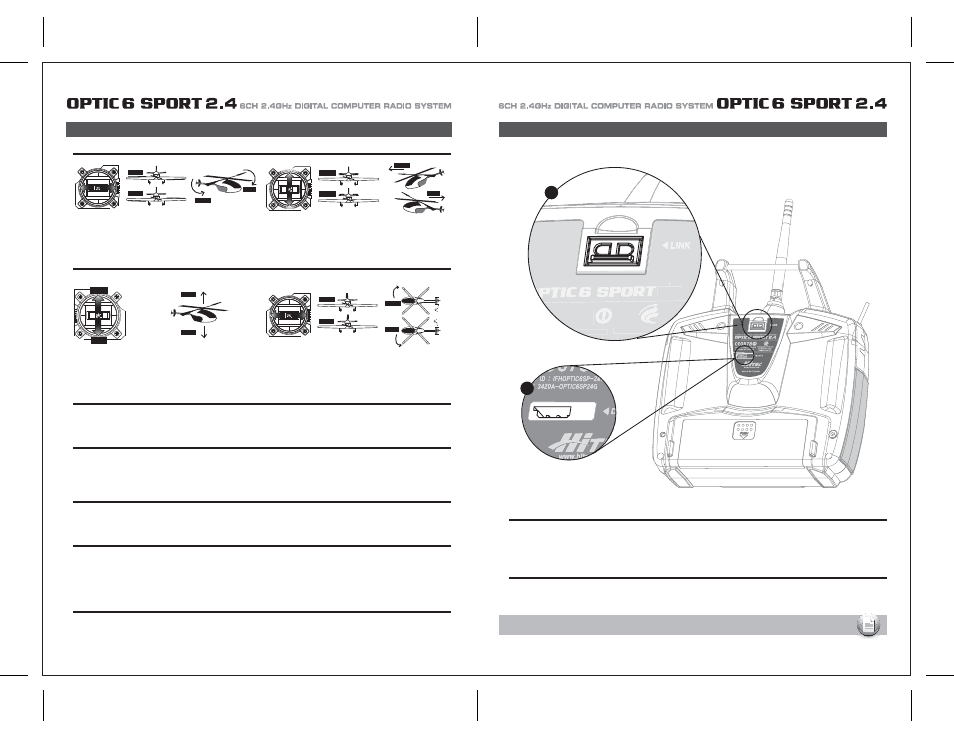
1. Function Button (With Dual LED Status Indicator)
This Function Button with Dual LED indicator has two colored LEDs, blue and red, for status indication and for set-up process indication of
2.4GHz system.
This function button can be used for Link(ID -Setting) process between Optic 6 Sport 2.4 to a Optima series receivers, entering the
power down mode for range checks, and the Nomal / Scan Mode set-up.
2. Sensor Data Output and System Upgrade Connector Port
A three pin servo plug connector port is featured on the 2.4GHz module.
Using the HPP-22 PC interface accessory this port serves to facilitate upgrading the devices software and downloading information from
Optima 7 and 9 channel receiver if using optional onboard sensor station.
Joystick Controls
Assuming you have selected "Mode 2" in the initial setup menu (the most common control arrangement in North America), this stick controls
the elevator (forward is down and back toward you is up) and the ailerons (left and right).
Again assuming the "Mode 2" configuration, this stick controls the rudder (left and right) and the throttle (forward and back-back is off for
electric motors and idle for glow). If you have selected "GLID" as the transmitter's programming baseline in the initial setup menu than the
stick's forward and back movement controls the ailerons and flaps for the model's descent control (called "CROW").
LEFT
RIGHT
RIGHT
LEFT
Front View
LEFT
RIGHT
DOWN
UP
DOWN
UP
UP
DOWN
HIGH
LOW
HIGH
LOW
HIGH Position:
Full Throttle
LOW Position:
Power Off
LEFT
RIGHT
RIGHT
LEFT
Front View
RIGHT
LEFT
The following contains the complete instructions on how to use the Hitec AFHSS 2.4GHz system on Optic 6 Sport 2.4 and Optima series receiver set.
We encourage you to review this information before using these products.
*$41
015*$
1(
ݚ⧕ྕᖁᖅእ۵
2.4GHz 6 CHANNEL RADIO CONTROL SYSTEM
2.4
ᯙ᷾ჩ⪙)3,015*$41
015*$41(
1(
ݚ⧕ྕᖁᖅእ۵
1
2
Note : Only the basic telemetry function (Receiver Low Battery Warning) is available for Optima 6.