Rt series hood use, 6rt series hood u se – Bullard EVA User Manual
Page 6
6
RT Series Hood U
se
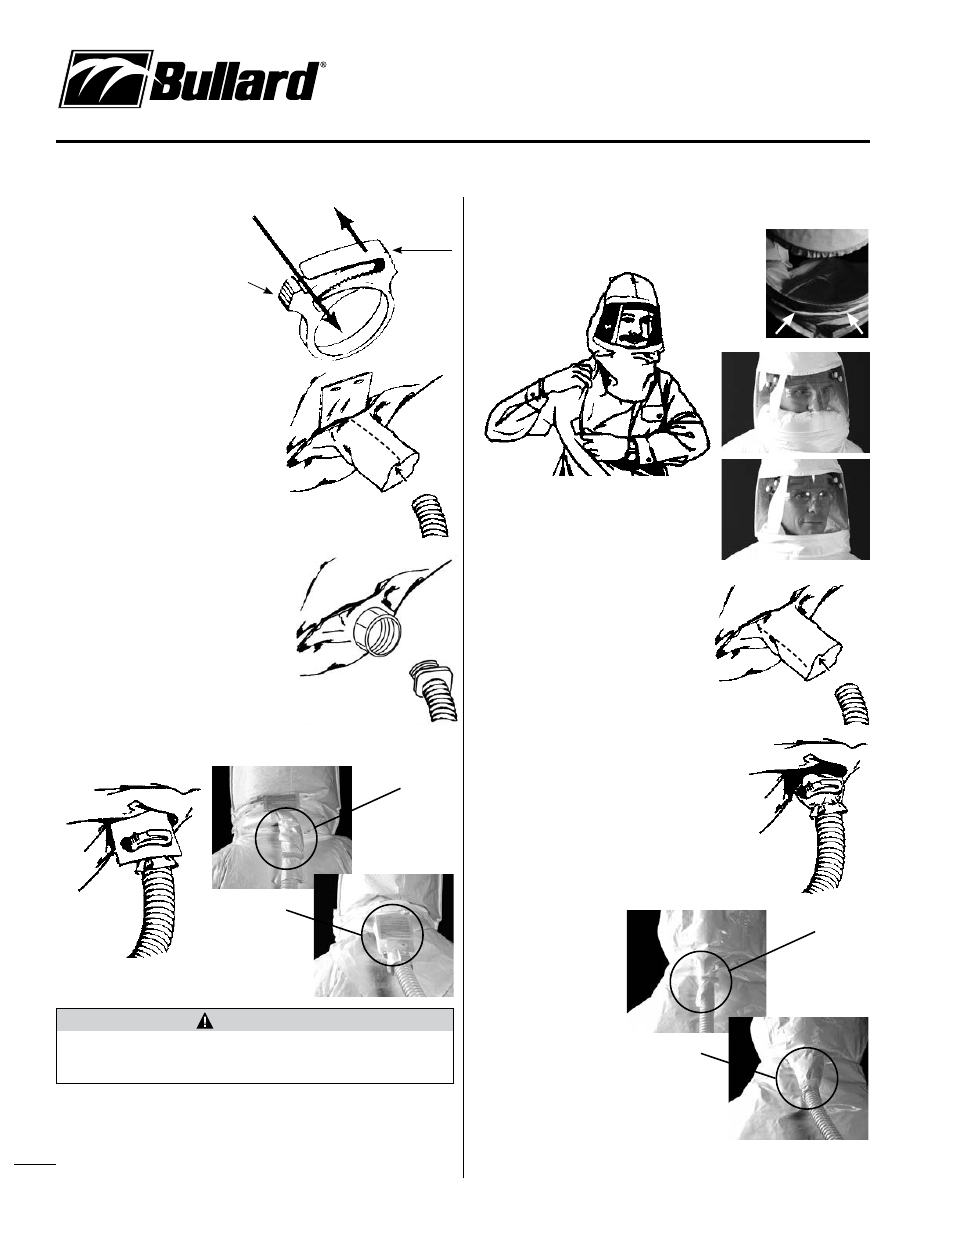
Installing Breathing Tube Assembly in CC20 or GRH Hoods
For hoods without a threaded
port at the rear, Breathing Tubes
PA1BT, PA1BTXS and PA1BTXL will
attach to the hood with a clamp
as follows:
1. Remove nylon clamp from
plastic anchor plate on hood
(see Figure 21).
2. Insert the open end of the
breathing tube approximately
five inches into hood’s air
entry sleeve (see Figure 22). Do not
insert breathing tube into hood air entry
sleeve more than 6 inches as it may
cause a flow restriction.
3. Install nylon clamp over air entry
sleeve and breathing tube, inserting
clamp locks through two holes in plastic
anchor plate that is sewn into hood.
Locks should face away from user’s
neck (see Figure 23). The air entry
sleeve seams should be on the top
and bottom of the breathing tube when
properly installed and worn.
4. Engage clamp locks and squeeze together
until tight. Air entry sleeve should not be
twisted or restricted (see Figure 24). If
so, then remove the clamp and repeat
steps 2-4.
For hoods with a threaded port at the rear
(designated with a “T” suffix), Breathing
Tubes PAHBT, PAHBTXS, PAHBTXL will attach
to the hood by the threading into the port at the rear (See Figure 22A).
Donning the CC20 or GRH and EVA
1. With PAPR Blower Unit Running, put on CC20 or GRH Series respirator
hood.
2. Position headband suspension or hard hat for a comfortable fit.
3. If using an optional chin strap, pull elastic strap under your chin. Adjust for
a secure and comfortable fit.
4. Tuck inner bib of hood into shirt or protective clothing if using hood with
inner bib (see Figure 25).
5. Pull respirator outer bib over collar of shirt or protective clothing.
6. Ensure that the neck cuff is down below the chin and
that the air outlets of the cuff (see Figure 26) are
not restricted. If the
neck cuff is not
below the chin,
then pull down
before continuing
(See Figure 27).
RT Series Hood Use
Installing Breathing Tube
Assembly in RT Series
Respirator Hoods
For hoods without a threaded port at the rear,
Breathing Tubes PA1BT, PA1BTXS and PA1BTXL
will attach to the hood with a clamp as follows:
1. Remove nylon clamp from the breathing tube
(see Figure 22).
2. Insert the open end of the breathing tube
approximately five inches into hood’s air
entry sleeve (see Figure 28). Do not insert
breathing tube into hood air entry sleeve
more than 6 inches as it may cause a flow
restriction.
3. Install nylon clamp over air entry sleeve and
breathing tube. If desired, 2 or more clamps
may be used(see Figure 29). The air entry sleeve
seams should be on the sides of the breathing
tube when properly installed and worn.
4. Engage clamp locks and squeeze together until
tight. Air entry sleeve should not be twisted or
restricted (see Figure 30).
If so, then remove the
clamp and repeat steps 2-4.
5. With PAPR blower unit
running, put on RT Series
respirator hood. Pull the
hood over your head until
the neck cuff is securely
around your neck.
6. Ensure that the neck cuff
is down below the chin and
that the air outlets of the
cuff are not restricted. If
the neck cuff (see Figure
26) is not below the chin,
then pull down before continuing (See Figure 27).
Figure 22
Figure 23
Figure 21
To tighten
To remove
To tighten
WARNING
Do not put on or remove these respirators in a hazardous atmosphere except for
emergency escape purposes. Failure to heed these warnings could result in death
or serious injury.
Figure 28
Figure 29
Figure 22A
Twisted – incorrect
Correct
Figure 24
Figure 25
Figure 27
Incorrect
Correct
Twisted – incorrect
Correct
Figure 30
Figure 26