Eva series papr air-purifying elements, Mounting and replacing filters on the blower unit – Bullard EVA User Manual
Page 4
4
Checking Airflo
w / Air-Purifying Elements
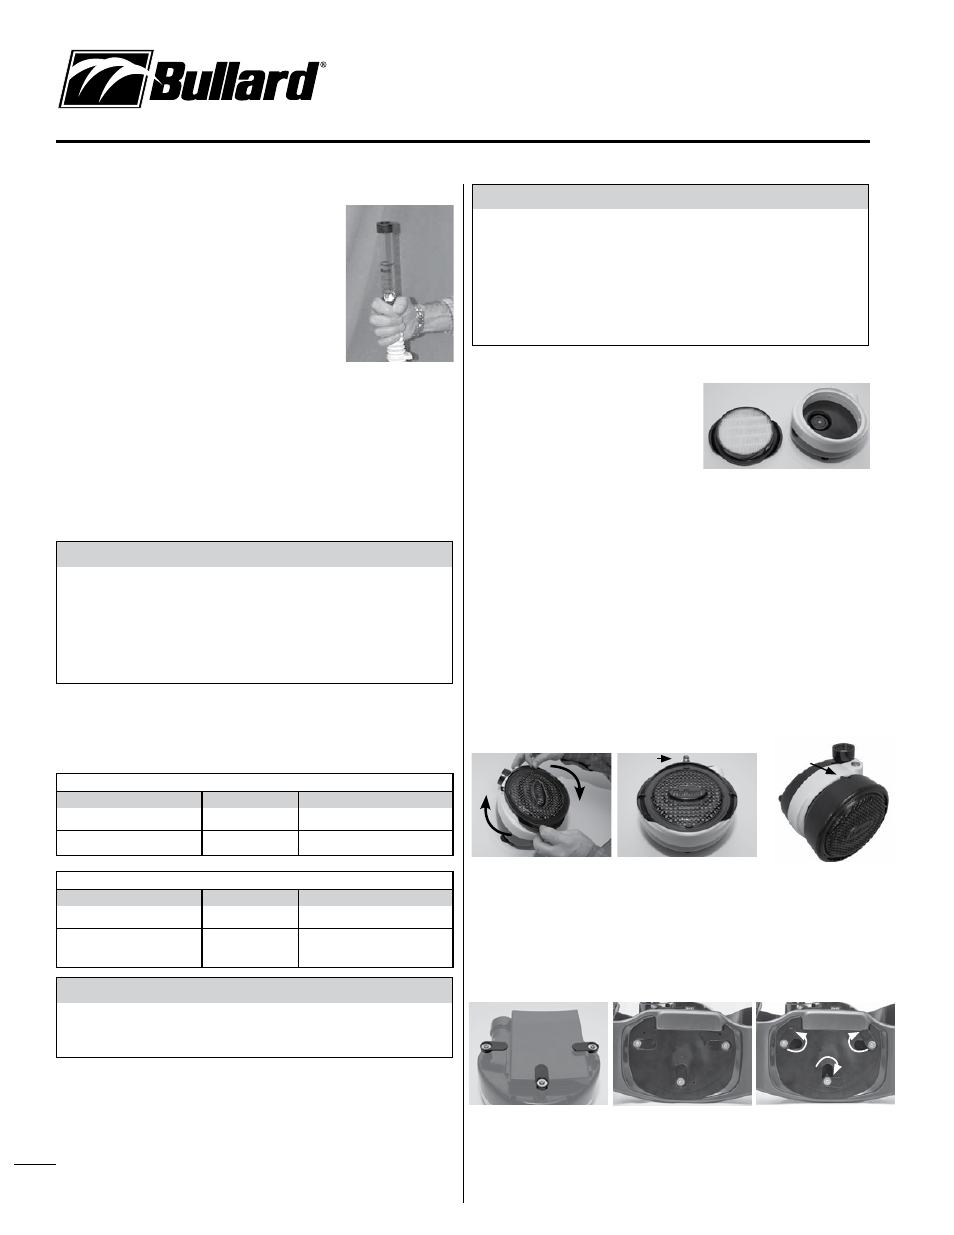
Checking Airflow with the Airflow Indicator
(PA1AFI - sold separately)
With the blower switched ON and the filters/cartridges
mounted, take the free end of the breathing tube in one
hand, hold it upright and place the Airflow Indicator into the
end of the tube. (See Figure 6).
Apply a light downward pressure to the Airflow Indicator
to get a reasonable seal at the breathing tube end. Ensure
that the air outlet holes in the Airflow Indicator tube are
not blocked. Two hands may be used if preferred, one
to hold the breathing tube and one to hold the Airflow
Indicator.
The position of the ball in the Airflow Indicator should be observed. If any part of
the ball is below the PASS LINE on the Airflow Indicator, check for:
• Blower malfunction.
• Clogged or damaged Air-Purifying filter elements on the HE filter. See
“Mounting and Replacing Cartridges on the Blower Unit” on page 7.
• Low battery or battery malfunction.
If the ball is completely above the PASS LINE on the Airflow Indicator, then the
system is ready for use.
�
WARNING
If the blower malfunctions during use in a hazardous area:
Remain calm and
LEAVE the hazardous area immediately.
DO NOT use a blower that fails the flow test (air flow indicator sold separately).
Use
ONLY Bullard filter/cartridges which comply with and have the NIOSH
approval label and which are appropriate for the contaminant.
Failure to observe these warnings could result in death or serious injury.
EVA Series PAPR Air-Purifying Elements
Principle of Operation
The following filter/cartridge protection classification applies when used with any
of the hoods or loose fitting facepieces.
NIOSH Filter/Cartridges
Protection
Filter/Cartridge NIOSH / ANSI Color Code
HE (particulate)
PAPRFC3
Magenta
OV/CL/HC/SD/CD/HF/HE
PAPRFC4
Olive and Magenta
EN Filter/Cartridges*
Protection
Filter/Cartridge Color Code
EN12941 P3
PAPRFC3
White
A2P3 P3 R S L
EN12941
PAPRFC4
White, Brown,
Grey, Yellow
�
WARNING
* The user should not confuse the markings on a filter relating to other standard
other than EN 12941 with the classification of this device when used with
this filter.
HE particulate filters are 99.97% effective against all particulate aerosols.
Filters are supplied in quantities of three per box.
The following abbreviations are approved by NIOSH to indicate the particulates,
gases, or vapors which are removed by the gas/vapor cartridges:
HE High Efficiency Particulate Air Filter for Powered Air-Purifying Respirators
�
WARNING
Use only the filter/cartridge(s) described in the above table.
Do not change cartridges while in a hazardous atmosphere.
Incorrect cartridge selection will invalidate all performance statements and
approvals for this equipment.
Follow established cartridge change schedules to ensure that cartridges are
replaced before breakthrough occurs.
Failure to follow these warnings could result in death or serious injury.
*DO NOT fit filters directly to the hood.
Mounting and Replacing Filters
on the Blower Unit
High efficiency particulate filters must be
replaced when retained particles clog the
filters and reduce air flow below acceptable
levels, as indicated by testing with the Air Flow
Indicator as described at left.
To Replace Filters
• Remove the air-purifying element from its packaging, and inspect for damage.
If in doubt do not use.
• Check that the air-purifying element has not exceeded its “use-by” date.
• Check that the filter connecting thread and gasket are in good condition.
• Check that the air-purifying element is appropriate to the hazard. If in doubt
consult your respirator program administrator or supervisor.
• Check that the threads in the blower unit port are in good condition and clear of
contaminant.
• Screw the air-purifying elements into the receptacles (see Figure 8) until the
cartridge is hand tight. DO NOT OVERTIGHTEN.
• Check to see that the locking tab is secure. (see Figure 9)
To Replace Combination Filter/Cartridge
• Follow the steps above, but beware that the filter locking tab is beneath the
filter rim. (see Figure 10)
Installing and Removing the Belt on the
Blower Unit
To install the belt
• With the blower filter side down, orient the lever locks as shown in Figure 11
• Lay belt over blower as shown in Figure 12
• Rotate level locks until they are oriented as shown in Figure 13
To Remove the Belt
• With the blower filter side down, orient the lever locks as shown in
Figure 12
• Remove belt from blower
Figure 7
Figure 8
Figure 9
Figure 10
Locking
tab
Locking
tab
Figure 11
Figure 12
Figure 13
Figure 6