Connecting your eco, Use and operation – Bullard ECO User Manual
Page 2
www.bullard.com
Connecting Your ECO
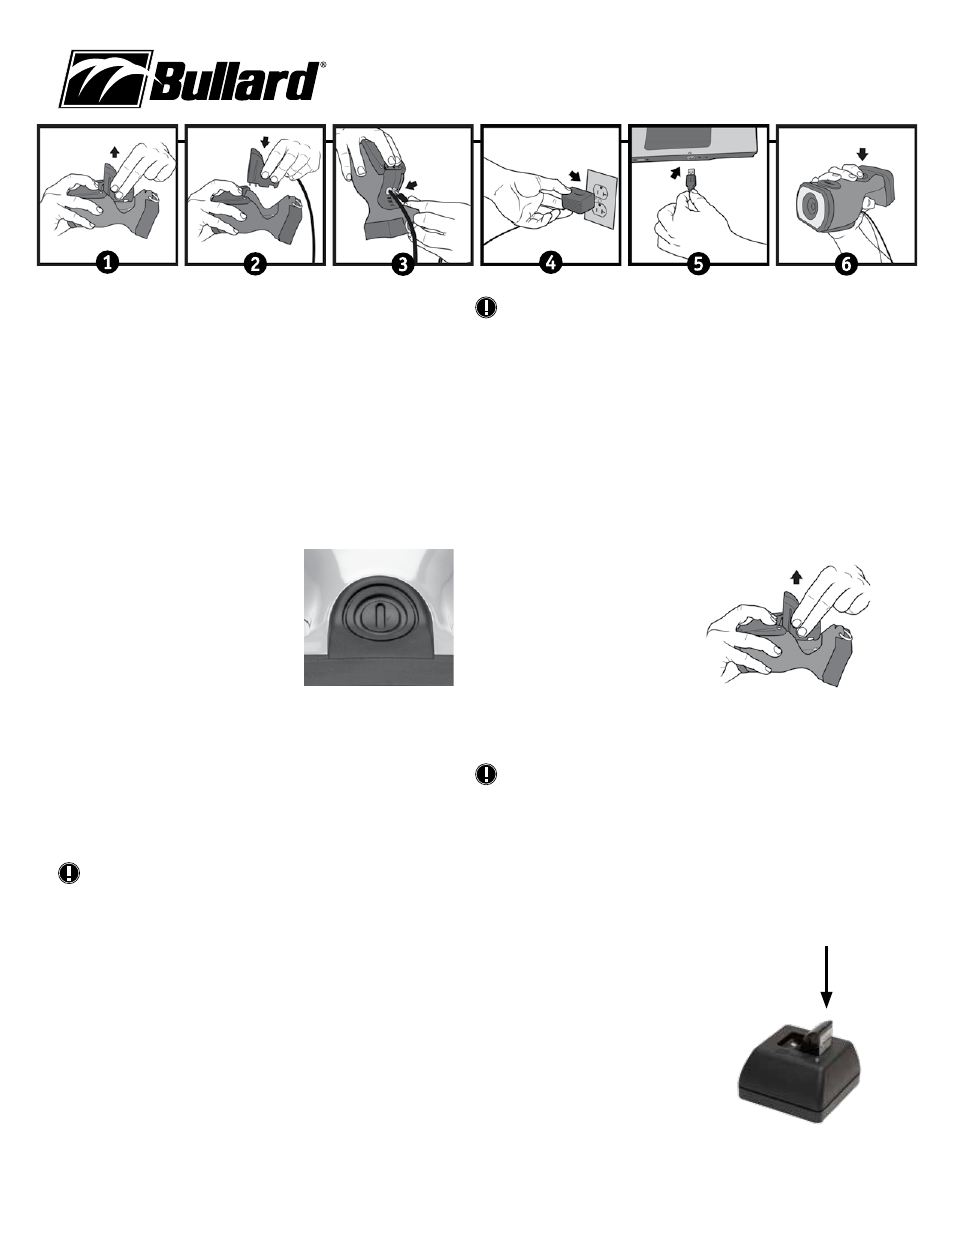
After installing the myBullard software, you will need to connect your ECO Thermal
Imager to your computer. In order to connect your ECO to your computer, please
follow these steps (Figure 2):
1. Press in firmly and pull back on battery release to release battery.
2. Press in firmly and pull back on battery release and insert the red data
cable assembly.
3. Connect power adaptor to red data cable assembly.
4. Connect power adaptor to power outlet.
5. Connect USB to PC.
6. Turn on ECO by pressing power button.
Use and Operation
Power
To turn on your Bullard ECO Thermal Imager,
depress the black power button located on top
of the unit (Figure 3). Upon pressing the power
button, you will hear an audible click, and the
thermal imager will display the Bullard logo. A
thermal image will appear within a few seconds.
This image consists of black, white and gray
elements indicating heat signatures of objects
and scene dynamics. Warmer elements appear as
lighter shades, while cooler elements appear as darker shades.
To turn off power, depress the power button.
Battery Status Indicator
A battery status indicator, located at the bottom center of the display, indicates the
remaining battery charge for the ECO. A full charge is indicated by a full green bar
in the battery indicator. During operation, the bar will deplete from left to right,
changing to yellow when it reaches 40% charge, and then to red when it reaches
20% charge. At 10% remaining charge, the red bar will flash.
NOTE
You will periodically observe a momentary freeze in the image. This is normal
and is a function of the self calibration shutter. The shutter will activate
every 30 seconds to three minutes, depending on the environment.
Temperature Measurement Features
Your ECO is equipped with temperature measurement features. The display
on the ECO will show a bar graph style and/or numeric temperature gauge.
The bar graph indicator shows the approximate temperature of the object
viewed within the “crosshairs” shown in the middle of the display. The numeric
temperature indicator functions in the same way but shows the temperature as a
numeric value. The accuracy of the indicators is dependent on numerous factors
including the distance from the object being viewed and its emissivity, which is
the object’s ability to radiate heat. Units are calibrated with a preset emissivity
corresponding with normal construction materials. Objects with emissivities that
vary greatly from this, such as metals and shiny objects, will reduce the accuracy
of the temperature indication. Additionally, temperature measurement accuracy
decreases as the distance from the object in the “crosshairs” increases.
NOTE
The RHI and numeric temperature indicators provide a quick reference to
compare objects of similar emissivities to serve as a guide to pinpoint
intense heat sources. Due to the inherent issues with accuracy, use these
features with caution and verify indicated heat levels through traditional
means whenever possible.
High Heat Colorization Feature
Your ECO is equipped with High Heat Colorization, a feature which colorizes heat
levels in various color hues. Starting at 250 degrees C, heated objects are tinted
yellow and gradually transition to orange and then to solid red as heat levels rise.
This feature identifies specific heat layers alerting firefighters to areas of intense
heat providing an enhanced visual awareness of the hottest objects in a scene.
Loading/Unloading a Battery
To load a battery (Figure 4), depress and then
slide the battery release switch in the direction
of the arrow indicated on the button. With
the battery release switch engaged, slide the
battery into the groove in the cavity located at
the bottom of the unit. You will hear an audible
“click” when the battery is properly seated.
To unload a battery, depress and then slide the
battery release switch in the direction of the
arrow indicated on the switch. With the battery
release switch engaged, grip the battery by its exposed bottom section and pull it
away from the unit (Figure 4).
NOTE
If the battery is inserted without first retracting the battery release switch,
the battery will not fully seat. If this occurs, remove the battery and follow
reload using the instructions above. The battery latch mechanism prevents
accidental battery release upon impact.
Charging and Maintaining Batteries
If you purchased an ECO Powerhouse with your ECO Thermal Imager, see the
enclosed Powerhouse manual for charging instructions. If you purchased a
PowerUp Charger/Conditioner/Analyzer with your ECO Thermal Imager, see
the enclosed PowerUp manual for charging
instructions. If you purchased an ECO Thermal
Imager only, you received a charging base.
To charge a battery in the charger included
with your ECO, place it in the charging base
(Figure 5). A steady red light will indicate that
the battery is charging, while a steady green
light will indicate a full charge. The system will
detect the full charge and will not overcharge
the battery. A completely drained battery takes
up to three hours to fully recharge.
Figure 3
Figure 4
Figure 2
Figure 5