Desa E36LBH User Manual
Page 8
ELECTRIC
FIREPLACE
INSTALLATION
INSTRUCTIONS
Models: (V)E32L, (V)E32LB, (V)E32LH, (V)E32LBH
(V)E36L, (V)E36LB, (V)E36LH and (V)E36LBH
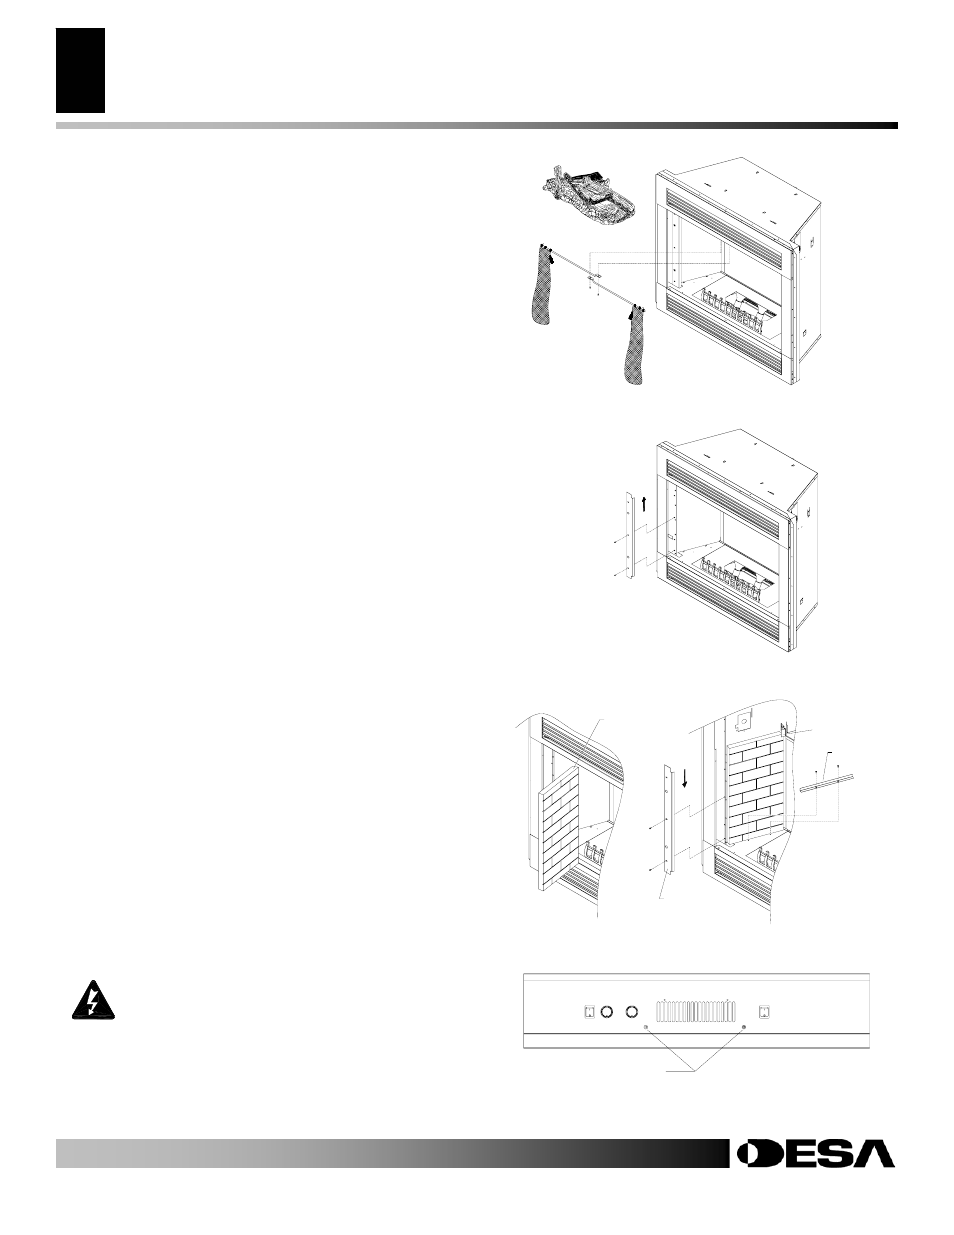
OPTIONAL BRICK LINERS
Installing/Removing BL36/32E(W) Brick Liner Kits
Models (V)E36/32(L)(H) may accept optional BL36/32E(W)
brick liner kits (see Accessories, page 24). The brick panels may be
installed anytime after the fireplace installation is complete.
Follow these steps to install left and right panels:
1. Remove the glass doors (if equipped) follow the instructions
under - Optional Glass Doors, page 7.
2. Remove each retaining screw holding the screen rods and pull
entire screen and rod assembly out from the locating hole on the
inside top of each screen pocket (see Figure 16).
3. Remove log bed from hearth pan and place in a safe area. The
log bed is attached with contact magnets only.
4. Remove the two screws holding each face extension to the
firebox. Then pull up and lift out of the positioning slot at the
bottom of the hearth pan (see Figure 17).
5. Insert the brick panel, with the beveled edge first, through the
firebox opening. Then tilt and angle the top edge into the brick
retainer until the bevel edge contacts the imager and the panel is
flat against the firebox (see Figure 18).
6. Align the heart extension over the holes near the lower edge of
the brick panel and secure with 2 pan screws provided.
7. Replace the face extension using the 2 screws removed prior.
8. Repeat steps 5 through 7 for the opposite panel assembly.
9. Replace each screen assembly by positioning the screen rod
into locating holes at the very top of each screen pocket and
securing with the 2 Phillips screws removed prior.
Note: The rods may have to be angled into the locating holes which
are exposed through a knockout at the top of each screen pocket.
Once inserted, pull the free end of the rod forward until it lines up
over the farthest mounting hole respectively so both rods overlap.
10. Replace the log bed over the hearth opening and center between
the grate and the viewing screen.
11. Replace glass doors if removed. See Optional Glass Doors.
OPTIONAL HEATER ACCESSORY
The models (V)E36/32L and (V)E36/32LB will accept the model
BHKE blower/heater kit. Either of 2 types of blower/heater
assemblies can be installed as follows on page 9:
8
Figure 16 - Removing Screens/Rod Assemblies
Figure 17 - Removing Face Extensions
BRICK RETAINER
HEARTH
EXTENSION
FACE
EXTENSION
BRICK PANEL
(BEVELED EDGE)
Figure 18 - Installing Brick Panels and Brackets
F
F
o
o
r
r
m
m
o
o
r
r
e
e
i
i
n
n
f
f
o
o
r
r
m
m
a
a
t
t
i
i
o
o
n
n
,
,
v
v
i
i
s
s
i
i
t
t
w
w
w
w
w
w
.
.
d
d
e
e
s
s
a
a
t
t
e
e
c
c
h
h
.
.
c
c
o
o
m
m
PANEL SCREWS
Figure 19 -Locating Front Panel Screws
Disconnect power before attempting any
maintenance or cleaning to reduce the risk
of fire, electrical shock or personal injury.
111076-01C