Ccoaxial cable connection), C semi-flush mounting to walx), Surface mounting to walq – Aiphone MA-4U User Manual
Page 4
Attention! The text in this document has been recognized automatically. To view the original document, you can use the "Original mode".
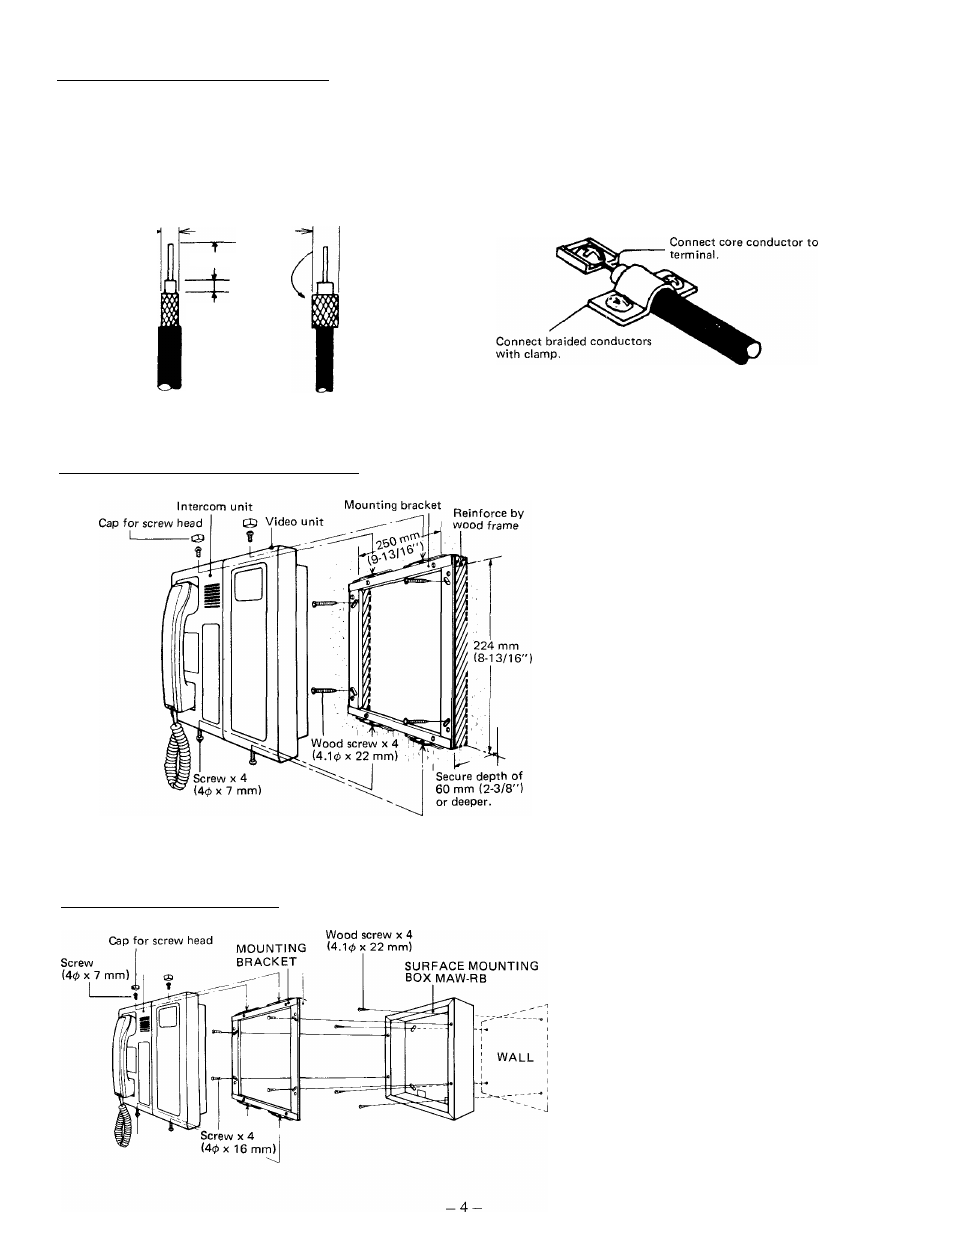
CCOAXIAL CABLE CONNECTION)
Please use 5C-2V, RG-59/U or equivalent.
Impedance: 75 ohm.
Observe the size of cable of 5.5 mm (7/32”) thick as shown to be firmly secured by the clamp.
When using 3C-2V, RG-58/U or equivalent, strip the insulation and fold back the braided conductors as shown to avoid
shorting to core conductor.
5.5 mm (7/32”)
16.5 mm (5/8")
3 mm
(
1/8”)
8.5 mm (3/8”)
_i_
Type: 5C-2V
(RG-59/U)
5.5 mm (7/32”)
Type: 3C-2V
(RG-58/U)
C
SEMI-FLUSH MOUNTING TO WALX)
Note: Use MAW-JB back box when mounting MA-4U recessed to
concrete wall in new construction.
(1) Use the provided template to open a
hole of H: 224 mm x W: 250 mm
(8-13/16” X 9-13/16”) securing depth
of 60 mm (2-3/8”) or deeper.
(2)
Provide backup wooden frame for
securing mounting bracket.
(3)
Attach the mounting bracket to wall
with 4 wood screws, so as to be fitted
vertically to the floor.
(4) Connect coaxial cable. After connecting
cable by wire nuts, plug in connector
(male) on MA-4U.
(5) Fit the MA-4U intercom unit first and
then Video unit to the mouting bracket.
Attach top and bottom of each unit
by 2 screws.
(6) Hide the head of the upper screws by
the caps provided.
(
surface
mounting
to
wal
Q
(1) Attach MAW-RB surface-mounting back
box to wall with 4 wood screws.
(2) Attach the mounting bracket to surface
mounting back box with 4 screws.
(3) Connect coaxial cable. Remove connec
tor (female) and connect to wires by
wire nuts and plug in to connector
(male) on MA-4U.
(4) Fit MA-4U intercom unit first and then
Video unit to the mounting bracket.
Attach top and bottom of each unit
by 2 screws.
(5) Hide the head of the upper screws by
the caps provided.