Drive belt maintenance, Measuring and adjusting drive belt tension – Troy-Bilt 12204-10HP User Manual
Page 35
Attention! The text in this document has been recognized automatically. To view the original document, you can use the "Original mode".
Sections: Maintenance
A
W ARNING
W
Failure to follow these instructions can result in serious personal injury or property damage.
Before inspecting, cleaning or servicing the machine, shut off engine, wait for all moving parts to come
to a complete stop, disconnect spark plug wire and move wire away from spark plug. Remove ignition
key, if so equipped.
Drive Belt Maintenance
Measuring and Adjusting
Drive Belt Tension
On a new tiller (or if a new belt is
installed), the belt tension will probably
need to be adjusted after the first two (
2
)
hours of operation. Thereafter, check belt
tension every ten (
10
) operating hours.
Maintaining the right tension is important
to good tiller performance and long belt
life. If too loose, the belt will slip on the
pulleys, and be unable to deliver full
power to the wheels and tines. A loose
belt will also wear prematurely.
While checking belt tension, also inspect
the belt for cuts, cracks, deterioration,
etc. Don’t continue using a belt that isn’t
in good shape. You’re sacrificing tiller
performance by doing so.
Tips on keeping the drive belt in top
condition include:
• Always put the Wheels/Tines/PTO Drive
Lever in NEUTRAL when the tiller is not in
use.
• Keep tension adjusted correctly.
• Don’t “speed shift” when moving the
Wheels/Tines/PTO Drive Lever between
FORWARD and REVERSE.
How to Measure Belt Tension
1. Before taking a measurement, be sure
the linkages and pivot points on the
Wheels/Tines/PTO Drive Lever are clean
and lubricated. If there is any binding,
you won’t get true measurements. Also,
you’ll need the belt adjustment tool you
received with your new tiller (Figure
5-11).
2. Move the Wheels/Tines/PTO Drive
Lever fully down to the FORWARD
position. The clutch roller at the bottom
of the lever should be positioned under
neath the belt adjustment block (Figure
5-12). Don’t let the clutch roller move
during the next few steps. If it moves,
you’ll get a false belt tension reading.
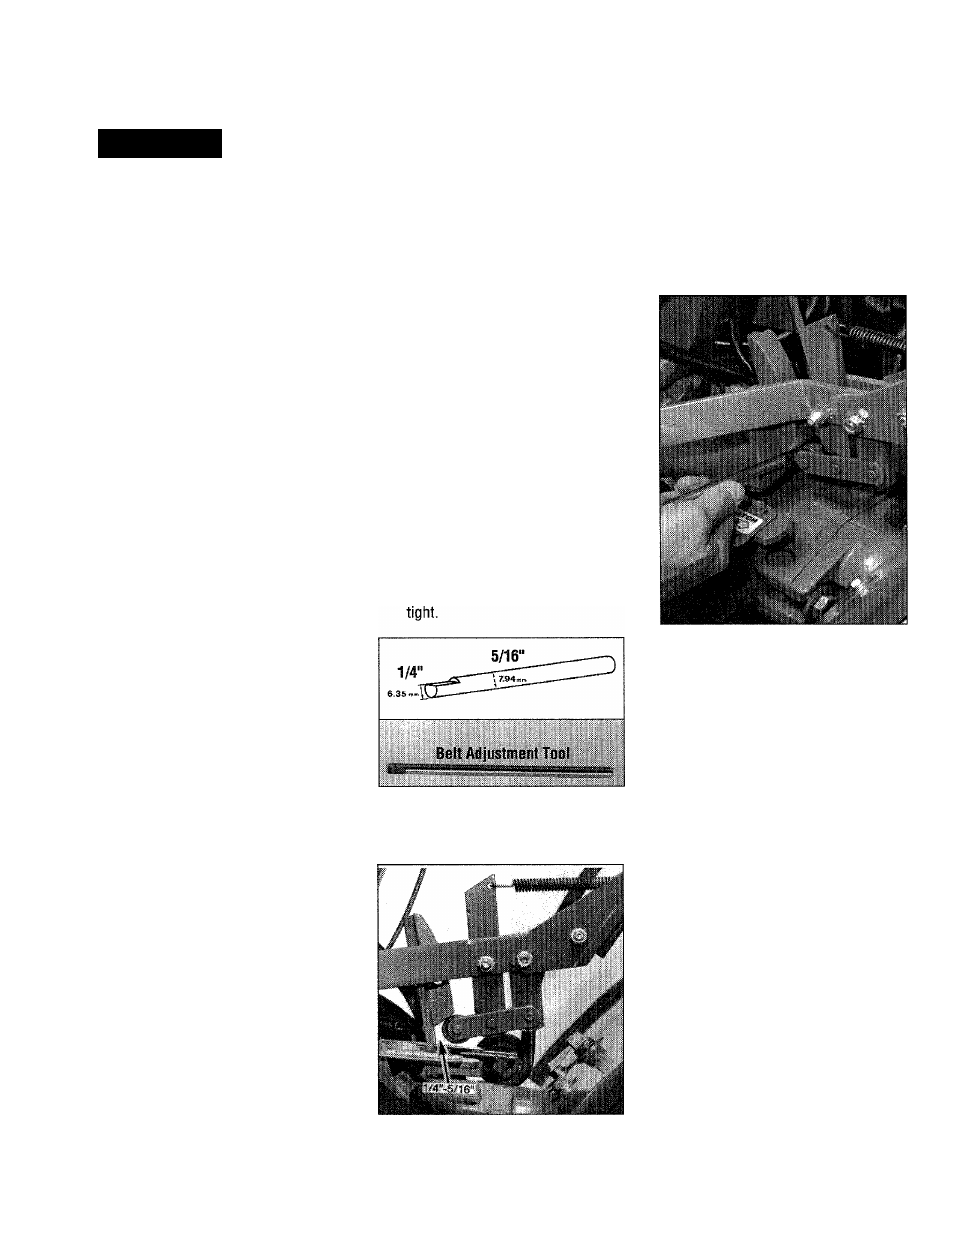
3. The belt tension is correct if the front
of the clutch roller is 1/4"-to-5/16" away
from the face of the upright bracket that
holds the adjustment block in place
(Figure 5-12). To measure this distance:
a.
Without moving the clutch roller, try
inserting the 1/4"-thick, slotted end
of the belt adjustment tool in
between the roller and the upright
bracket. (The flat edge of the tool
must be facing the roller.) Refer to
Figure 5-13.
b. If only the
slotted
portion of the tool
will fit, the belt tension is correct.
c.
If the slotted part of the tool ’
fit in, the belt is too loose.
not
, If the full thickness (5/16") of the
tool easily fits in, the belt is too
Figure 5-11: Use this beit adjust
ment tool to measure and adjust
drive belt tension.
Figure 5-12: Shift into FORWARD
and measure distance between
roller and upright bracket using the
belt adjustment tool.
4. If the belt tension is correct, move the
Wheels/Tines/PTO Drive Lever back to
NEUTRAL.
Figure 5-13: Insert slotted end of
belt adjustment tool between roller
and bracket, with the flat side of the
slotted end facing the roller.
How to Adjust Belt Tension
1. As described in the following steps,
drive belt tension is adjusted by moving
the adjustment block up or down.
Moving it down will tighten the belt;
moving it up loosens the belt.
HINT: The distance the block moves
approximately equals the distance the
roller moves.
In most cases, the clutch roller will not
have been very far out of position, so the
adjustment block will only need to be
moved slightly (up or down).
2. Move the Wheels/Tines/PTO Drive
Lever to NEUTRAL position. The clutch
roller will come to rest anywhere on the
face of the belt adjustment block,
depending upon drive beit length and
current belt tension adjustment.
35