Troy-Bilt 12204-10HP User Manual
Page 17
Attention! The text in this document has been recognized automatically. To view the original document, you can use the "Original mode".
Section 4: Operation
Wheels/Tines/PTO
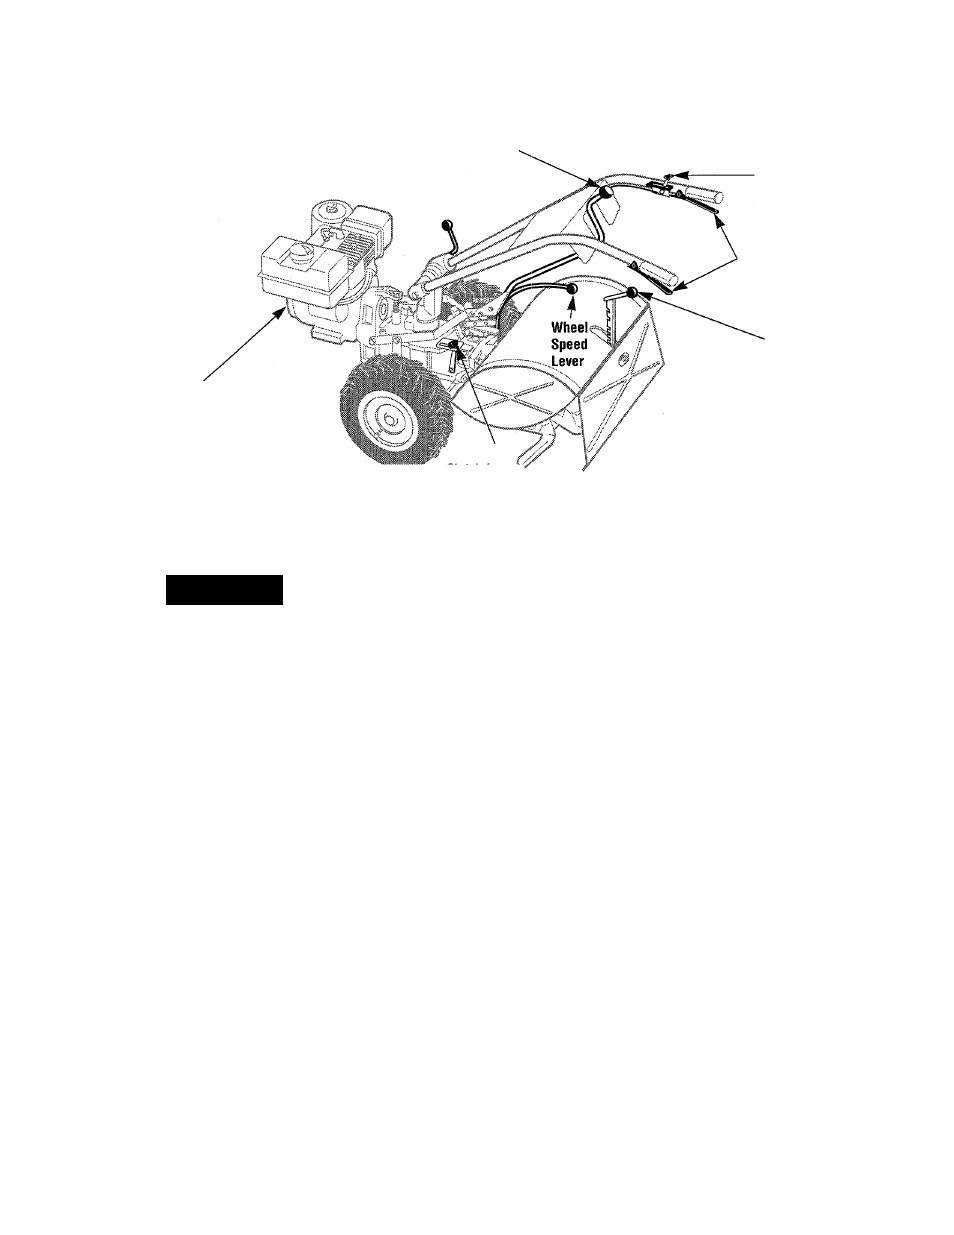
Drive Lever
Recoii Start Rope
(at front of engine)
Engine Throttie
Lever
Forward
interlock Levers
Depth
Regulator
Lever
Tines/PTO
Clutch Lever^
Starting the Engine:
A
CAUTION
To help prevent serious
personal injury or damage to equipment:
• Always place Wheels/Tines/PTO Drive
Lever
into
NEUTRAL
before
starting
engine, and before engaging wheels,
tines or other PTO-driven attachments.
•
Never
run
engine
indoors
or
in
enclosed,
poorly
ventilated
areas.
Engine
exhaust
contains
carbon
monoxide,
an
odorless
and
deadly
gas.
•
Avoid
engine
muffler
and
nearby
areas. Temperatures in these areas
may exceed 150°F.
1. With the engine off, place the
Wheels/Tines/PTO Drive Lever (Figure
4-2) in the NEUTRAL position. If in the
FORWARD position, tap the lever sharply
upward, it should automatically move into
NEUTRAL position.
2.
Put the Depth Regulator Lever in the
Travel position (lever all the way down)
so that the tines are off the ground. To do
this, lift up on the handlebars, pull the
lever (Figure 4-2) back, and push it down
all the way to the top detent (notched)
position.
Figure 4-2: Tiller and engine controis.
3. Move the Wheel Speed Lever (Figure
4-2) to either the SLOW or FAST position.
Be sure to roll the wheels while shifting the
lever until the wheels engage.
NOTE: If using a PTO stationary attach
ment, move the Wheel Speed Lever into
FREEWHEEL and block the wheels to
prevent the equipment from moving (Figure
4-29 on page 29).
4.
Move the Tines/PTO Clutch Lever into
DISENGAGE position (Figure 4-2).
NOTE: Use the ENGAGE position if you want
the tines to revolve or to apply power to a
PTO-driven stationary attachment.
5. If engine is equipped with a fuel valve,
turn valve to OPEN position as instructed
in the separate Engine Owner’s Manual.
6
. If engine is equipped with an ON/OFF
switch, move the switch to ON.
7. Move engine throttle lever (Figure 4-2)
awayfrom STOP.
8
. Choke or prime engine as instructed in
the separate Engine Owner’s Manual.
9. If not equipped with an electric start
system, place one hand on the fuel tank to
stabilize the unit when you pull the recoii
starter rope. Use the recoil starter rope to
start the engine as instructed in the
separate Engine Owner’s Manual.
10. If equipped with an electric start
system, turn key to START position to crank
engine then release when engine starts. If
the engine does not start right away, do not
hold key at START for more than a few
seconds. Release then try again after a short
pause. Damage to starter motor can occur if
it is cranked more than 15 seconds per
minute.
11
. If the engine does not start after a
number of tries, refer to the Engine Owner’s
Manual for specific instructions.
12. When engine starts, move the Throttle
Lever to the SLOW position and then
gradually move choke lever (on engines so
equipped) to OFF or RUN position.
13.
Move the throttle speed control to
FAST setting when tilling.
Starting Electric Start Engines
with the Recoil Starter Rope
You may, at some point, have to start an
electric start engine with the recoil starter
rope. Before attempting to do so,
perform the following applicable steps:
• If you suspect the battery charge is
weak, and there is no visible damage,
check battery cells and fill to the proper
level with electrolytic solution. Discon
nect cables from battery and clean both
cable terminals, and the battery posts In
accordance with the instructions
provided in Section 5,
Battery Care and
Maintenance.
7