Setting up non-powered attachments, Starting the engine, Operating stationary attachments – Troy-Bilt 12204-10HP User Manual
Page 29: Stopping the engine
Attention! The text in this document has been recognized automatically. To view the original document, you can use the "Original mode".
Section 4: Operation
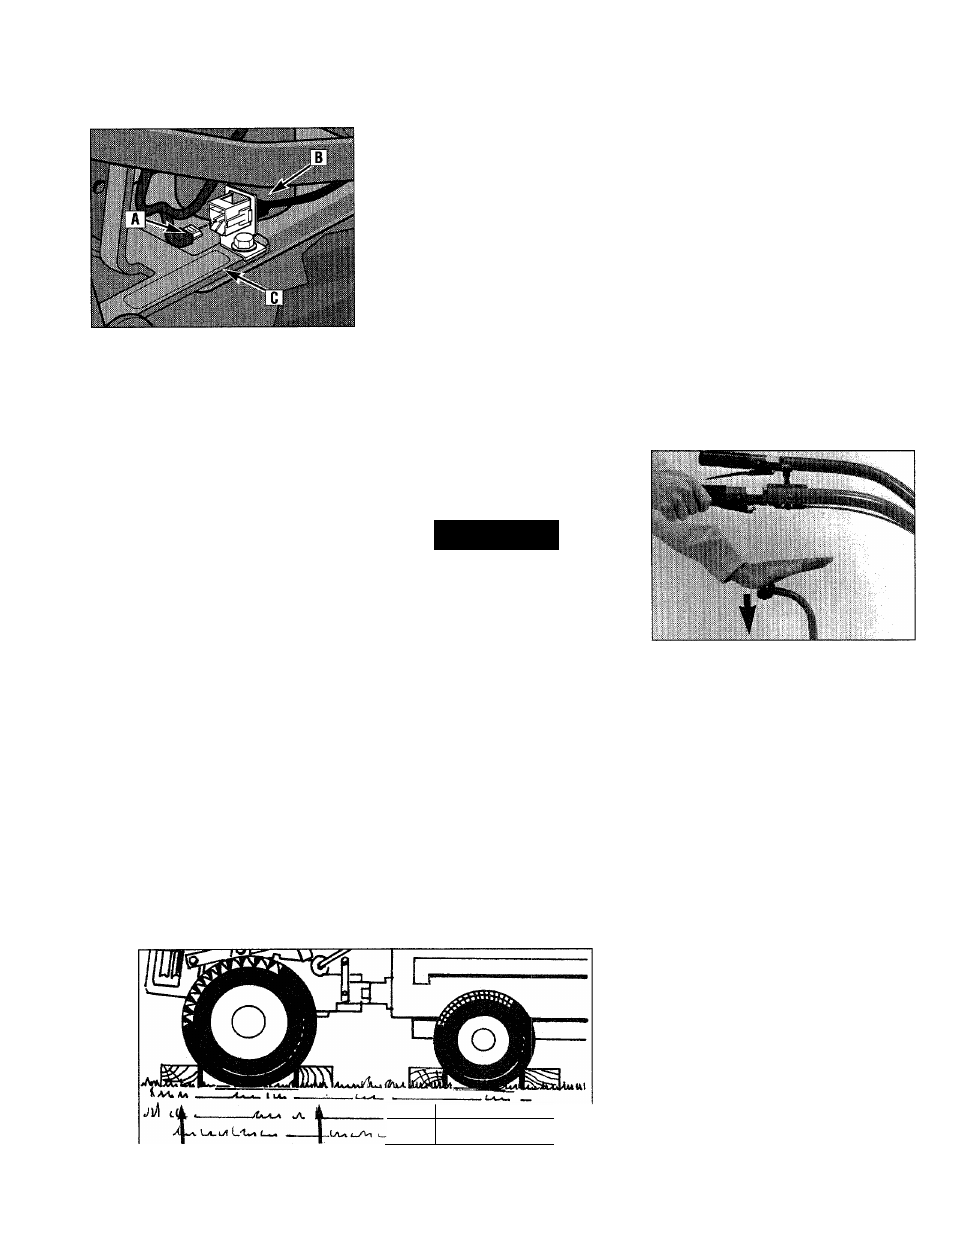
Figure 4-28: Forward Interlock Wiring
A - PTO Power Unit Interlock Harness
B - Forward Interlock Receptacle
C - Attachment Interlock Wire
3. On the PTO Power Unit, unplug the
Forward Interlock Wire Harness that leads
from the base of the handlebars (A, Figure
4-28) to the receptacle (B) located on the
top, right side of the transmission cover.
4. On the Stationary Attachment, locate
the interlock wire (C, Figure 4-28) and
clean contacts on plug and receptacle (B).
This connection enables you to operate
the Wheels/Tines/PTO Drive Lever in
FORWARD without having to squeeze a
Forward Interlock Lever.
5. Connect the plug from the Stationary
Attachment (C, Figure 4-28) to the recep
tacle on the PTO Power Unit (B). The
connection must be tight.
Setting Up Non-Powered Attach
ments
1. Move the Tines/PTO Clutch Lever
(Figure 4-22) to DISENGAGE.
2. Move the Wheel Speed Lever (Figure
4-22) to either SLOW or FAST position
To do this, roll the PTO Power Unit while
shifting lever until wheels engage.
3. Verify that the Forward Interlock Wire
Harness plug at the base of the handle
bars (A, Figure 4-28) is connected to the
Forward Interlock Wire Harness recepta
cle (B) on the top right side of the
transmission.
Starting The Engine
IMPORTANT:
Reier \o Cold Weather
Operation
instructions, in this section,
before operating in temperatures below
40°F.
1. Move the Wheels/Tines/PTO Drive
Lever into NEUTRAL. To find NEUTRAL
(be sure engine is off), push lever down
and engage it in FORWARD then tap the
lever upward to automatically move into
NEUTRAL.
2. Move the Tines/PTO Clutch Lever into
DISENGAGE position.
A
WARNING
To avoid injury,do not run the engine in
an enclosed or poorly vented area.
Engine
exhaust
contains
carbon
monoxide, an odoriess and deadly gas.
3. Start Engine. See
Starting and
Stopping the Engine,
in the beginning of
this section, for detailed starting informa
tion. Also see the Engine Owner's Manual.
4. For non-powered attachments only test
the Forward Interlock Safety System. See
Testing the Forward Interlock
System, in this section, for a procedure.
Operating Stationary Attachments
1. Move Tines/PTO Clutch Lever (Figure
4-22) into ENGAGE.
L
Ol,
a
2. To apply power to PTO-driven attach
ments, move Wheels/Tines/PTO Lever
(Figure 4-22) down to FORWARD position
{do not use REVERSE with stationary
attachments).
3. To stop the PTO Power Unit, tap the
Wheels/Tines/PTO Drive Lever upward
into NEUTRAL position.
Operating Non-Powered Attachments
(or to Tow Stationary Attachments)
1. To move forward, squeeze and hold
one Forward Interlock Lever (Figure 4-30)
up against the handlebars, and move the
Wheels/Tines/PTO Drive Lever down to
FORWARD.
Figure 4-30: Moving tiller forward:
squeeze one Forward Interlock Lever
and then move Wheels/Tines/PTO
Drive Lever down to FORWARD.
2. To stop forward motion, tap
Wheels/Tines/PTO Drive Lever upward
into NEUTRAL, then release the Forward
Interlock Levers.
3. To stop forward motion in an
emergency, release all PTO Power Unit
controls (stops engine).
4. To move in reverse, reduce the engine
speed then shift the Wheel Speed Lever
into SLOW. Move and hold the
Wheels/Tines/PTO Drive Lever all the way
up. Ensure that the area behind you is
clear of all obstacles, before moving the
lever into REVERSE.
5. To stop moving in REVERSE, release
the Wheels/Tines/PTO Drive Lever.
Stopping the Engine
Move the Engine Throttle Lever to STOP.
Turn keyswitch to OFF on electric start
models.
Figure 4-29: Block wheels on PTO Power Unit and stationary
attachment.
29