Assembly, Inspect unit, Shipping carton contents – Troy-Bilt 42000 User Manual
Page 8: Toois/additionai assembiy materials, Discharge chute assembiy, Tools/additional assembly materials, Discharge chute assembly
Attention! The text in this document has been recognized automatically. To view the original document, you can use the "Original mode".
Section
2
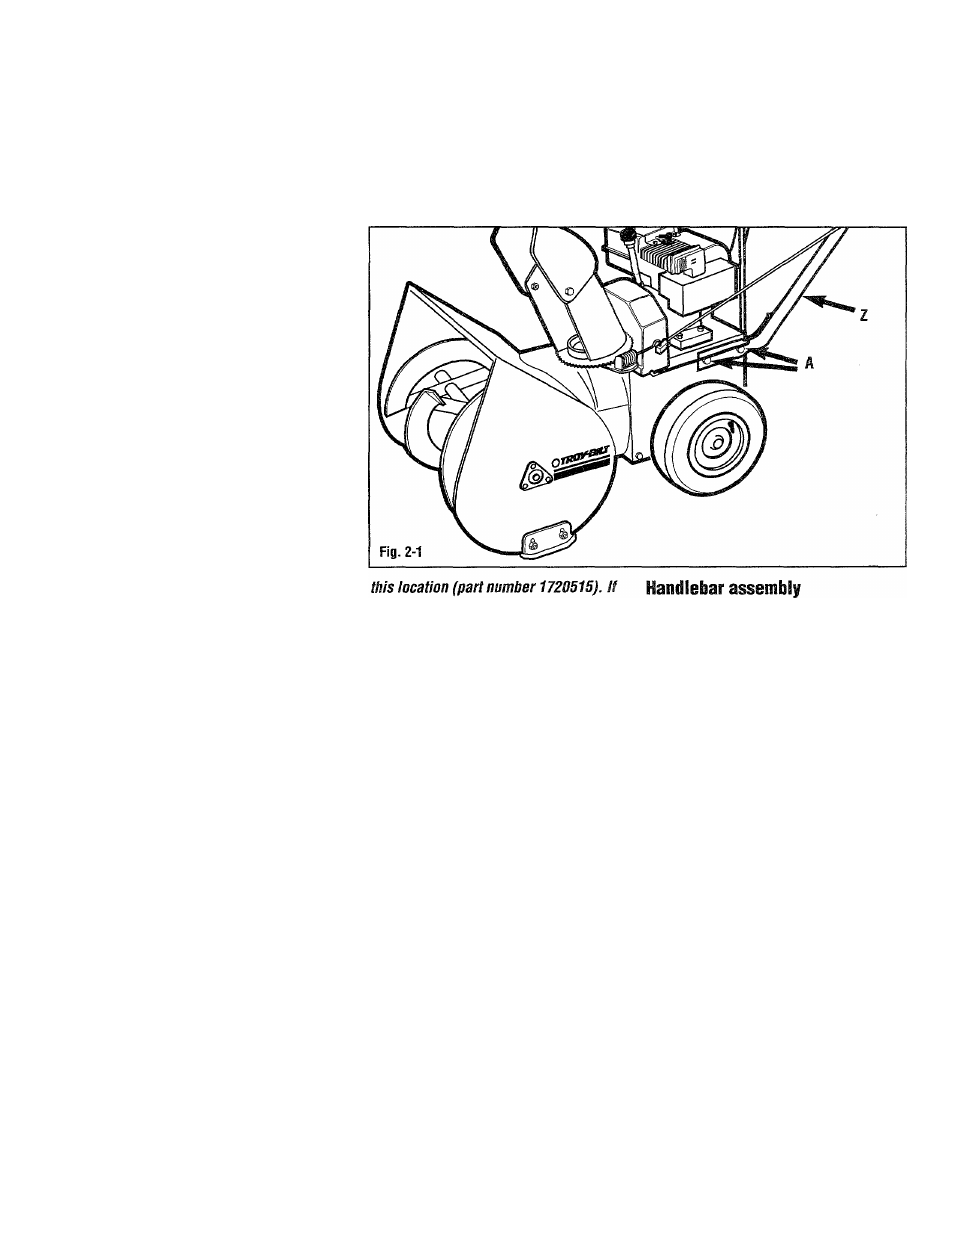
Assembly
inspect unit
Inspect the unit and carton for damage
immediately after delivery. Contact the
carrier (trucking company) if you find or
suspect damage. Inform them of the
damage and request instructions for filing
a claim, to protect your rights, put your
claim in writing and mail a copy to the
carrier within 15 days after the unit has
been delivered, Contact us at the factory
as indicated on page 3 of this manual if
you need assistance in this matter.
Shipping carton contents
The shipping carton should contain:
• Snowthrower/engine/auger assembly.
• Handlebars.
• Discharge chute assembly (including
discharge chute control rod and
control rod support bracket).
• Hardware package containing:
(2) cable brackets.
(1) 1/4”-20 X1-1/2" cap bolt
(1) 1/4“ flat washer
(1) 1/4"-20 locknut
(4) 5/16"-18 X 5/8" hex flange bolts
(2) 1/4”-20 x 3/4“ hex flange bolts.
(2) cotter pins.
(2) ignition keys (attached to choke
knob).
*(2) extra 5/16"-18 x 1-3/4" locknuts
(see note below).
*(2) extra 5/16"-18 x 1 -3/4” shear
bolts (see note below).
*Note: These Items are replacements
for the auger shear bolts and
lockwashers (If the auger jams, the
shear bolts are designed to break to
prevent damage to the auger). Tighten
these bolts and lockwasheis t o l l ft-lbs
(15 Nm). Only use these special bolts In
other bolts are used In this location,
damage to the unit could result.
Toois/additionai assembiy
materials
Tools/materials required to assemble the
unit:
**(2) 7/16" wrenches.
**(2) 1/2" wrenches (one open-ended).
**(1) 3/8" wrench.
**(1)5/16" wrench.
**(1) 9/16" wrench.
(1) needle-nosed pliers.
(1) automotive-type air pressure gauge.
(1) clean funnel.
(1 oz.) multi-purpose grease.
(approximately 21 oz.) clean, high-quality
engine oil. Refer to the engine owner
manual for exact engine oil
specifications.
**Note: adjustable wrenches may be
substituted.
1. Position the handlebars (Z, Fig. 2-1)
as shown, so the holes In the
handlebars align with the holes in the
upper rear corners of the
snowthrower frame.
2. Loosely install four 5/16”-18 x 5/8”
hex flange bolts (A).
3. Evenly tighten all four bolts (A).
Discharge chute assembiy
1. Remove the cardboard liner and the
chute control assembly inside the
discharge opening on top of the unit.
2. Remove the shims and clips (B and D,
Fig. 2-2) from the sides of the
discharge chute. Loosen, but do not
remove the front shim and clip.
3. Apply multi-purpose grease to the top
surface of the discharge chute flange
(C).
8