Auger shear bolts, Caution, Off-season storage – Troy-Bilt 42000 User Manual
Page 27: Off season storage, Sectíoo 5: maintenance (continued)
Attention! The text in this document has been recognized automatically. To view the original document, you can use the "Original mode".
Sectíoo 5: Maintenance (continued)
5. Loosen the belt guides on the back of
the auger housing, below the auger
drive pulley. Rotate the guides to
allow removal of the auger drive belt.
Remove the auger drive belt.
INSTALLATION:
1. Position the auger drive belt around
the auger drive pulley in the auger
housing.
2. Adjust and tighten any belt guides
^ loosened during step 5, “REMOVAL.”
Adjust the belt guides 1/16” (Imm)
away from the auger drive belt when
the belt is tight against the auger
drive pulley.
3. Move the auger housing and the
frame/handlebar assembly together
and position the auger drive belt (S,
Fig. 5-9) around the drive pulley on
the engine (T).
4. Secure the auger housing and the
frame/handlebar assembly together
with the
four
flange bolts (X) removed
earlier.
5. Adjust and tighten any belt guides (U)
loosened earlier during step 4,
“REMOVAL”. Adjust the belt guides
1/16” (1mm) away from the auger
drive belt (S) when the belt is tight.
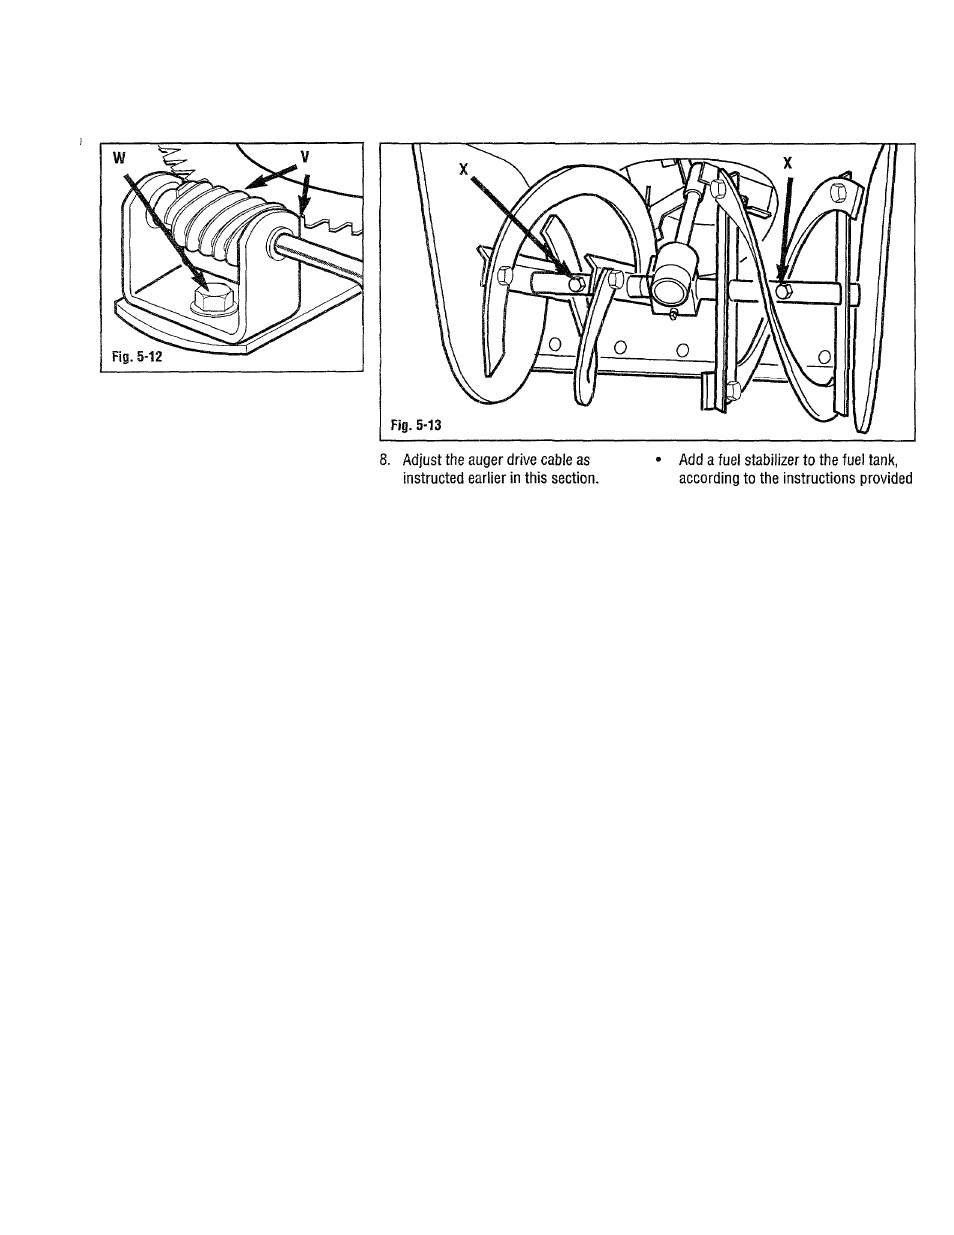
6. Position the worm gear and support
(V. Fig. 5-12) back in place on the
unit. Secure the worm gear and
support with bolt (W).
7. Rotate the chute control crank and
check for binding. Reposition the
worm gear and support (V) as needed
for smooth operation.
9. Position the belt cover (G, Fig. 5-10)
and secure with the two bolts
removed earlier.
Auger shear bolts
The auger shear bolts (X, Fig. 5-13)
are designed to shear if the auger
becomes jammed. This prevents damage
to other parts of the unit. Replace these
shear bolts with only original equipment
replacements (part number 1720515),
and tighten to a torque value of 11 ft. lbs.
(15 Nm).
CAUTION
USING ANYTHING BUT
ORIGINAL EQUIPMENT SHEAR
BOLTS COULD RESULT IN
DAMAGE TO THE UNIT.
Off-season storage
When storing the unit for more than
90 days, follow these procedures to help
keep the unit in good condition for future
use;
•
Clean dirt, grime and grease from the
unit and engine.
•
Perform routine lubrication as
instructed earlier in this section.
with the stabilizer. Avoid leaving non-
stabilized fuel in the fuel tank for
longer than 30 days because gum and
other deposits can form which could
foul the carburetor and fuel line.
If the unit is equipped with a fuel
shut-off valve, rotate the valve to the
“OFF’ position.
Change the engine oil.
Remove the spark plug and squirt 1/2
ounce of engine oil into the spark
plug hole. Hold a rag over the hole
(be careful to prevent the rag from
entering the hole). Slowly pull the
recoil starter several times to coat the
cylinder wall with oil. Re-install the
spark plug, but leave the spark plug
wire disconnected from the spark
plug.
Thoroughly inspect the unit for any
loose, damaged, or missing parts.
Repair or replace the parts as
necessary.
Check all nuts, bolts and other
fasteners for tightness and tighten as
necessary.
Touch-up scratches and chipped paint
to prevent corrosion.
Store the unit on a level surface, out
of the reach of children.
27