Recommended accessories, Trouble shooting, Column collar -2438 – Sears 113.24611 User Manual
Page 19: The time
Attention! The text in this document has been recognized automatically. To view the original document, you can use the "Original mode".
trouble shooting
WARNING: FOR YOUR OWN SAFETY, TURN SWITCH "OFF" AND ALWAYS REMOVE PLUG FROM POWER SOURCE
OUTLET BEFORE TROUBLE SHOOTING.
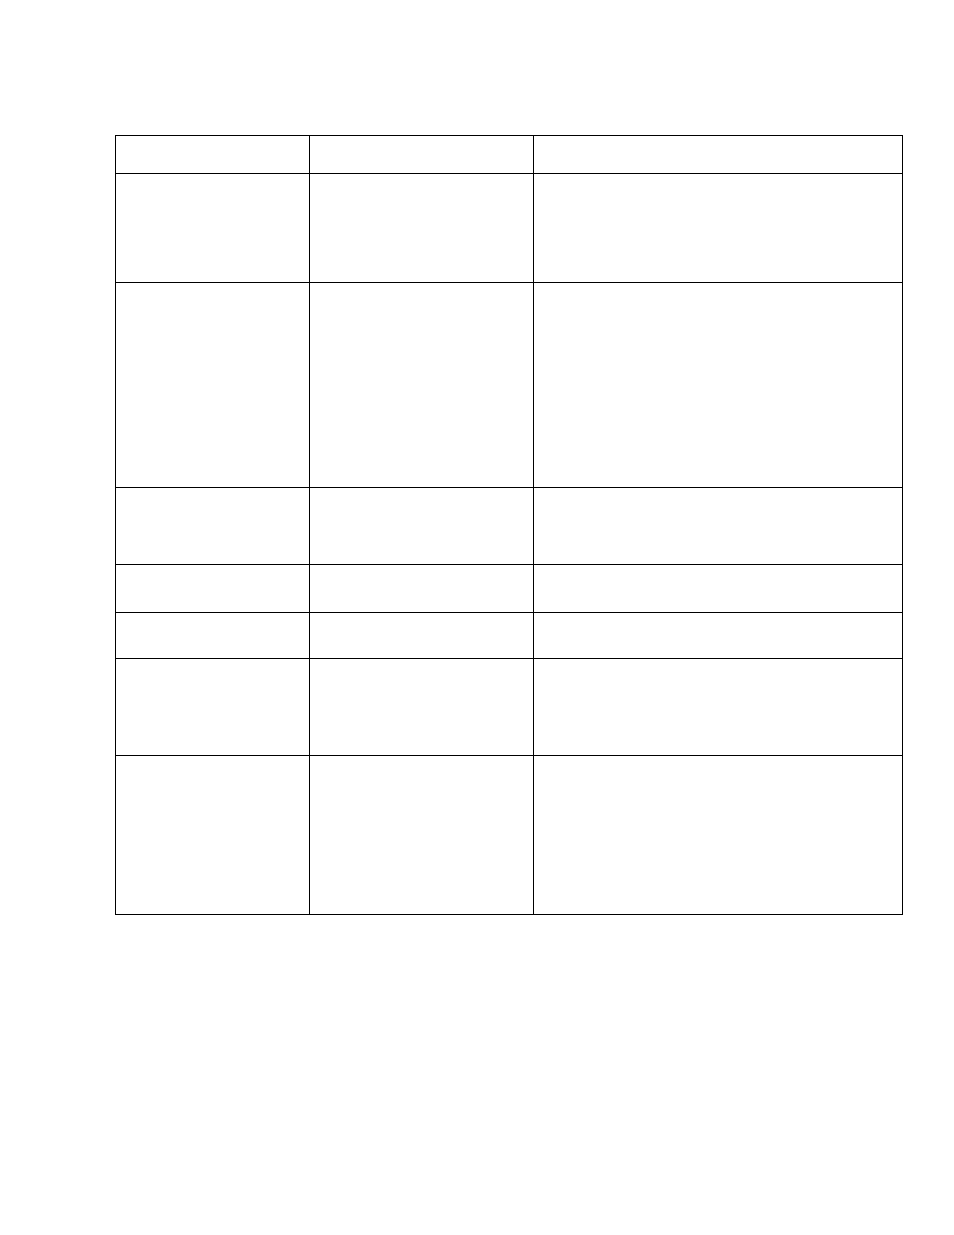
TROUBLE
PROBABLE CAUSE
REMEDY
Noisy Operation
1
. Incorrect belt tension
2. Dry Spindle
3. Loose spindle pulley
or motor pulley.
1. Adjust tension. See section "Getting To Know
Your Drill Press" . . .BELT TENSIONING ROD.
2. Lubricate spindle. See "Lubrication" section.
3. Tighten setscrews in pulleys.
Drill Burns.
1
. Incorrect speed
2. Chips not coming out
of hole.
3. Dull Drill
4. Feeding too slow.
5. Not lubricated.
6
.
Drill running backwards.
1. Change speed. See section "Getting To Know
Your Drill Press" . . . DRILLING SPEED.
2. Retract drill frequently to clear chips.
3. Reshapen drill.
4. Feed fast enough .. .allow drill to cut.
5. Lubricate drill. See "Basic Drill Press
Operation" section.
6
.
Check motor rotation. See "Motor Specifications
and Electrical Requirements" section.
Drill leads off
. . .
hole not round.
1
. Hard grain in wood or
lengths of cutting
lips and/or angles
not equal.
1. Resharpen drill correctly.
Wood splinters on
underside.
1. No "back-up material"
under workpiece.
1
. Use "back-up material" . . .See Basic Drill
Press Operation" section.
Workpiece torn
loose from hand.
1
. Not supported or
clamped properly.
1. Support workpiece or clamp it. . .See-"Basic
Drill Press Operation" section.
Drill Binds in
workpiece.
1. Workpiece pinching drill
or excessive feed
pressure.
2. Improper belt tension.
1. Support workpiece or clamp it. . .See "Basic
Drill Press Operation" section.
2 Adjust tension . . .See section "Getting to Know
Your Drill Press" .. .BELT TENSION ROD.
Excessive drill
runout
or wobble.
1. Bent drill.
2. Worn spindle bearings.
3. Drill not properly
installed in chuck.
4. Chuck not properly installed.
1
. Use a straight drill.
2. Replace bearings.
3. Install drill properly .. .See "Basic Drill
Press Operation" section.
4. Install chuck properly .. .refer to "Unpacking
and Assembly Instructions" . . .INSTALLING THE
CHUCK.
recommended accessories
Drills, Shaper Cutters, Router Bits ....................... See Catalog
Rotary Planer ............................................................... 9-2745
Mortising Chisel Housing ............................................ 9-2465
Hollow Chisels and Mortising Bits.........................See Catalog
Dovetailing Attachment ................................................. 9-2462
Shaper Fence Attachment ............................................ 9-2487
Hold-Down and Guide .................................................. 9-2457
Drill Press Vises ................................................... See Catalog
Rotary Table ................................................................ 9-2495
Tilt Table ....................................................................
9-2439
Collet Chuck................................................................. 9-24672
Shaper Cutter Adapter ................................................ 9-24832
Sanding Drum,..............................................
9-2497 — 9-2498
Hole Saws up to 214 in. dia..................................
See
Catalog
Wire Wheels up to 4 in. dia. max. . . . . . . . . . . See
Catalog
Buffing Wheels
up
to 4 in. dia. max.......................
See Catalog
Polishing Wheel,
1/4"
x 1
In........................ .................... 9-64991
Column Collar ........................................... 9-2438
The
recommended accessories listed here are current and
were available
at
the time
this manual was printed.
19