Carrier 542E User Manual
Page 15
Attention! The text in this document has been recognized automatically. To view the original document, you can use the "Original mode".
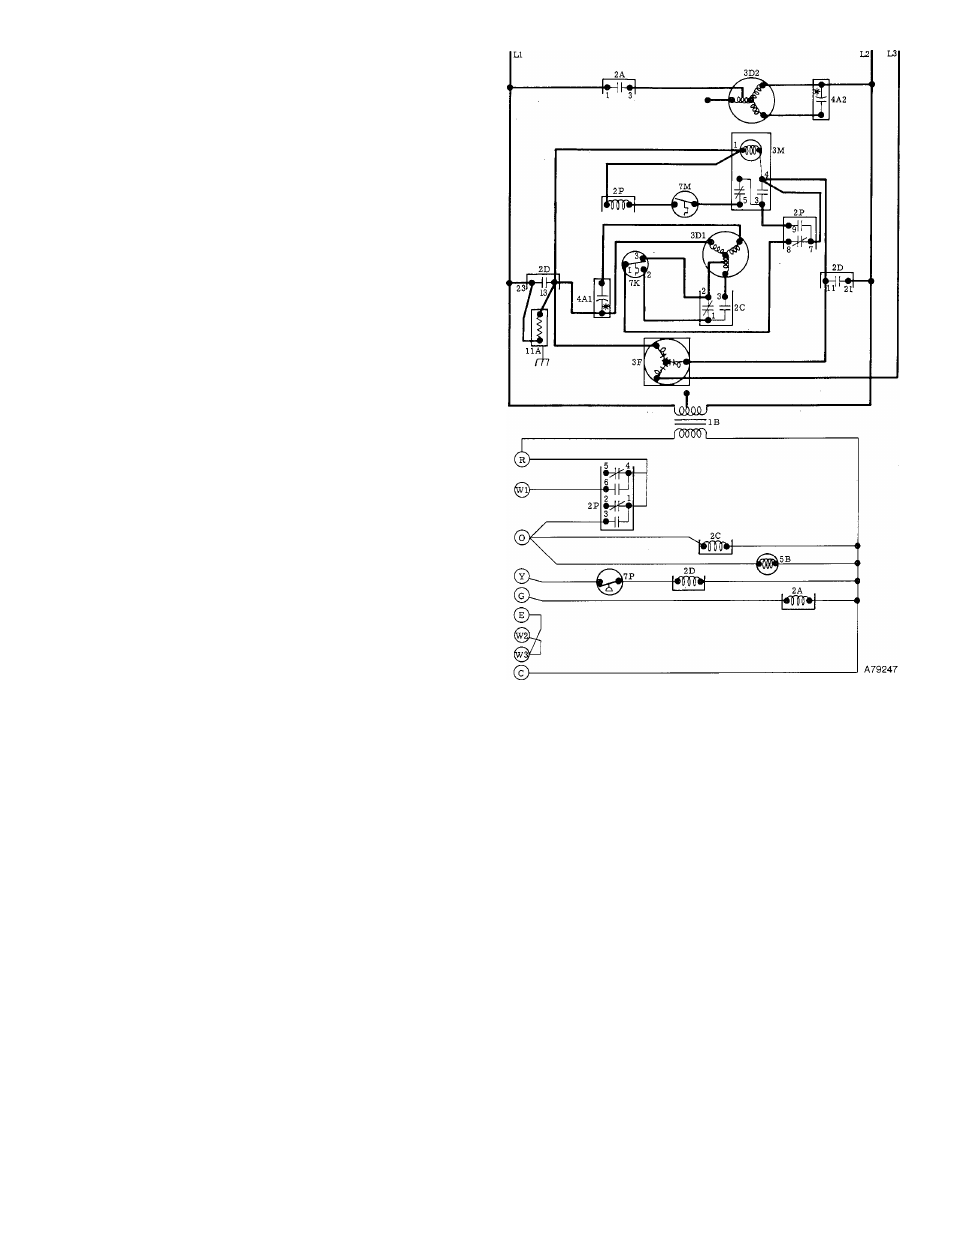
LEGEND
I B-Transformer
2A-lndoor Blower Relay SPST (N.O.)
2C-Outdoor Fan Relay SPOT
2D-Compressor Contactor DPST (N.O.)
2P-Defrost Relay TPDT
3D1-Outdoor Fan Motor
3D2-lndoor Blower Motor
3F-Com pressor
3M-Defrost Timer
4A1-Fan Motor Capacitor
4A2-Blower Motor Capacitor
5B-Reversing Valve Solenoid
7K-Fan Switching Thermostat
SPOT
7M-Defrost Thermostat
Switch (N.O.)
7P-Low-Pressure Switch
SPST (N.O.)
II A-Crankcase Fleater
2. Inspect coils, drain pan, and condensate drain annually.
Clean when necessary.
3. Inspect blower motor and wheel for cleanliness, and
check lubrication annually. Clean and lubricate when
necessary.
4. Check electrical connections for tightness and controls
for proper operation annually. Service when necessary.
WARNING: A failure to follow these warnings could result
in serious personal injury:
1. Disconnect electrical power to the unit before perform
ing any maintenance or service on the unit. (There may
be more than one disconnect switch.)
2. Use extreme caution when removing panels and parts.
As with any mechanical equipment, personal injury can
result from sharp edges, etc.
A. Unit Top Removal
WARNING: Removal of the unit top must never be at
tempted by anyone other than qualified technicians.
CAUTION: The outdoor fan and motor are fastened to the
unit top. When removing the top, use extreme care to not
pull the fan motor leads loose.
NOTE: When performing maintenance or service procedures
that require removal of the unit top, be sure to perform all of
the routine maintenance procedures that require top
removal; including coil inspection and cleaning, and conden
sate drain pan inspection and cleaning.
When performing maintenance and service procedures that
require unit top removal, refer to the following top removal
procedures:
1. Disconnect electric power to unit.
2. Remove all screws that secure unit top, including
screws around four sides and those on top that screw
into internal divider panels. Save all screws.
3. Tape all side panels at each seam near unit top. Use tape
strips that are at least 5 inches long to prevent sides
from falling when top is removed.
4. Lift top from unit carefully. Set top on edge and ensure
that top is supported by unit side that is opposite duct
(or plenum) side. Use extreme care to prevent damage to
fan blades, motor, insulation, and coils.
5. Carefully replace and secure unit top to unit, using
screws removed in step 2 when maintenance and/or
service procedures are concluded. (Be sure to use origi
nal screws that have rubber washers to seal out water
when securing top to internal divider panels.)
Figure 13—Typical Line-to-Line Wiring Diagram
B. Air Filter
CAUTION: Never operate the unit without a suitable air
filter in the return-air duct system. Always replace the filter
with the same size and type. See Table I for recommended
filter sizes. '
Inspect air filter(s) at least once each month and replace
(disposable-type) or clean (cleanable-type) at least twice
during each heating and cooling season or whenever the
filter (s) become clogged with dust and lint.
Model 542E units do not have factory-supplied air filters.
The field-supplied air filter(s) may be either disposable or
cleanable. Model 542D units have two factory-supplied, dis
posable-type air filters located in the plenum section of the
unit. Remove the access door on the return-air inlet side of
the plenum to gain access to the filters. See Figure 4. Re
place these filters with the same size and type when
necessary.
C. Direct-Drive Indoor Blower and Motor
For longer life, operating economy, and continuing efficien
cy; clean accumulated dirt and grease from the blower wheel
and motor annually.
Lubricate the motor every 5 years if the motor is used inter
mittently (thermostat FAN switch in AUTO position), or
every 2 years if the motor is used continuously (thermostat
FAN switch in ON position).
WARNING: Disconnect electrical power to the unit before
cleaning and lubricating the blower motor and wheel.
-
1 5
-