Paratoie^ wilii oiergemsstier valve open – Carrier 38GK User Manual
Page 5
Attention! The text in this document has been recognized automatically. To view the original document, you can use the "Original mode".
Motors and controls operate satisfactorily in a
range from 10% above to 10% below nominal unit
voltage (Table 5).
Do not connect charging hoses during initial
start procedure. (Loss of charge from this pro
cedure may result in capacity reduction.) If
necessary to add manifold gages for servicing, refer
to Carrier Standard Service Techniques Manual,
Chapter 1, page 1-5, Fig. 8, for bypass method of
returning charge to system.
REFRIGERANT CHARGING
38GK
condensing
units
contain
operating
charge for complete system when connected to
Carrier evaporators using 25 ft of accessory tubing.
Charge adjustment may be required on other
systems.
Checking Charge
1. Remove the valve stem caps from both service
valves and check the valve stems for the
backseat position (counterclockwise).
2. Remove the service port cap from both service
valves and attach a gage manifold. Purge the
gage manifold and hoses.
3.
Start the unit and allow it to run until
operating conditions stabilize and pressures
level out. To obtain pressure readings, the
service valve stems need only be turned clock
wise approximately one turn from the backseat
position.
4. Evaluate the system performance and the refrig
erant
charge
level as
in Chargemaster®
Operation section.
5. When the correct refrigerant charge level is
obtained, turn both service valves counter
clockwise. Remove the gage manifold.
6. Replace the valve stem and service port caps.
CHARGEMASTER OPERATION - Operate unit
10 minutes before using Chargemaster (Carrier Part
No. 38GC680004).
1. Tape Chargemaster feeler bulb to suction line
close to condensing unit. Insulate bulb. Ensure
suction line is clean for good contact with bulb.
2. Connect refrigerant drum to Chargemaster inlet
port with dmm in position for vapor charging.
3.
Connect Chargemaster outlet port to unit
suction valve service port.
4. Crack valves on refrigerant drum and Charge-
master to purge lines from drum to suction
valve. After purging lines, close valve on Charge-
master only.
5. Measure outdoor air dry-bulb temperature.
6. Crack unit suction valve and read evaporator
temperature at red needle position on Charge-
master temperature gage and suction line tem
perature at black needle position.
CACTIION: Do ooi read eva|)Oiaior
Um~
paratoie^ wilii Oiergemsstier valve open.
7. Enter Suction Line Temperature, Table 6, at
outdoor
air
temperature
(Step
5)
and
evaporator temperature (step 6). Find the
suction line temperature required for correct
system charge. If actual suction line tempera
ture (step 6) is higher than table value, the
system is undercharged. If suction line tempera
ture is lower than table value, the system is
overcharged.
Example-. At outdoor air temperature of 84 F
and evaporator temperature of 40 F, the system
will be correctly charged at 66 F (± 2 F)
suction line temperature.
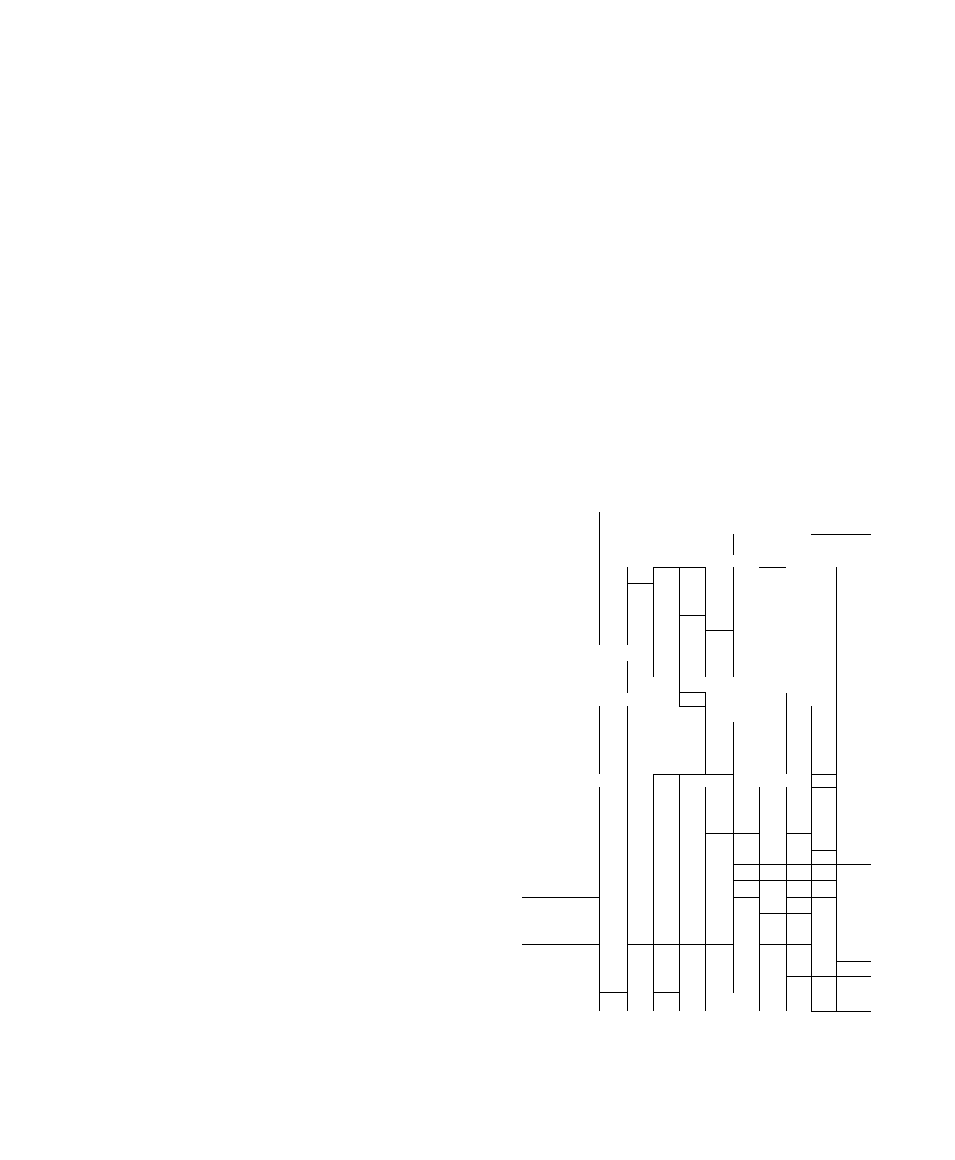
Table
6
— 38GK Chargemaster Charging Chart
(Capillary Tube or AccuRater Systems)
OUTDOOR
TEMP (F)
EVAPORATOR TEMP (F)*
^iJ
jj
I
m
J 7
. 4 3
4 5 L 4 8 _
Suction Line
1 emperature
6 0
32
4G
..
6 2
30 . 38 „49
6 4
28
37
47
60
_
6 6
27
35
45
57
If
6 8
34
43 1 54
67
,
7 0
32
41
52
64
7 2
1
31
39
50
61 j 72
7 4
30
37
48
58
69
7 6
29
36
46
56
ÓÓ
7 8
'"27
35
44
54 1 63
ill
8 0
8 2
_2%
illi
T3j
4^
321 40
52
50 "
61
”
59
"
a/
'W
.i
~80
—
- —
» 6
29
37
46
55
63
73
85
8 8
35
44
53
61
70
81
9 0
34
42
51
59
68
7S„ 90
9 2
33
41
49
57
65
75
86
9 4
39
47
55
63
72
83
9 6
38
45
53
61
70
80
9 8
36
44
51
59
67
77
1 0 0
42
49
57
65
75
1 0 2
41
48
55
63
73
1 0 4
39
46
53
61
70
1 0 6
45
51
59
68
1 0 8
43
49
65
n o
41
47
55
63
1 1 2
46
53
61
1 1 4
._ !..
50
59
Example
“Saturated evaporator temperature which is tlie equivalent tem
perature of pressure taken at the condensing unit suction service
valve