Installation – Toa H-1 User Manual
Page 5
5
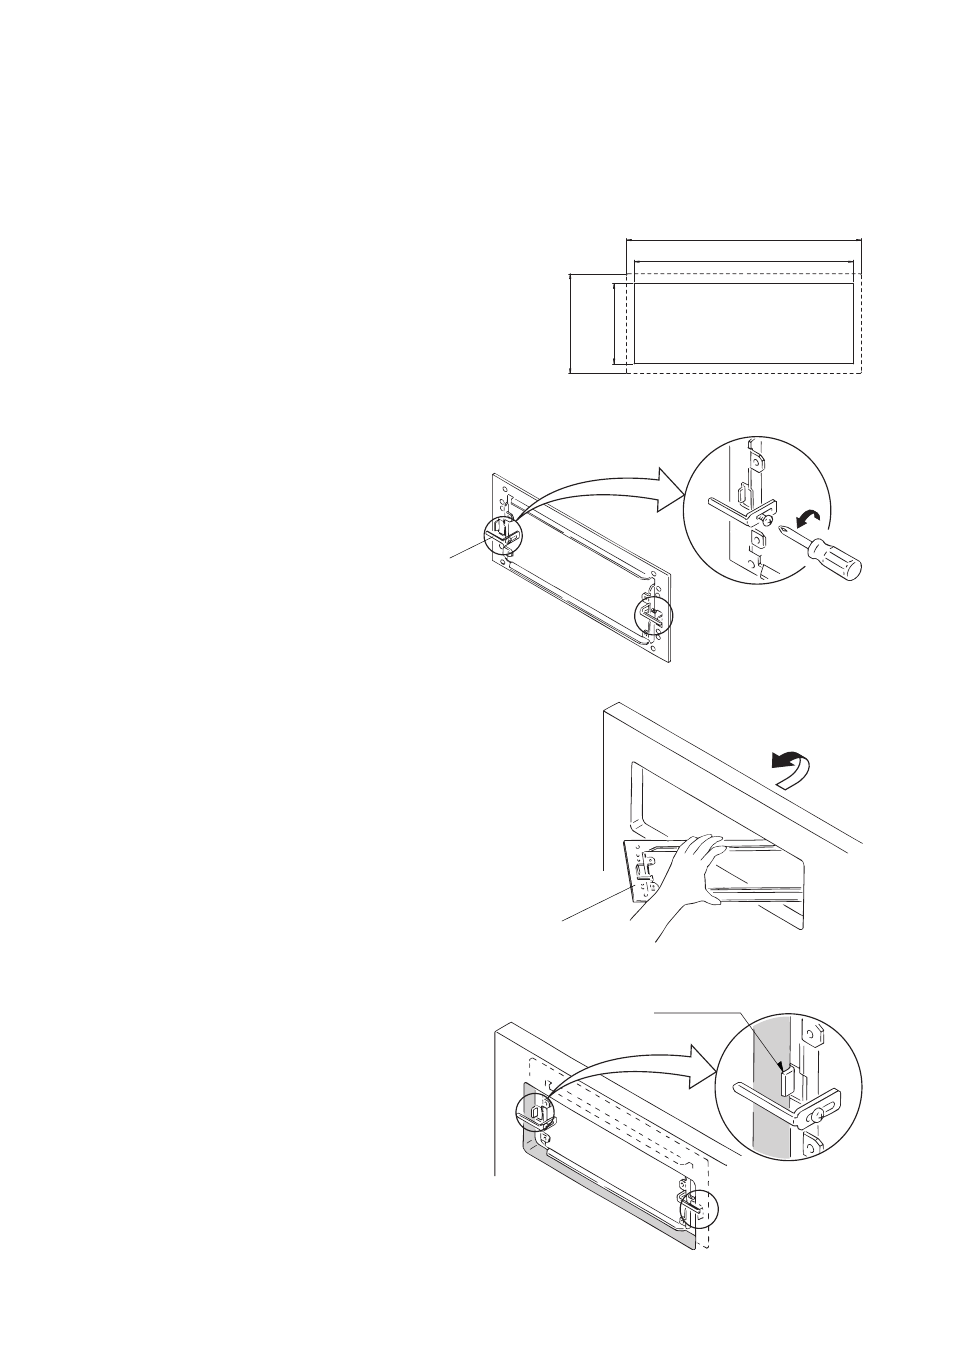
5. INSTALLATION
5.1. Direct Wall/Ceiling Mounting Without Using an Electrical Box
Step 1. Adapter Panel mounting
1-1. Using the supplied hole pattern sheet as a guide,
make an opening of the specified size in the wall or
ceiling panel.
Note
The thickness of the suitable wall or ceiling panel is 9
to 30 mm.
1-2. Loosen the two board clamp screws.
1-3. Place the Adapter Panel inside the opening, and set
the panel to the desired position using the positioning
tabs.
287.2 (Adapter Panel)
122 (Adapter Panel)
268 (Mounting hole)
98
(Mounting hole)
Adapter Panel
Positioning tab
Board clamp
See also other documents in the category Toa Acoustics:
- F-2000B (20 pages)
- F-2322CU2 (16 pages)
- F-2352SC (12 pages)
- F-2852CU2 (16 pages)
- FB-100 (8 pages)
- FB-120B (4 pages)
- FB-150B (4 pages)
- FG-C0651 (1 page)
- H-2 (12 pages)
- H-3 (12 pages)
- HB-1 (12 pages)
- HS-1200BT (8 pages)
- HS-120B (8 pages)
- HX-5B (16 pages)
- HX-7B (20 pages)
- HY-0871CL (2 pages)
- HY-0871WS (2 pages)
- HY-1200VB (16 pages)
- HY-60D (2 pages)
- HY-AH1 (2 pages)
- HY-BC1 (2 pages)
- HY-BH10B (1 page)
- HY-C0801 (1 page)
- HY-CL10B (1 page)
- HY-CN1B (4 pages)
- HY-CN7B (8 pages)
- HY-CW1B (1 page)
- HY-MS7B-W (8 pages)
- HY-MT7 (4 pages)
- HY-PF1B (4 pages)
- HY-PF7B (4 pages)
- HY-RR1 (2 pages)
- HY-RR2 (2 pages)
- HY-ST1 (1 page)
- HY-TB1 (2 pages)
- HY-TM7B-WP (4 pages)
- HY-TR1 (2 pages)
- HY-VM7B (12 pages)
- HY-W0801 (1 page)
- HY-WM1B (1 page)
- HY-WM2B (1 page)
- HY-WM7B (2 pages)
- PC-1867F (4 pages)
- PJ-100W (2 pages)