Reznor R6GN Option - Installation - Economizer User Manual
Page 3
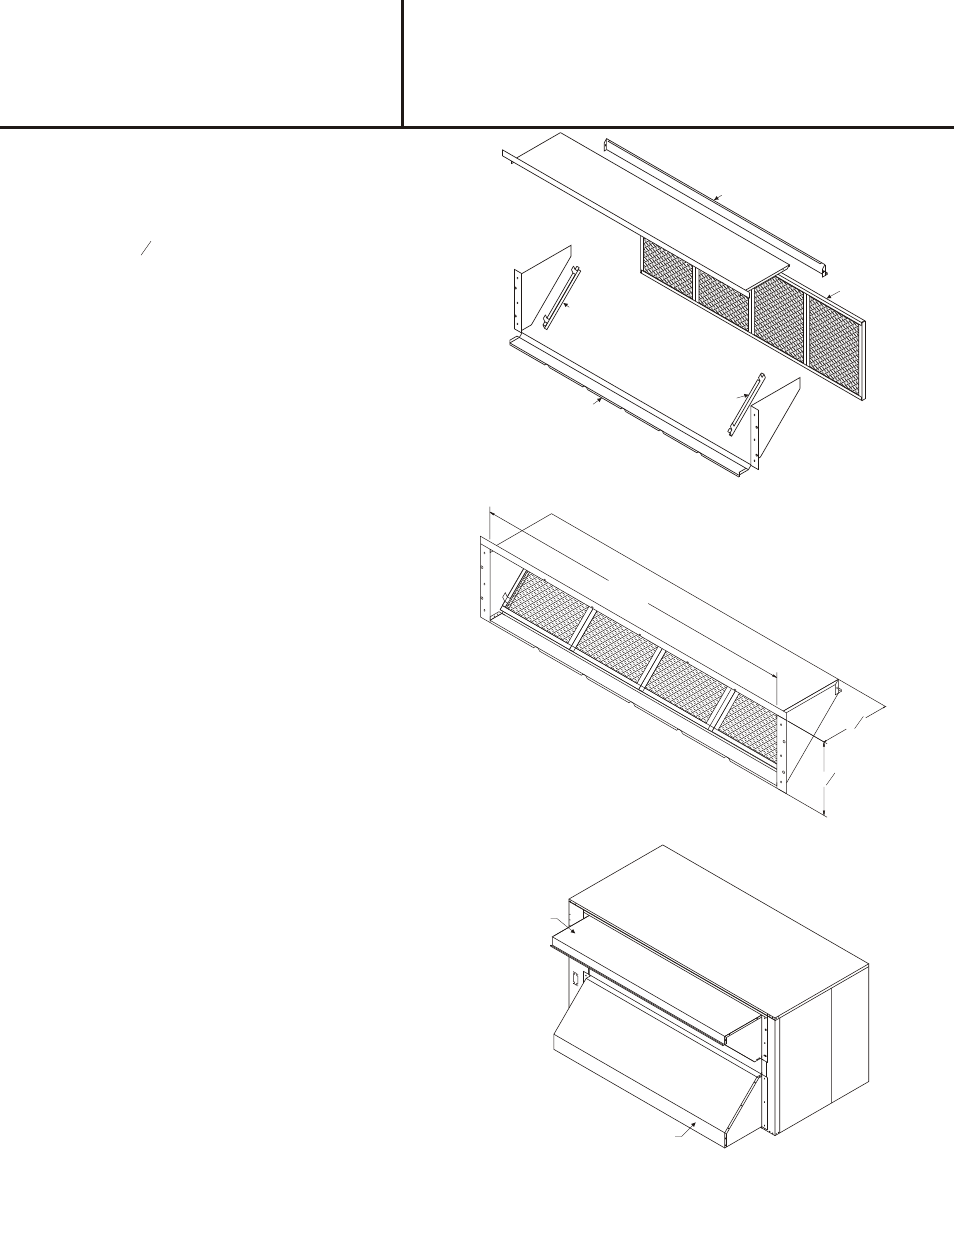
Step 11:
To assemble the Fresh Air Hood the following will
be needed.
29 ea. - Type A #10 16 - x ½ Screws
15 ft. -
1
8
x ½ Gasket
Follow these steps:
A. Take (2) and screw through (1) into (2) using
the Type A screws.
B
Take (4) and screw through (3) into (4) using
the Type A screws.
C
Take (5) and put to the inside of (1 & 3) and
secure with Type A screws.
D. Take (6) and place flanges over (1 & 3) and
secure with Type A screws.
E. Slide filter in the hood in (2 & 4).
F. Take (7) and secure to (1 & 3) with Type A
screws.
G. Place gasket on the back flanges of (1, 3, 5, 6).
Step 12:
Install fresh air hood over fresh air intake opening
on unit using screws provided as shown in Figure 9.
Step 13:
Replace all access panels and restore power to the
unit.
Step 14:
To ensure watertight operation, small amounts of
caulk may be used on clearance holes, seams, etc.
IN STAL LA TION
IN STRUC TION
Fig ure 9
BAROMETRIC RELIEF HOOD
FRESH AIR HOOD
INSTALLATION INSTRUCTIONS FOR
555621
ECONOMIZERS USED WITH R4GM 150/180 UNITS
Fig ure 7
Fig ure 8
19
5
8
69 ¾
15
9
16
3
6
1
8
7
4
5
2
- UDAP Unit Installation Manual (40 pages)
- UDBP Unit Installation Manual (44 pages)
- UEAS Unit Installation Manual (44 pages)
- VPS Unit Installation Manual (44 pages)
- VPT Unit Installation Manual (40 pages)
- VCS Unit Installation Manual (48 pages)
- CAUA Unit Installation Manual (44 pages)
- EEDU Unit Installation Manual (32 pages)
- LDAP Unit Installation Manual (44 pages)
- MASA Unit Installation Manual (40 pages)
- RDF Unit Installation Manual (28 pages)
- RPB Unit Installation Manual (40 pages)
- SC Duct Furnace Unit Installation Manual (40 pages)
- SSCBL Unit Installation Manual (60 pages)
- X Unit Installation Manual (32 pages)
- ZQYRA Unit Installation Manual (72 pages)
- ADF Unit Installation Manual (28 pages)
- F Unit Installation Manual (40 pages)
- PDH (Indoor PreevA) Unit Installation Manual (72 pages)
- MAPSIII Unit Installation Manual (76 pages)
- RDH (Outdoor PreevA) Unit Installation Manual (68 pages)
- RP (Outdoor Duct Furnaces) Unit Installation Manual (32 pages)
- YDHA Unit Installation Manual (76 pages)
- OH Unit Installation Manual (28 pages)
- RBL (Cabinet Blower) Unit Installation Manual (12 pages)
- REC (Evaporative Cooling) Unit Installation Manual (12 pages)
- RIHN Unit Installation Manual (20 pages)
- UDAP Option - Installation - Power Venting (12 pages)
- UDAS Option - Installation - Separated Combustion Venting (16 pages)
- WS Unit Installation Manual (15 pages)
- EBHB Option - Installation - Thermostat Kit (2 pages)
- EFMA Unit Installation Manual (27 pages)
- EWHB Unit Installation Manual (9 pages)
- EXUB Unit Installation Manual (16 pages)
- XAWS Unit Installation Manual (12 pages)
- XAWU Unit Installation Manual (12 pages)
- XBWU Unit Installation Manual (12 pages)
- MAPS III Option - Installation - Energy Recovery Module Installation (12 pages)
- UDAP in sizes 30 through 125 Option - Installation - Ceiling Suspension Kit (2 pages)
- UEAS Option - Installation - Downturn Nozzles - V3 (4 pages)
- UDBP Option - Installation - Polytube Adapter Instructions (4 pages)
- UDBS Option - Installation - Vertical Louvers - V3 Series (2 pages)
- B Option - Installation - Blower/Filter Cabinet (4 pages)
- PDH with 1-stage gas control or 2-stage gas control Gas Conversion Kit Instructions (8 pages)
- VP series infrared heaters High altitude conversion instructions (12 pages)